How to Remove Write Protection and Format Write Protected SSD [6+ Fixes]
Are you being unable to format SSD? Is your SSD displaying as read-only in Windows 10? Your SSD is highly possible write-protected. Check out the causes and learn how to remove write protection from your SSD on Windows 10/8/7 with ease.
| Workable Solutions | Step-by-step Troubleshooting |
|---|---|
| Fix 1. Manually Unlock Write-Protected SSD with Password | Step 1: Run the write-protection software; Step 2: Select to remove write protection from SSD...Full steps |
| Fix 2. Repair Bad Sectors and File System Errors to Unlock Write-Protected SSD | Step 1: Open Qiling Partition Master on your computer. Then, locate the disk, right-click the partition you want to check...Full steps |
| Fix 3. Remove Write Protection from SSD using CMD | Step 1: Type cmd in Windows search, right-click on Command Prompt and select "Run as administrator"...Full steps |
| Fix 4. Run CMD Alternative - Write-Protection Removal Tool | Step 1: DOWNLOAD and install Qiling CleanGenius (free) on your computer...Full steps |
| Fix 5. Remove SSD Write Protection using Registry | Step 1: Type Regedit in the Windows search box, and hit Enter to open the Registry; Step 2: Navigate to...Full steps |
| Fix 6. Clean Up Virus to Remove SSD Write-Protection | Step 1: Download and install antivirus software on your PC; Step 2: Scan the SSD and confirm...Full steps |
Fixes on this page can also be applied to fix and remove write protection from hard drives on Windows PC. If your external storage device like USB is with the same problem, you may refer to Format a Write-Protected USB for help.
Can't Format SSD Which Is Write-Protected, Help
"I just got a new Samsung 840 Evo SSD. It told me that I couldn't format SSD as it was write-protected. It seemed that Windows can't format a write-protected SSD.
I searched online and figured out that I should remove the write protection first before formatting. However, there is little information about how to remove write protection from SSD or format write protected SSD. Any suggestions?"
Generally, when an SSD is write-protected, you can neither access it nor do any operations on the disk. Also, you can't format SSD when it's locked by write protection.
Don't worry. In the following, you will learn why is the SSD write-protected, how to remove write protection from SSD, and tips to protect SSD from being write-protected again.
Causes - Why Is SSD Write Protected
Write protection is a mechanism used for protecting vital data and files from being deleted, formatted, and removed on storage devices. Ordinary people often use it to guard storage devices like SSD, hard drive, external hard drive, USB, etc., from being modified.
However, "The disk is write-protected" is also one of the top concerned problems among both hard drive and SSD users. Once your storage device is with a write-protected state, you cannot access nor open the device.
If you see one of the following symptoms, it means that your SSD locked by write protection:
Symptom 1.You cannot open SSD and Windows warns that "The disk is write-protected. Remove the write-protection or use another disk."
Symptom 2.Your SSD stuck in read-only mode in Disk Management as shown below:
Sometimes, you can manually add write protection to SSD for data security. However, sometimes, your disk may become write-protected due to some other reasons.
Here is a list of causes that can explain why your SSD becomes write-protected:
- Virus or malware infection that adds write protection to your SSD.
- Bad sectors on SSD make the drive write-protected.
- You manually add write protection to SSD.
- Third-party software adds write protection to SSD.
Solutions - 6 Fixes to Remove Write Protection from SSD
So how do I remove write protection from SSD? If you are having the same question on your mind, stay here. Based on the known causes, we've collected 6 practical fixes with detailed tutorials to make your SSD work normally again.
- #1. Manually Unlock Write-Protected SSD with Password
- #2. Repair Bad Sectors and File System Errors to Unlock Write-Protected SSD
- #3. Remove Write Protection from SSD using CMD
- #4. Run CMD Alternative - Write-Protection Removal Tool
- #5. Remove SSD Write Protection using Registry
- #6. Clean Up Virus to Remove SSD Write-Protection
Follow to see how to unlock your write-protected SSD on your own.
Fix 1. Manually Unlock Write-Protected SSD with Password
If you manually locked or encrypted your SSD with a password, you can simply remove the write protection from SSD on your own.
If the SSD is locked by third-party write-protection software or application, run the software to unlock it with a password:
Step 1. Run the write-protection software.
Step 2. Select to remove write protection from SSD.
Step 3. Type your password if necessary.
Fix 2. Repair Bad Sectors and File System Errors to Unlock Write-Protected SSD
Sometimes, when your SSD contains bad sectors or unknown file system errors, it would be locked or becomes write-protected. The best way out is to repair bad sectors and fix file system errors on SSD.
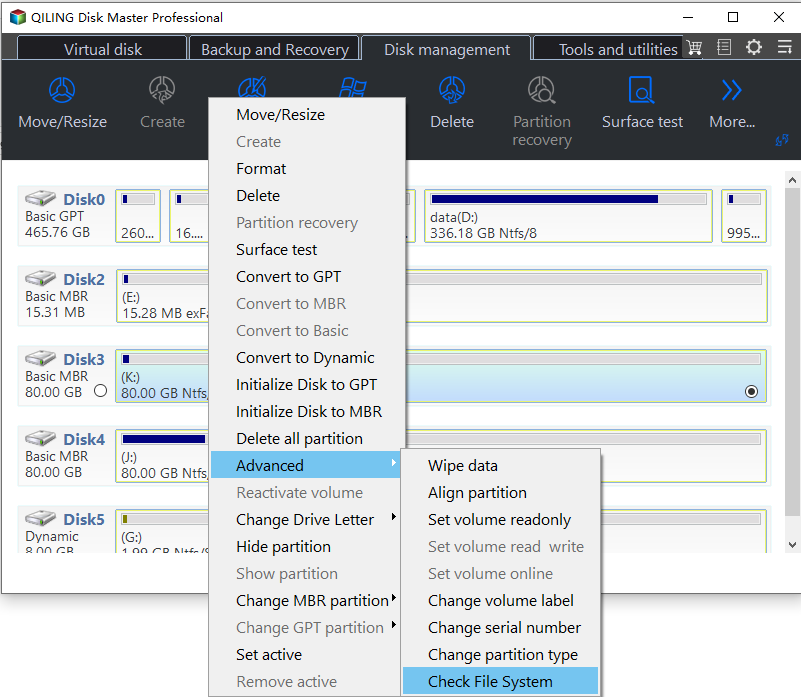
An all-in-one resolution is to turn to Qiling Partition Master for help. You can easily run its Check File System feature to repair software bad sector and repair file system errors on SSD at one time:
Step 1. Open Qiling Partition Master on your computer. Then, locate the disk, right-click the partition you want to check, and choose "Advanced" > "Check File System".

Step 2. In the Check File System window, keep the "Fix the error on the disk" option selected and click "Proceed" to begin checking your partition file system on your disk.

Fix 3. Remove Write Protection from SSD using CMD
If your SSD is write-protected, displaying as Read-only in Disk Management, you can run the following command to unlock it:
Step 1.Type cmd in Windows search, right-click on Command Prompt and select "Run as administrator".
Step 2.Typediskpart and hit Enter.
Step 3.Type the following command and hit Enter each time:
- list disk
- select disk # (# is the number of the write-protected SSD)
- attributes disk clear read-only

Step 4.When Diskpart tells that attributes cleared successfully, type exit and hit Enter to close the window.
Fix 4. Run CMD Alternative - Write-Protection Removal Tool
If you don't consider yourself a pro-computer user and you're not familiar with command-lines, don't worry. There are graphical-based solutions to help you remove write-protection from your hard drives, USB drives, and even SD cards.
Qiling CleanGenius is one of these tools that helps you fix aforementioned issues on your drives without knowing a thing about command-line.
Here's an easy-to-follow guide on how to use this tool to get your issues sorted:
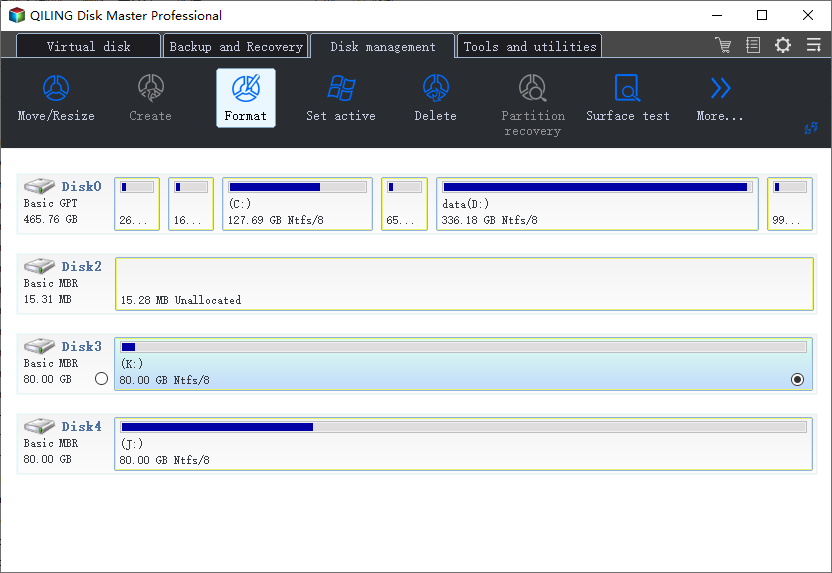
Step 1. Launch Qiling Partition Master, click the partition you intend to format and choose "Format" in "Disk management" page.

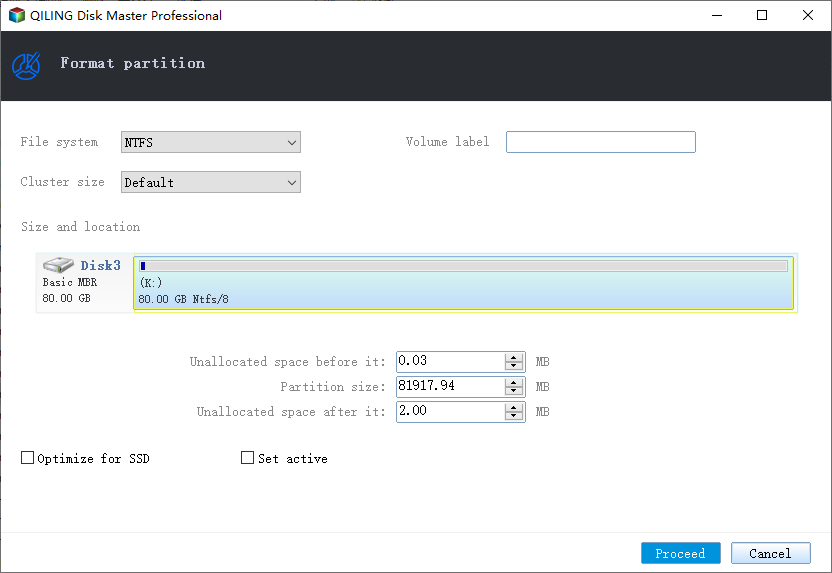
Step 2. In the next window, set the Partition label, File system, and Cluster size for the partition, then click "Proceed".

Fix 5. Remove SSD Write Protection using Registry
Another practical trick that you can try is to change the Registry WriteProtect WORD, which will also help you unlock the SSD from write protection:
Step 1. Type Regeditin the Windows search box, and hit Enter to open the Registry.
Step 2. Navigate to: Computer\HKEY_LOCAL_MACHINE\SYSTEM\CurrentControlSet\Control\StorageDevicePolicies.
Step 3. Find and double-click on the "WriteProtect value" in the right-hand pane.
Change the Value data from 1 to 0 and click "OK" to save the change.

Step 4. Close Registry and restart your computer.
After this, you can retry to open the SSD and check your data again.
Fix 6. Clean Up Virus to Remove SSD Write-Protection
Sometimes, virus or malware may hijack your storage device, preventing you from modifying the saved data and files. To remove write protection from the SSD, we suggest you run antivirus software to clean up viruses and malware from your computer first.
Step 1. Download and install antivirus software on your PC.
You can run Windows Defender, or use third-party antivirus software like Noton AntiVirus, Kaspersky Anti-Virus, ESET NOD32 Antivirus, etc.
Step 2. Scan the SSD and confirm to clean up found viruses, malware, or any suspicious files.
Step 3. Restart PC.
Important - Format SSD after Removing Write Protection
After removing write protection from SSD using CMD or Regedit, we suggest you format SSD. As formatting will erase all data on its location, so take it slow. Copy and back up all important files from the SSD to a safe place once the write protection is cleared.
Qiling Partition Master can help you format any internal or external hard drive storage in Windows 10/8/8.1/7/XP/Vista with no efforts.
It requires no technical skills or formatting experience. Formatting can also help you format RAW SSD or fix inaccessible issues on SSD disk.
Step 1. Right-click the hard drive partition and choose the "Format" option.
Step 2. In the new window, set the Partition label, File system, and Cluster size for the partition.
Step 4. Click the "Proceed" button to start formatting the hard drive partition.
Step 3. You can see a warning window, click "Yes" to continue.
Conclusion
SSD, known as Solid State Drive, is widely used by game players, administrators, and individual users as the game drive or new OS disk so as to optimize their computers' performances. When your SSD, HDD, external hard drive, or USB is write protected in Windows PC, stay calm.
On this page, we took SSD as an example to show you the causes why SSD gets write-protected, 6 practical resolutions to remove write protection from SSD.
After removing the write protection, don't forget to apply a reliable formatting tool like Qiling Partition Master to format the SSD, setting the file system to NTFS again.
FAQs About Write Protection Removal
Though, it is helpful to protect data by adding write protection to a storage device like SSD, HDD, external hard drive or USB. It also brings people troubles to access and format the device.
It is quite difficult for ordinary users to remove write protection from an SSD and format it for a new storage. And this problem has been answered in the above paragraphs.
If you have furthers related the write protection removal, check out the FAQS and find your answers:
1. How do I format a write-protected SSD?
To format a write-protected SSD, you need first remove write protection. To do so, you will need a write protection removal tool.
- As recommended on this page, you can try DiskPart, Registry, or Qiling CleanGenius to remove write protection first.
- Then, run a virus cleaner to clean up the disk.
- Last, you can either run Windows File Explorer, Disk Management, or Qiling Partition Master to safely format the SSD with ease.
2. How do I protect SSD, HDD, external hard drive from write protection?
In order to protect your storage devices and data, you can try the following tips to protect your device from write protection:
- #1. Run virus cleaner software regularly
- #2. Back up vital data to another location
- #3. Don't use any third-party encryption tool or software
- #4. Save the password if you tend to encrypt the storage device
3. What do I do if SSD stuck in read-only mode?
There are two ways to fix this issue. One is to remove the file ready only issue on SSD:
Step 1. Right-click on the Read-only file on SSD and select "Properties".
Step 2. On the General tab, uncheck the "Read-only" option and click "Apply" to save the changes.

The other way is to clear the read-only state on SSD by running CMD command:
Step 1. Run CMD as administrator
Step 2. Type diskpart.exe
Step 3. Type list disk
Step 4. Type select disk + number
Step 5. Type attributes disk clear readonly
After this, you can format the SSD and reset its file system to NTFS. Then you can save the files to the disk again.
Related Articles
- Can I Check and Optimize SSD Performance in Windows 11? Yes, Sure
- RAID 0 vs RAID 1, Comparison and How-to Setup Guide [2022 New]
- Fixed: The Disk Is Write Protected Windows 11
- How Do I Reset Hard Drive on My Own? Here Is the Complete Guide