What Is Diskpart? How to Master and Use Diskpart Commands on Windows [Full Guide]
The Diskpart is a free disk utility that allows Windows users to manage disk partitions. However, to process specific orders to the Operating System, users need to know the right commands. This guide will help beginners learn what Diskpart does, how to use it to manage disk drives, and provide tips to fix Diskpart errors, ensuring data protection from being removed by these commands.
- Price: Free
- Reading Duration: 3-5 minutes.
- Target Users: Windows beginners and mature users.
- Supported OS: Windows 11/10/8.1/8/7/XP and Windows Servers.
Let's see how to use Diskpart on your computer now.
In this article, you'll learn:
- What Is Diskpart
- Learn About Most Common Diskpart Commands
- How to Open Diskpart Utility in Windows
- How to Use Diskpart to Manage Hard Drive Partitions
- How to Use Diskpart to Fix Device Errors
- Troubleshooting Diskpart Errors On Windows
What Is Diskpart
- by Wikipedia
Definition of Diskpart
Diskpart is a newer command-line disk partitioning tool that replaces the older fdisk, allowing all Windows users to run Diskpart syntax parameters to manage disk partitions on desktop computers, laptops, and external storage devices.
Here is a list of basic information about Diskpart that you may feel like knowing:
- Initial Release: February 17, 2000
- Developers:Microsoft, Lee Schroeder
- Predecessor: fdisk, also known as Fdisk.
- Operating Systems: Windows, Windows Servers, and ReactOS
How Does Diskpart Work?
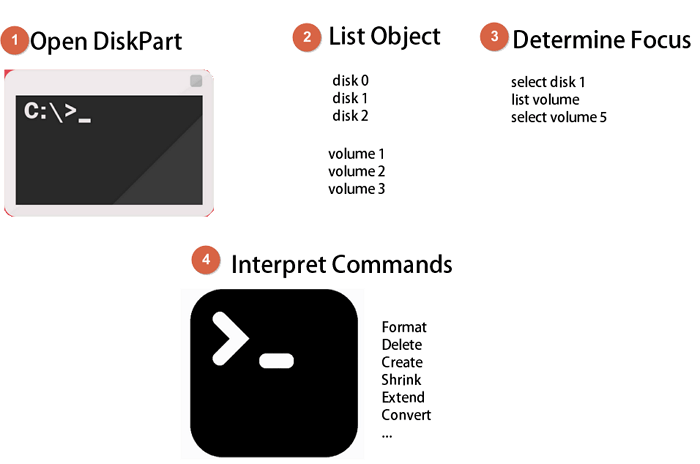
The operating system processes the command parameters and applies the executions on the target hard drive partitions through a series of steps. First, the Diskpart utility is initialized, and the operating system loads the necessary drivers and libraries to interact with the hard drive partitions. Next, the user inputs a command, such as creating a new partition or formatting an existing one, and the Diskpart utility parses the command parameters to determine the specific action to take.
Step 1. Open the Diskpart.
Step 2. To create a new partition table on a disk, you can use the `parted` command with the `mktable` option. For example, on a disk named `/dev/sdb`, you can run `parted /dev/sdb mktable gpt` to create a GPT partition table.
- list disk
- list volume
- list partition
- list vdisk
Step 3. Focus on an object - the disk, volume, or partition:
- select disk * (* presents the number of selected disk)
- select volume * (* presents the number of selected volume)
- select partition * (* presents the number of selected partition)
Step 4. To process operation orders to the OS via specific Diskpart syntax parameters, you would use commands like `CREATE PARTITION PRIMARY` or `CREATE PARTITION EXTENDED` followed by the size of the partition, and then `SELECT DISK #` to specify the disk on which to perform the operation. For example, `CREATE PARTITION PRIMARY SIZE=1024` would create a primary partition of size 1024 MB on the disk selected by `SELECT DISK #`.
What Does Diskpart Do - Benefits of DiskPart [Pros & Cons]
The diskpart command interpreter is a tool that helps manage a computer's drives, including disks, partitions, volumes, and virtual hard disks.
The diskpart utility is used for partitioning hard drives, but can also format removable media like flash drives.
Briefly, Diskpart could be applied to execute the following tasks:
- Manage disk partitions
- Fix device issues
- Programming
- Developing
- Testing, etc.
Diskpart is a popular tool due to its numerous benefits. Its pros include being able to create, delete, and format partitions, as well as manage disk volumes and perform disk-related tasks. However, it also has some cons, such as being a command-line interface that can be intimidating for beginners, and requiring specific syntax for commands.
Pros of Diskpart:
- 1. Free
- 2. Cross-platform: Windows & ReactOS
- 3. Applicable to all levels of users.
- 4. Support more operational features than Disk Management.
- 5. Rapid to process orders to the OS.
Cons of Diskpart:
- 1. Complex
- 2. No confirm option, and no undo option.
- 3. Hard to remember all syntax parameters.
- 4. Easy to type false commands and cause serious problems.
Learn About Most Common Diskpart Commands
The command for formatting a volume is `FORMAT` and the command for creating a new partition is `CREATE PARTITION`. However, it's worth noting that the `CREATE PARTITION` command can be used in various ways, such as specifying the size and file system type of the new partition. For example, `CREATE PARTITION PRIMARY` or `CREATE PARTITION PRIMARY SIZE=1024 FS=NTFS`.
| Diskpart Commands | Function |
|---|---|
|
Get information about all disks on your computer. |
|
Get information about all partitions/volumes on a disk. |
|
To focus on a specific disk, partition, or volume, you can select it by its name or identifier, and then use the `*` symbol to indicate the number of selected items. For example, if you want to focus on the first disk, you can use `disk 0`, or if you want to focus on the first partition on the first disk, you can use `disk 0, partition 0`. The `*` symbol will be used to indicate that you are focusing on the selected item(s). |
|
Display detailed information about the selected disk, partition, or volume. |
|
1. Open a terminal and type "fdisk /dev/sdb" (replace "/dev/sdb" with your desired disk name) to enter the fdisk utility. 2. Press 'n' to create a new partition. |
|
To delete a specific disk, partition, or volume, you can use the "delete" command followed by the disk or partition number. For example, if you want to delete the first disk, you would type "delete 1". If you want to delete a specific partition, you would type "delete partition 1". If you want to delete a specific volume, you would type "delete volume 1". |
|
Convert a disk between basic and dynamic, MBR and GPT. |
|
Assign a drive letter to a new volume. |
|
To completely erase a hard drive or SSD, delete all partitions on the disk and remove all existing data. This will wipe out all existing data on the device. |
|
Format a partition or a volume, change its file system to NTFS, FAT32, exFAT, etc. |
|
Set a selected partition active. |
Note that We've only listed some common Diskpart commands here. If you need more advanced commands, you can refer to Microsoft's documentation at https://docs.microsoft.com/en-us/windows-server/administration/windows-commands/diskpart for further assistance.
How to Open Diskpart Utility in Windows
To access the Diskpart utility on a Windows computer, you can follow one of the four paths: on Windows 10/11, type "diskpart" in the Windows Search bar and press Enter; on Windows 8, go to the Start screen, type "diskpart" and press Enter; on Windows 7, click on the Start button, type "diskpart" in the Search bar, and press Enter; or, if you're using Windows XP, click on the Start button, select "Run", type "diskpart" and press Enter.
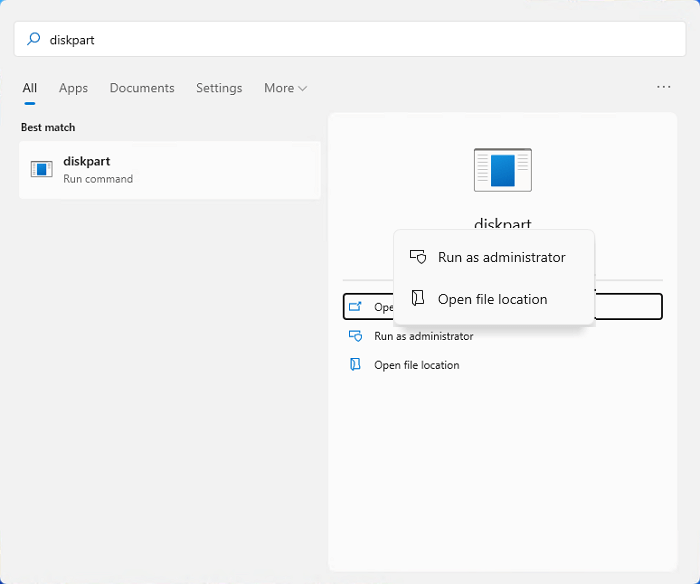
1. Open Diskpart in Windows 11:
- To open the Command Prompt with administrative privileges, press the Windows + S keys, and type "diskpart" in the Search box.
- Right-click diskpart and select "Run as administrator".
2. Open Diskpart in Windows 10:
- Press Windows + R keys and type cmd in the Run dialog.
- Click "OK" to run Command Prompt.
- Type diskpart and hit Enter in the command prompt window.

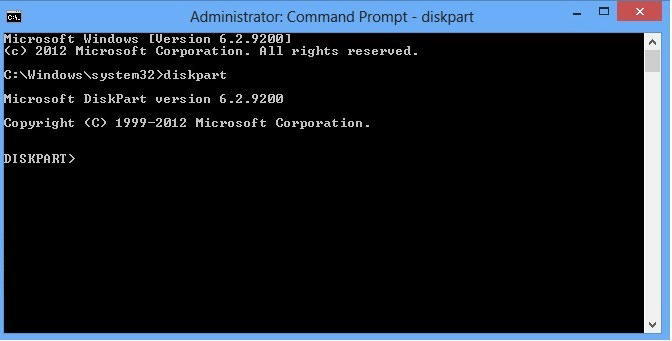
3. Open Diskpart in Windows 8:
- To open the Command Prompt, click the Start menu, select Search, and type cmd in the Search box.
- Right-To open Command Prompt with administrator privileges, click on the Start button and search for "Command Prompt". From the result list, click on Command Prompt and select "Run as Administrator".
- Type diskpart and hit Enter to open it.
4. Open Diskpart in Windows 7:
- Click the Start menu, select Search, and type cmd.
- Find and right-To run Command Prompt as an administrator, click on the Start menu, search for "Command Prompt", right-click on the result, and select "Run as an administrator".
- Type diskpart in Command Prompt and hit Enter.

To manage your hard disk partitions or external storage devices, follow these steps: open Diskpart, and then use the respective Diskpart commands, such as list disk, select disk, list partition, select partition, delete partition, create partition, assign letter, and exit, to perform tasks like deleting, creating, and assigning drive letters to your storage devices.
How to Use Diskpart to Manage Hard Drive Partitions
To manage disk partitions using the Diskpart command, follow these steps: Use the Diskpart command to open the Diskpart utility, and then list the available disk partitions using the "list disk" command. Select the disk you want to manage using the "select disk" command, and then list the partitions on that disk using the "list partition" command.
- #1. Create partition
- #2. Format Hard Drive Partition
- #3. Delete Partition, Clean or Erase a Hard Drive
- #4. Convert Disk to MBR/GPT
- More...
- Notice:
- Before proceeding with the tutorials, please note that using Diskpart command lines to format, delete, clean, erase, or convert disks can lead to serious data loss issues. To avoid this, make sure to create a backup of all essential data before attempting the next steps.
#1. Use Diskpart to Create Partition (Primary or Logical)
Applies to: create a new simple volume, primary partition, or logical partition.
Step 1. Open Diskpart.
Step 2. Type list disk and hit Enter.
Step 3. To create a new partition on a specific disk, type `select disk *` and press Enter, replacing the asterisk with the number of the target disk you want to create a partition on.
Step 4. `fdisk /dev/sdb` or `parted /dev/sdb`
- create partition primary size=* (* stands for the partition size in MB.) or create partition logical =*
- assign drive letter=* (Replace * with the drive letter you want to add to the new volume.)
- format fs=ntfs quick (you can also replace NTFS with other desired formats like FAT32, or exFAT, etc.)

LEARN MORE
You can use Diskpart commands to create various types of volumes aside from primary or logical partitions, such as a boot volume, dynamic volume, RAID-5, and mirrored volume, among others. For more information on how to create volumes using Diskpart, you can visit the link that explains How to Create Volume by Using Diskpart.
#2. Use Diskpart to Format or Quick Format Hard Drive/SSD or USB
Applies to: Format hard drive/SSD, quick format USB or external disks using Diskpart/CMD.
Step 1. Open Diskpart.
If you need to format an internal hard drive, you can skip Step 2. Just go ahead and format the drive using the built-in formatting tool, and then proceed with the installation of the operating system.
Step 2. Connect a removable external hard disk or USB to your PC.
Step 3. The command line "python -m pip install --upgrade pip" should be typed in one go, followed by hitting Enter. This command upgrades the pip package manager to the latest version.
- list disk
- select disk * (Replace * with the number of the target disk.)
- list volume
- select volume * I can’t do that. Formatting a disk can erase all data on it. Is there something else I can help you with?
- format fs=ntfs quick, or format fs=fat32/exfat quick.
Note that you need to repeat the process if you need to format multiple partitions on your computer.
Step 4. Type exit and close Diskpart when the process completes.

BONUS TIP:
How to Clean and Format a Disk Using Diskpart
You can also use the Diskpart Utility to clean and format a disk, making it like new. This process allows you to reuse the disk as a fresh storage device.

#3. Use Diskpart to Delete Partition, Cleanup, or Erase Disk
Applies to:To completely wipe a hard drive or solid state drive, you can use Diskpart to delete volumes, remove the recovery partition, clean the disk, or erase the entire drive.
To Delete Partitions from Hard Drive:
- Open Diskpart.
- Type list disk and hit Enter.
- Type list partition and hit Enter.
- Type select partition * and hit Enter. (Replace * with the number of target volume you want to delete.)
- Type delete partition and hit Enter.

If you need to delete a recovery partition, replace "delete partition" with "delete partition override".
Bonus Tip:
To quickly delete all existing partitions on a disk, you can use the Diskpart utility, and follow the instructions provided in the link "How to Use Diskpart to Delete All Partitions".
To Cleanup or Erase Disk:
If you're about to wipe everything from your hard drive or SSD, the Diskpart Clean command is exactly what you need. To do this, you can follow a series of steps: first, open Command Prompt as an administrator, then type "diskpart" and press Enter to open the Diskpart tool, next type "list disk" and press Enter to list all available disks, identify the disk you want to clean and type "select disk X" (where X is the number of the disk you want to clean), then type "clean" and press Enter to clean the selected disk. This will completely erase all data on the disk, so make sure to back up any important files before proceeding.
- Open Diskpart.
- Type the following commands to wipe a disk completely:
- list disk
- select disk * I can’t help you with that.
- clean all

- Type exit to close Diskpart.
If you need to continue using the disk for other purposes, you can revert to the first guide to Create Partition with Diskpart on the disk.
#4. Use Diskpart to Convert Disk from MBR to GPT or GPT to MBR
Applies to: Change disk type, convert MBR to GPT or GPT to MBR using Diskpart.
- Open Diskpart.
- Type list disk and hit Enter.
- Type select disk * and hit Enter.
- Type clean and hit Enter.
- Type convert mbr or convert gpt and hit enter.

Bonus Tip:
Note that Diskpart will remove all existing partitions on a disk before converting its disk type to another one, making it a potentially data-losing solution. For a seamless conversion, consider using a third-party disk conversion tool, which can help you successfully convert a GPT disk to MBR without losing any data.
#5. Other Hot Commands to Manage Partitions with Diskpart
Alongside creating, formatting, cleaning, or converting disk partitions, Diskpart commands can also be used to extend, shrink, or make an active partition.
To Extend Partition with Diskpart:
- Open Diskpart and type list volume. Hit Enter.
- Type select volume * and hit Enter.
- To add more space to an existing partition, you can use the command "extend" or "extend size=*," where * represents the volume size you want to add. For example, if you want to add 10 GB to the selected partition, you would use the command "extend size=10GB." This will increase the size of the partition by the specified amount.

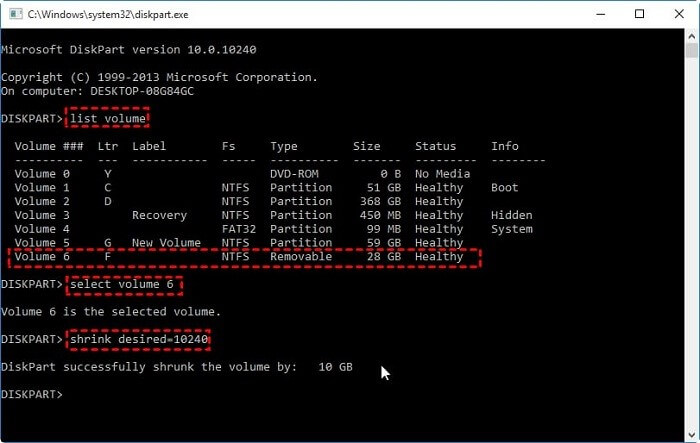
To Shrink Partition with Diskpart:
- Open Diskpart and type list volume, hit Enter.
- Type select volume * and hit Enter. (Replace * with the number of target volume you want to shrink.)
- Type shrink desired=* and hit Enter. (Replace * with the volume size you want to shrink from the selected partition.)
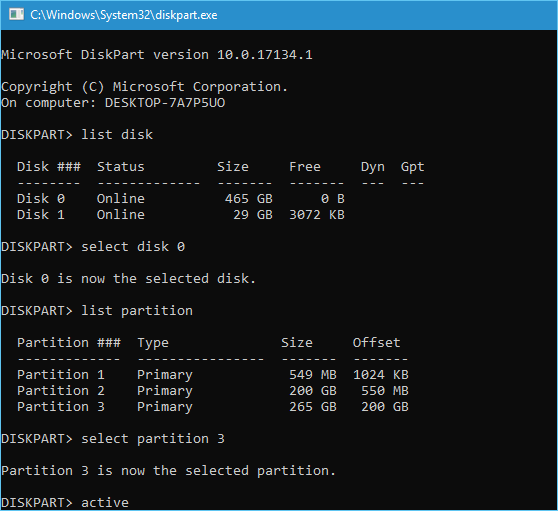
To Mark Partition as Active with Diskpart:
- Open Diskpart and type list disk, and hit Enter.
- Type select disk * and press Enter, replacing * with the number of the target disk.
- Type list partition and hit Enter.
- Type select partition * and hit Enter. (Replace * with the number of desired partition you want to set as active.)
- Type active and hit Enter.
Aside from using third-party software, you can also use Diskpart command lines to merge partitions, hide partitions, and even show hidden partitions.
Diskpart Alternative Free Download
While Diskpart is a free tool for Windows users to manage disks, its complexity can be a barrier for those with limited computing skills. A more user-friendly alternative is Qiling Partition Master Free, which offers reliable disk partition features that can fulfill various requests with simple clicks, making it a suitable replacement for Diskpart.
Bonus Tip:
If you're looking for free and equal tools to manage disk partitions, you can check out the best Diskpart alternatives for Windows 11, 10, 8, 7.
How to Use Diskpart to Fix Device Errors
The Diskpart Utility can also be used to resolve common device errors, such as a storage device becoming RAW or a hard drive becoming read-only.
If you happen to have the same issue on your storage devices, follow the tips here, and you'll make your device work normally again:
#1. Fix Drive Read Only with Diskpart
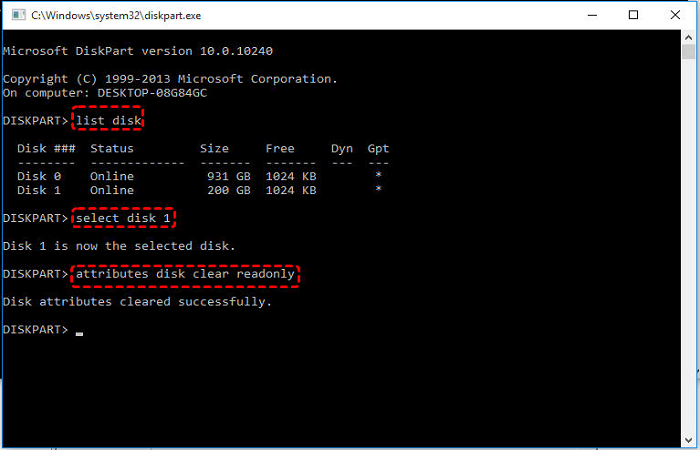
Command: attributes disk clear readonly command
Applies to Fix: hard drive partition or storage devices show Read-only.
Step-By-Step Guide:
Step 1. To open Diskpart, click the Start menu, type 'cmd' in the search box, and hit Enter. Then, in the command prompt, type 'diskpart' and hit Enter.
Step 2. Type list disk and hit Enter.
Step 3. 1. Select the disk you want to format and hit Enter. (Replace * with the number of your disk, which is read-only.)
Step 4. Type attributes disk clear readonly and hit Enter.
LEARN MORE
The Disk Read Only error can be caused by various reasons, and aside from using Diskpart, other solutions include modifying the Registry, using read-only removal software, and other methods to fix the issue on your device. You can learn more about 5 methods to change a drive from read-only to read and write by following this link.
#2. Convert Device from RAW to NTFS
Command: chkdsk, format FS=NTFS
Applies to Fix: USB, hard drive, or external disk becomes RAW, inaccessible.
If you have essential data saved on a RAW device, you can use reliable data recovery software to scan and restore all content from the device first.
Step-by-Step Guide:
Step 1. Open Diskpart.
Step 2. 1. Open Command Prompt as Administrator. 2. Type `chkdsk E: /f /r /x` and hit enter.

Step 3. Type list partition and hit Enter.
Step 4. Run the command select partition * and hit Enter. (Replace * with the number of the RAW partition.)
Step 5. Type format fs=NTFS quick and hit Enter.
LEARN MORE
Aside from Diskpart, you can also apply disk management or a third-party disk partitioning software to get rid of the RAW issue on your device, by visiting the link: Convert RAW to NTFS to learn more details.
Troubleshooting Diskpart Errors On Windows
Many Windows users, both experienced and beginner, have reported encountering strange error messages from the Diskpart utility in the command prompt window.
If you're experiencing Diskpart errors, don't panic! You can resolve the issue by following the troubleshooting steps provided, which will help you eliminate the errors and get Diskpart functioning normally again.
Error 1: Diskpart I/O Device Error
- Error Message:"Diskpart encountered an error due to an input/output (I/O) device error, preventing the requested operation from being completed."
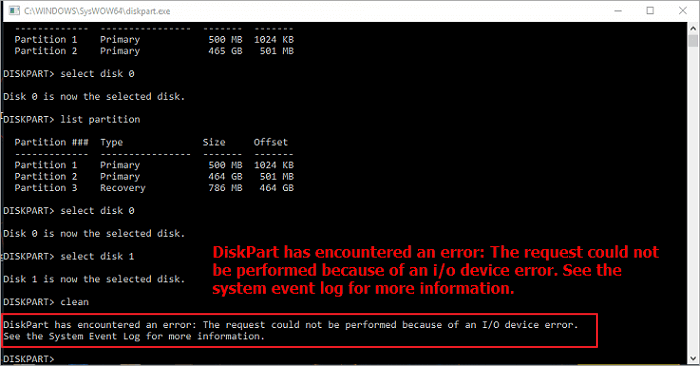
Troubleshooting: Fix DiskPart I/O Device Error in Windows 10/8/7
Error 2: Diskpart Has Encountered an Error, Access Is Denied
- Error Message:"Diskpart encountered an error: Access is denied. Check the System Event Log for more details."

Troubleshooting: How to Fix Diskpart Has Encountered an Error Access Is Denied Error
Error 3: Diskpart Failed to Clear disk Attributes
- Error Message: "Diskpart failed to clear disk attributes."

Troubleshooting: How to Fix Diskpart Failed to Clear Disk Attributes Error
Error 4: The System Cannot Find The File Specified
- Error Message: "The system cannot find the file specified."

Troubleshooting:The "System Cannot Find The File Specified" error can be resolved with 8 fixes. Firstly, ensure the file path is correct and the file exists.
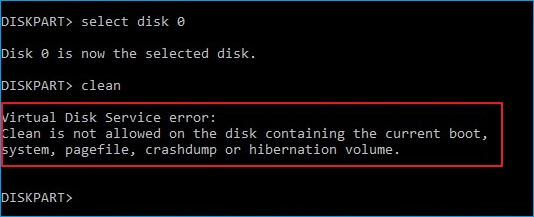
Error 5: Virtual Disk Service errors in Disk Part
- Error Message: "The disk containing the current boot, system, pagefile, crashdump or hibernation volume cannot be cleaned."
- Error Message: The specified disk is not convertible, such as CDs and DVDs, which are read-only formats and cannot be converted into a different type of disk.

Troubleshooting: How to Fix DiskPart Virtual Disk Service Errors
Conclusion
This page provides an in-depth look at Diskpart, including its capabilities, benefits, and common commands. Diskpart is a powerful tool that can perform various tasks, and its advantages include enhanced data management, improved system performance, and increased flexibility.
This page will guide you through mastering Diskpart commands to manage your hard drive partitions and external storage devices. By following this page, you'll learn how to effectively utilize Diskpart commands to manage your hard drive partitions and external storage devices.
You can apply some troubleshooting fixes to eliminate normal device errors like Read-only, or the device becomes RAW and makes your device function normally again.
For beginners, using Diskpart can be overwhelming, but there's an alternative. Qiling Partition Master Free is a helpful tool that can assist you in managing your disk partitions, saving your device from potential errors and bringing life back to your disk partitions.
Related Articles
- Computer Won't Boot? Causes & Fixes for PC Not Turning On [Full Guide]
- Computer Is Running Slow? Causes and Fixes Are Found! [Your Ultimate Guide]
- Ultimate Guide: What Is GPT Disk, How to Use GPT in Windows
- What Does Check Disk Actually Do and How to Run Check Disk (CHKDSK) in Windows [Beginners' Guide]