Windows 11 Gets/Adds a Watermark on Unsupported Hardware, How to Remove It
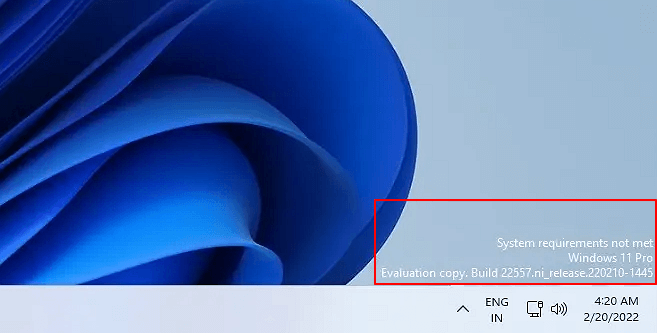
Microsoft has approved a desktop watermark to be displayed on Windows 11 unsupported PCs, notifying users that their hardware doesn't meet the full system requirements for Windows 11. This watermark will be visible at the lower right corner of the screen.
Windows 11 Pro
Evaluation copy. Build 22557.ni_release.202210-1445
I don't see a question. It seems you're providing a prompt with no question. Could you please clarify what you're looking for?
In this article, you'll learn:
- #1. What Is "System requirements not met" Watermark
- #2. Why Does Microsoft Add This Watermark to Windows 11 on Unsupported Hardware
- #3. How to Remove and Get Rid Of the 'System requirements not met' Watermark from Windows 11
- #3. How to Remove and Get Rid Of the 'System requirements not met' Watermark from Windows 11
#1. What Is "System requirements not met" Watermark
The "System requirements not met" watermark is a feature that displays a warning on the screen if a user's computer hardware doesn't meet the minimum requirements for Windows 11, prompting them to upgrade or replace their hardware.

What does this message mean? It means that your current Windows 11 computer doesn't meet the minimum system requirements as listed here:
- 1 gigahertz (GHz) or faster with two or more cores on a compatible 64-bit processor or System on a Chip (SoC)
- Memory: 4 GB RAM
- Storage: 64 GB or larger storage device
- System firmware: UEFI, Secure Boot capable
- TPM: Trusted Platform Module (TPM) version 2.0
- Graphics card: DirectX 12 compatible graphics / WDDM 2.x
- Display: >9'' with HD Resolution (720p)
- Internet connection: Microsoft account and internet connectivity required for setup for Windows 11 Home.
#2. Why Does Microsoft Add This Watermark to Windows 11 on Unsupported Hardware
Microsoft adds a watermark to old Windows computers to indicate that they do not meet the minimum system requirements to install the newest operating System, Windows 11. This is to inform users that their computer may not be compatible with the latest version of Windows, and they may receive an error message when trying to install or upgrade.
Even if a computer doesn't meet the minimum requirements for Windows 11, there are still ways to force an installation, such as bypassing the CPU check, secure boot and TPM settings, and converting the MBR to GPT.
Microsoft doesn't encourage users to try these methods as it may lead to some possible corruption on Windows 11, so it's best to check if your computer meets the system requirements first.
You May Also Interested In:
So now you've already installed Windows 11 on your computer with unsupported hardware, how will you do with the watermark?
#3. How to Remove and Get Rid Of the 'System requirements not met' Watermark from Windows 11
If you want to remove the 'System requirements not met' watermark from your computer, you can follow these steps. First, open Registry Editor by searching for it in the Start menu, then navigate to the 'Computer' key. Next, click on the 'HKEY_LOCAL_MACHINE' key, followed by 'SOFTWARE', 'Microsoft', 'Windows NT', 'CurrentVersion', 'GPC', and finally 'Registry' in the left-hand menu.
Here are the steps:
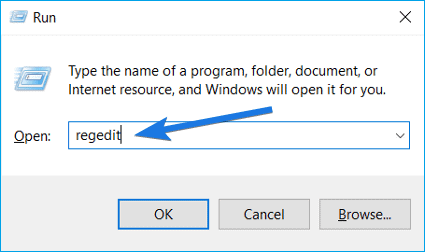
Step 1. Press Windows + R keys, type regedit to open Registry Editor.

Step 2.The notification value can be opened in the Registry by navigating to HKEY_CURRENT_USER\Control Panel\UnsupportedHardwareNotificationCache.
Step 3. To disable SV2, right-click on it in the Registry, change its value from 1 to 0, save the change, and exit the Registry.

To remove the watermark from your computer, first, go to the settings, then to the system, and finally to the display. In the display settings, you'll find the watermark option, where you can toggle it off. After doing so, restart your PC to ensure the change takes effect.
#4. Tips to Protect Windows 11 with Unsupported Hardware
If you've updated Windows 11 from an older version and are now encountering issues due to unsupported hardware, you can try updating Windows 11 again from the Microsoft website, as the update process may have been interrupted. Alternatively, you can also try using the Windows Update Troubleshooter to resolve any issues preventing the update from completing.
You have two options here: you can either choose to read the entire conversation thread or jump straight to the part where the answer is provided. The first option allows you to gain a deeper understanding of the context and the reasoning behind the answer, while the second option is quicker and more efficient, getting you to the point where you can take action. Which one would you prefer?
Option 1. Revert Windows 11 to Previous System
For a step-To rollback from Windows 11 to Windows 10 or go back to the previous version in Windows 11, follow these steps: Open the Settings app, click on "Update & Security," and then click on "Recovery" from the left menu. Click on "Go back" and select the reason for going back. If you're within the 10-day period, you'll be taken back to Windows 10.
Option 2. Stay with Windows 11 with Unsupported Hardware
Many Windows 11 users with outdated hardware may still choose to remain on Windows 11 to take advantage of its latest features, despite the operating system's hardware requirements.
Here are some tips that you can follow to set up a stable and secure working environment on your computer. To start, ensure that your operating system and software are up to date, as these updates often include security patches and bug fixes. Next, use strong and unique passwords for all of your accounts, and consider using a password manager to keep track of them.
1. Turn on Firewall and Run Antivirus
To enable Windows 11 Virus Defender, go to Settings, then Update & Security, and finally Virus & Threat Protection. From there, toggle the switch to turn it on. Alternatively, you can also search for "Windows Defender" in the Start menu and click on the result to open it.
To keep your Windows 11 safe from malware and virus infection, it's essential to install Antivirus software and regularly scan your PC. This will help protect your system from various types of threats and ensure a smooth user experience.
2. Disable Windows 11 Automatic Update or Turn Off Windows 11 Update Service
To prevent Windows 11 from automatically updating your PC with unsupported hardware, you can disable the automatic update feature.
To manually turn off the Windows Update Service in Windows 11, you can follow these steps:
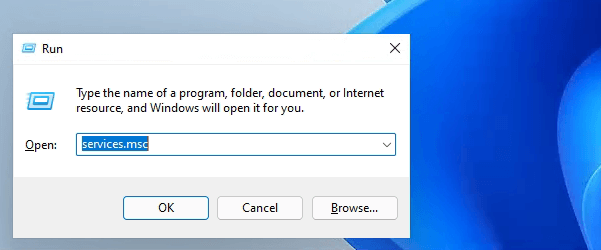
Step 1. Press Windows + R keys, type services.msc and click "OK".

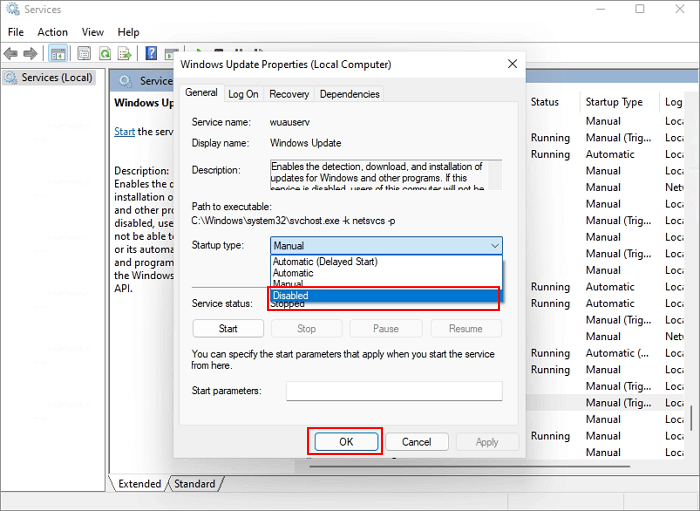
Step 2. To stop the Windows Update service, find it in the Services list and click the "Stop" button.
Step 3. To disable the Windows Search service, click the drop-down menu next to Startup type, select "Disabled", and click "OK" to confirm.

You can also try to disable Windows 11 update service via Qiling Windows CG with one click or rewrite it in one paragraph shortly.
Step 1. To free up space on your computer, click on the D: partition with enough free space and select the option to "Resize/Move".

Step 2. To relocate the partition panel to the left and make space available from the D: drive to the C: drive, drag the partition panel leftward and click "Proceed" to confirm.

Step 3. Select the target partition - C: drive and select "Resize/Move".
Step 4. The partition panel is dragged rightward to add free space from the D: drive to the C: drive.
Step 5. To move free space from the D: drive to the C: drive, click the "Proceed" button. This will initiate the process of relocating unused space from the D: drive to the C: drive, potentially increasing the available storage capacity on the C: drive.
3. Extend and Leave Enough Space to C Drive
To optimize Windows 11's performance, try extending the system C drive and leaving enough space, as this will allow the operating system to run as fast as new with sufficient free space.
When your drive is almost full, you'll likely notice that your computer's performance slows down due to the lack of space. This is because the operating system and other programs need to constantly access and rewrite data on the drive, which can become a bottleneck when the drive is nearly full. Windows 11 will slow down To resolve the issue of running out of space on the system C drive, you can add more space to it using reliable partition manager software. This will help prevent the system from slowing down or getting stuck while running multiple programs in the background.
Qiling Partition Master offers a range of features to manage and partition your disks, allowing you to fulfill your needs. With its capabilities, you can resize, split, merge, and convert partitions, as well as create, delete, and format partitions, making it a powerful tool for disk management.
#1. Extend C Drive with Unallocated Space
Step 1: Free up unallocated space for C drive.
If there is no unallocated space on the system disk, right-click on a partition next to the C: drive and select "Resize/Move" to free up space.
Drag the left panel of the partition to shrink and leave unallocated space behind the system C: drive, then click "Proceed".
Step 2: Increase C drive space.
1. Click on C: drive and select "Resize/Move".

2. To increase the size of the C: drive, you need to drag the system partition end into the unallocated space, effectively adding that space to the C: drive. This will allow you to expand the C: drive and utilize the additional storage capacity.

Step 3: Keep all changes to extend C: drive.
Click the "Proceed" to keep all changes so to extend the system C: drive.
#2. Extend C Drive with Space from D Drive
Step 1. Click on the D: partition with enough free space and select "Resize/Move" to free up space.
Step 2. To free up space on your C: drive, drag the partition panel to the left to shrink it and make room for the free space from the D: drive. Once you've made the adjustment, confirm the change by clicking "Proceed".
Step 3. Select the target partition - C: drive and select "Resize/Move".
Step 4. To add free space from the D: drive to the C: drive, drag the partition panel to the right. This action will allocate the available space from the D: drive to the C: drive, effectively increasing the storage capacity of the C: drive.
Step 5. To start, click the "Proceed" button to begin the process of moving free space from the D: drive to the C: drive.
In the End
Microsoft will add a watermark to Windows 11 on unsupported hardware, but if you've already installed it, you can simply remove it.
If you're planning to install Windows 11 on a computer that doesn't meet the system requirements, it's recommended to reconsider and prioritize keeping your computer safe and stable with a suitable operating system instead of rushing to experience the new features in Windows 11.
We hope that this page has successfully solved your problem and alleviated your worries.
Related Articles
- How to Repair or Fix MBR (Master Boot Record) in Windows 11/10/8/7/Vista/XP
- How to Partition A Hard Drive in Windows 11/10 [Create & Format Hard Disk]
- How to Clone SD Card in Windows 11/10/8/7 (5 Minutes Tutorial)
- How to Corrupt A Flash Drive on Purpose