2 Ways to Backup Windows 7 PC
Quick Navigation:
- Part 1. How to Backup Computer in Windows 7 Effectively
- Step 1: Install and Run the Windows 7 backup Software
- Step 2: Select the Backup Option
- Step 3: Backup Completion
- Part 2: How to Backup Windows 7 Computer Manually
To avoid losing your important data on a Windows 7 PC, it's essential to back up your computer. While data loss can't be completely prevented, backing up your PC can minimize the damage. We've outlined two methods to backup your Windows 7 computer, allowing you to choose the one that best suits your needs.
Part 1. How to Backup Computer in Windows 7 Effectively
For users seeking a reliable method to backup their Windows 7 PC, QILING Disk Master is a highly recommended option. This software is specifically designed to simplify the process of backing up files, the entire system, and individual drives with ease. By using QILING Disk Master, you can ensure the protection of your disks, partitions, files, and the entire system, providing peace of mind against data loss scenarios.
Your Reliable Windows 7 Computer Backup Software
- File backup: This feature allows you to select specific files or folders to backup, giving you flexibility in choosing what data to protect.
- Drive backup: This feature enables you to create an exact copy of your entire drive, including all files, settings, and applications, with no data loss. This is similar to cloning a HDD to an SSD in Windows 7, but with more flexibility and options.
- System backup: This feature allows you to create a full system image backup of your Windows 7 installation, either from the operating system partition or the entire drive. This creates a complete snapshot of your system, including all installed applications, settings, and files.
- In addition to Windows 7, this feature also supports Windows 10, 8, and XP Server, allowing you to create system image backups for these operating systems as well. This means you can protect your data and settings across various Windows versions.
To start using QILING Disk Master to backup your Windows 7 system, you'll need to download the software from its official website and install it on your system. Once installed, you'll be able to access its features and start the backup process.
Step 1: Install and Run the Windows 7 backup Software
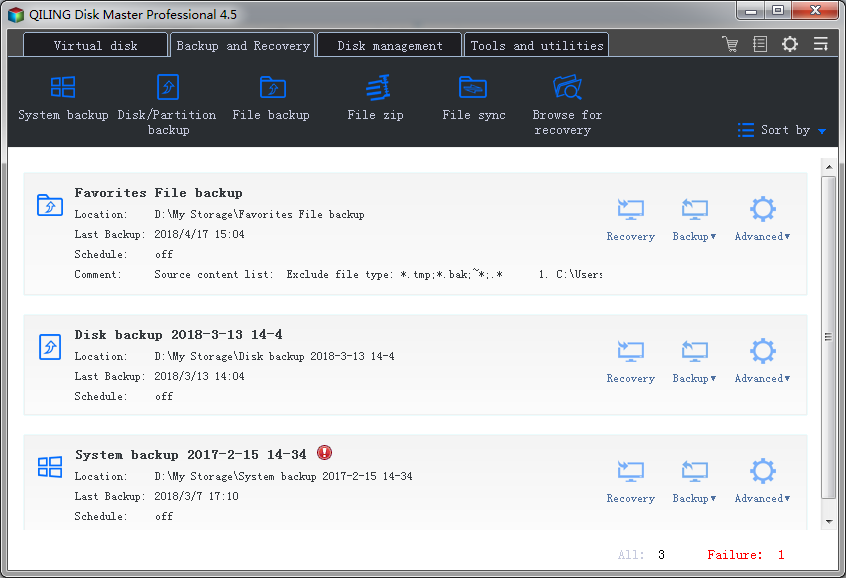
Once you have installed QILING Disk Master, launch the software on your computer. The main window will display three primary options: File Backup, Drive Backup, and System Backup. These options will guide you through the process of selecting the type of backup you want to perform.
Step 2: Select the Backup Option
As you can see that there are three options.
To back up files in Windows 7, follow the below steps.
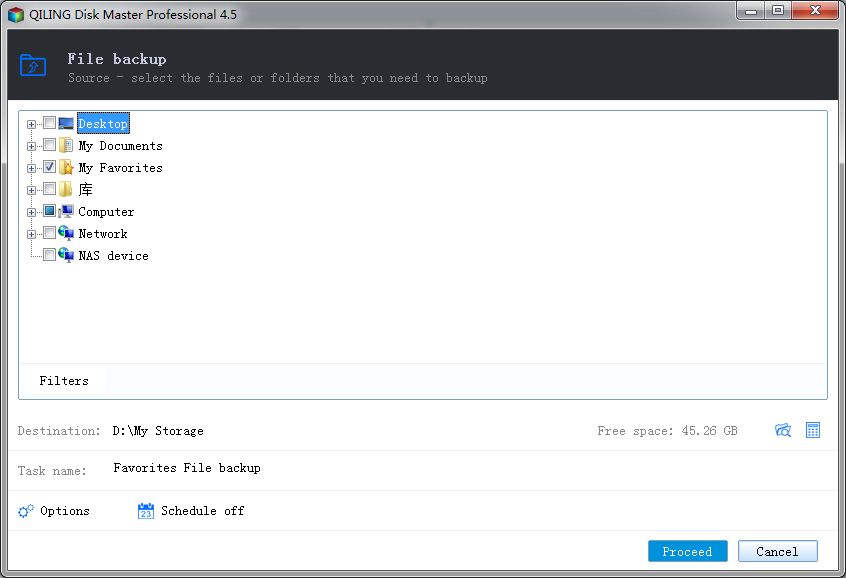
To back up files, choose the "File Backup" option. If you want to back up data from portable storage devices, make sure to connect the device to your computer first. This will allow you to access the device's contents and select the files and folders you want to back up.
To initiate the backup process, select the files or folders you want to back up and click the "Proceed" button. This will start the backup process.
To backup a Windows 7 PC's hard drive, follow these steps:
Select "Disk/Partition Backup" and then, choose the drive you would like to backup.
The next step is to make a choice between automatic backup and sector by sector backup. After that, hit the "Proceed" button.
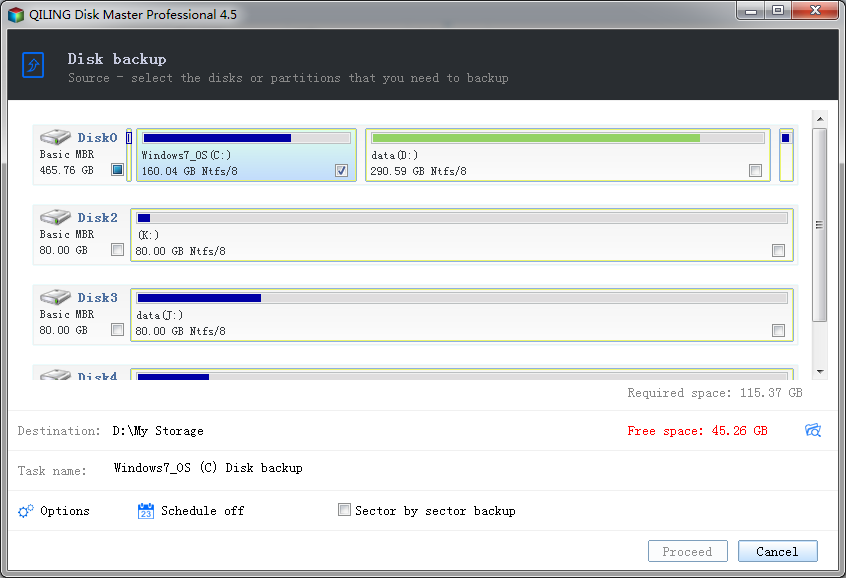
After the completion of the backup, you will get the options to manage your drive backup file.
To back up a file system in Windows 7 PC
Select "System Backup". If you would like to back up your system to the external hard drive, then connect the drive to the computer first.
Set up your file system backup path, or choose whether to set up sector by sector or automatic backup. Once all settings are done, hit the "Proceed" button.
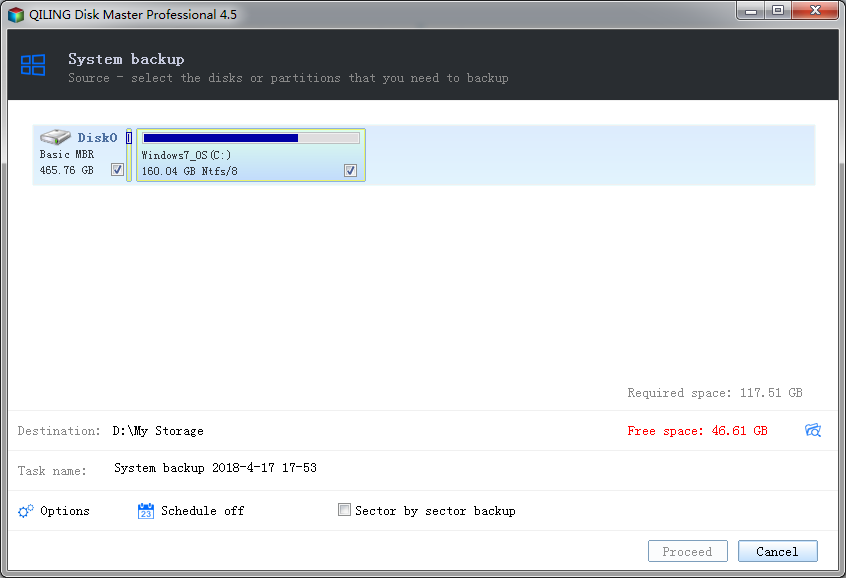
After successfully completing your file system backup, you will be presented with options to customize the preferences for your system backup file. This step allows you to fine-tune the backup settings to suit your specific needs.
Step 3: Backup Completion
Once you've initiated the backup process with QILING Disk Master, let the software complete the task. This may take some time, depending on the size of the data being backed up and the speed of your system.

The QILING Disk Master software offers several benefits when it comes to backing up your Windows 7 system. Some of the main advantages include:
- Easy, straightforward and quick backup process.
- Features multiple backup modes along with scheduling functionality.
- Let you create a full, incremental and differential backup.
- QILING Disk Master is a powerful software that enables you to restore a computer from a created backup file. The process is straightforward and can be completed in a few simple steps.
QILING Disk Master is the ultimate solution for backing up your system, drive, or applications on Windows 7. With its advanced features and user-friendly interface, you can protect your valuable data and ensure business continuity.
Part 2: How to Backup Windows 7 Computer Manually
Windows 7 has a built-in Backup and Restore feature that allows you to create backups of your computer. This feature is easy to use and provides a reliable way to protect your data.
Backing up your Windows 7 PC manually is a straightforward process that involves creating a system image, disk image, or file backup. Here's a step-by-step guide to help you do it:
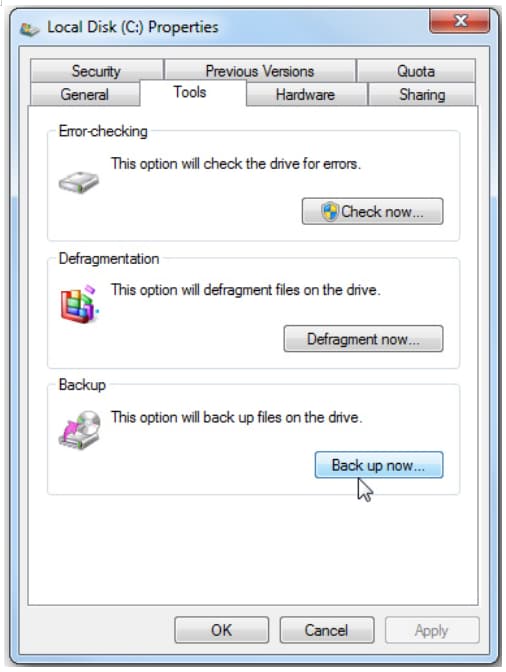
Step 1: Select your local drive and right-click on it to select "Properties". Next, click the "Tools" tab and click the "Back up now" button.
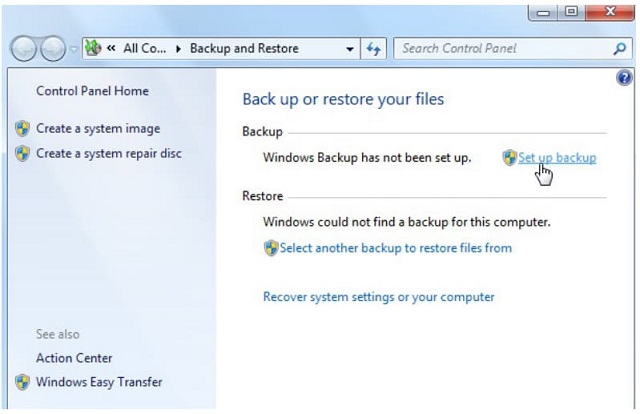
Step 2: In the "Back up or restore your files" window, click the "Set up backup" link to set up a backup.
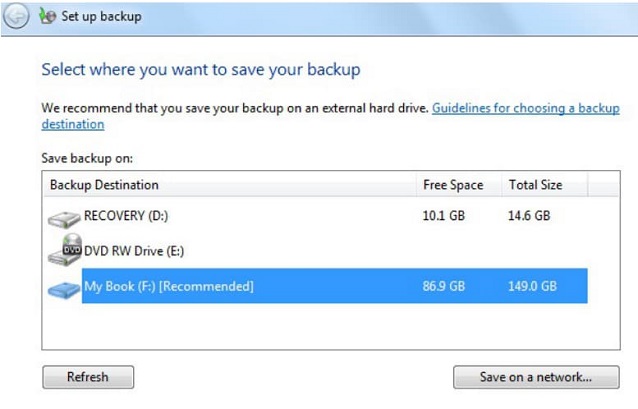
Step 3: Next, select a network or drive where you would like to store a backup. Windows will suggest a drive for you, but you can choose what suits you the best. To bear in mind, you will need a password for saving the backup to a network location.
Step 4: After determining the backup storage location, select which files and folders you want to backup. Or you can let Windows decide for you or decide yourself.
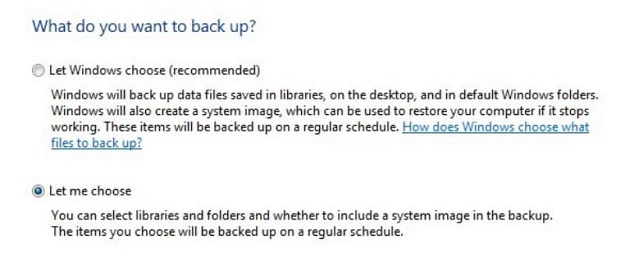
Step 5: Select the files and folders that need to be backed up. Ensure that you check the box saying "include a system image of a local drive".
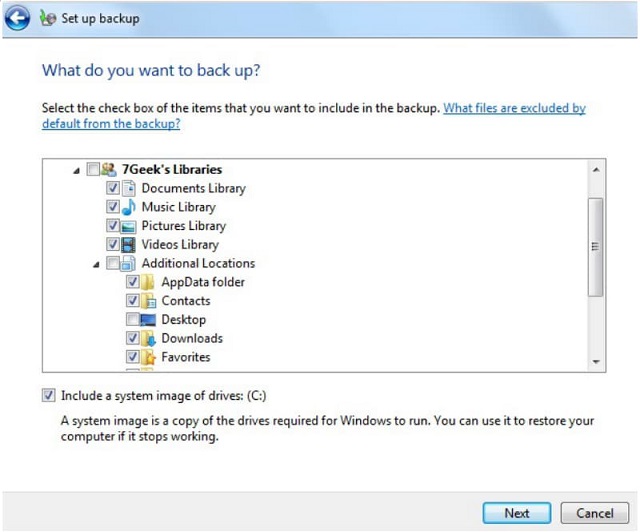
Step 6: The next step in the backup process is to review your backup settings to ensure that everything is properly configured and that all the files and folders you want to backup are included.
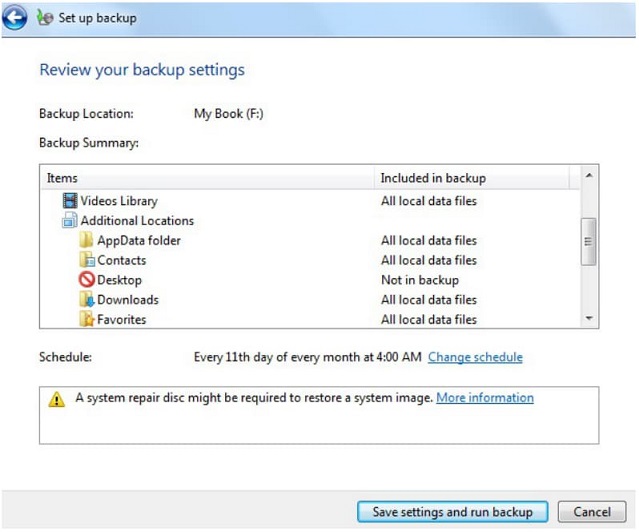
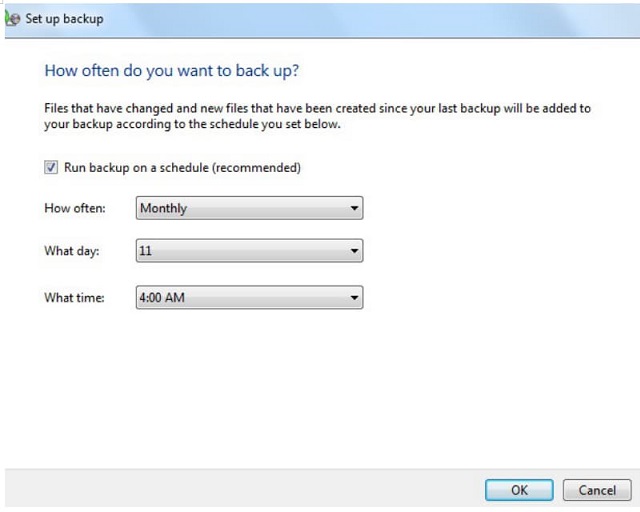
Step 7: Next, you can set the times and days the backup takes place.
Step 8: After that, save your backup settings and begin with the backup.
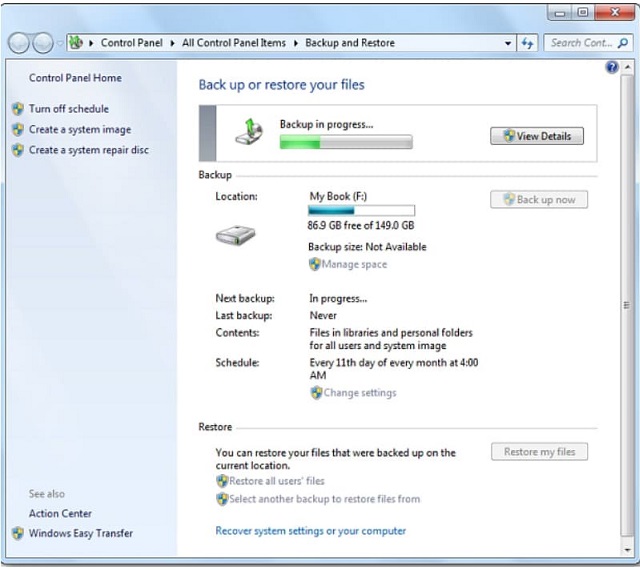
Step 9: To check your backup progress, click the "View Details" button.
Step 10: After the backup process is complete, you'll have two backup files and one image folder to review.
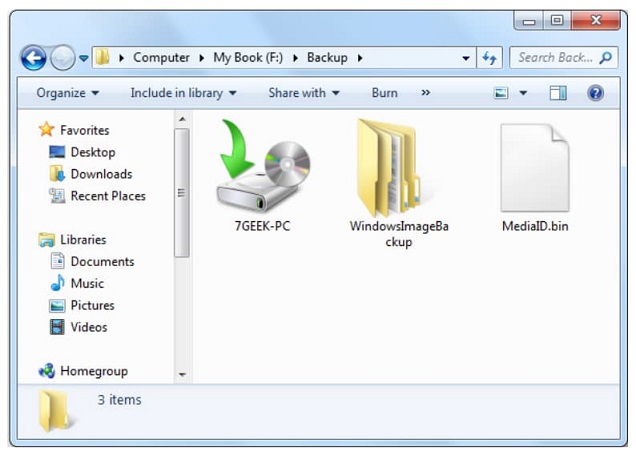
For the management of your backup size or the file restoration, all you have to do is to double-tap on your backup file.
Pros:
- No need to install additional software.
- You can track the backup Windows 7 progress.
- It offers control over what gets backed up.
Cons:
- Quite lengthy and time-consuming Windows 7 backup process.
- No automatic backup option.
Related Articles
- How to Fix "This Copy of Windows Is Not Genuine" [2020]
- How to Recover Photos from Leica Camera
- Ace Data Recovery Services Near Me in Houston, TX | Top 10
How to find the best data recovery services near me in Houston? You can learn ten ace data recovery services in Houston, TX, in this passage. You'll get detailed information after reading the passage.