How to Enter Safe Mode in Windows 10
Quick Navigation:
- Part 1. 5 Ways for How to Enter Safe Mode in Windows 10
- Method #1. Using "Shift + Restart" on Sign-in Screen to Enter Safe Mode in Windows 10
- Method 2. Entering Safe Mode Using USB Drive
- Method 3. Interrupting the Normal Boot Procedure
- Method 4. Entering Safe Mode Using Installation Drive and Command Prompt
- Method 5. Using the System Configuration Tool
- Part 2. Unable to Enter Safe Mode in Windows? Solve It!
The Safe Mode in Windows 10 is a troubleshooting feature that allows the operating system to boot in a minimal and safe state. When Windows 10 is started in Safe Mode, it uses only the most basic drivers and system files, excluding any third-party software or hardware drivers. This means that only the essential components of the operating system are loaded, and the system is isolated from any potential conflicts or issues caused by external drivers or software.
Windows 10 Safe Mode is a troubleshooting feature that allows the operating system to boot in a minimal and safe state. This mode helps you identify and resolve issues on your PC. There are two versions of Safe Mode: Safe Mode and Safe Mode with Networking.
Entering safe mode on your Windows PC is a troubleshooting feature that allows you to boot the operating system in a minimal and safe state. This mode is useful when your PC is not responding or showing errors, and you need to identify and resolve the issues.
Part 1. 5 Ways for How to Enter Safe Mode in Windows 10
Method #1. Using "Shift + Restart" on Sign-in Screen to Enter Safe Mode in Windows 10
Safe Mode is a diagnostic mode in Windows 8 that allows you to troubleshoot and resolve issues with your operating system. When your PC is not responding or showing errors, Safe Mode can help you identify and fix the problems.
1. Unable to enter Safe Mode in Windows 10 can be frustrating, but there are a few troubleshooting steps you can try to resolve the issue.
2. Windows 10 will restart and display a list of options. To troubleshoot the issue, click on the "Troubleshoot" option.

3. Click the "Advanced options" feature on the next screen.
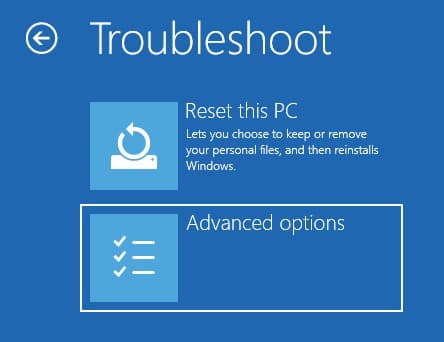
4. You will see a list of options. If the "Startup Settings" feature is not visible, click on "See more recovery options" at the bottom of the screen. This will expand the available options.

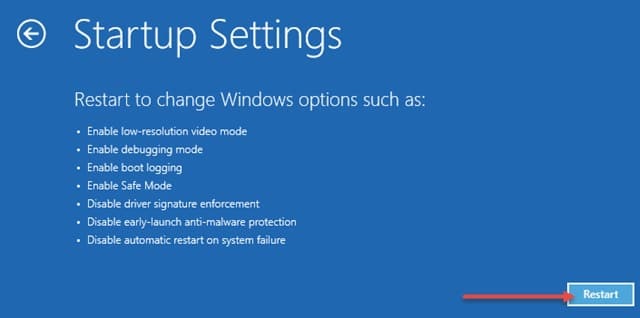
5. Windows 10 will display a list of features, including enabling Safe Mode. Click the "Restart" button to proceed.
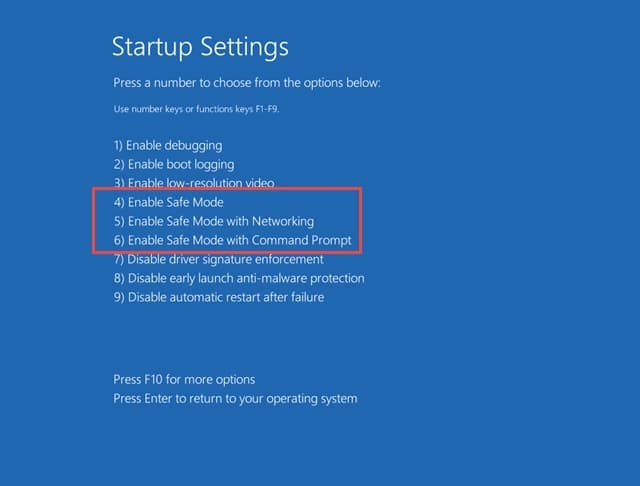
6. Once the Windows 10 restarts, choose F4, F5, or F6 to enter safe mode available in three versions.
Method 2. Entering Safe Mode Using USB Drive
Learning how to enter safe mode Windows 10 with USB requires the use of another computer. You can create a system recovery using a USB flash drive. Create this using another computer running on Windows 10.
1. After the creation of the drive, use it to boot your computer. Select the keyboard layout and proceed.

2. Windows 10 will take you to the "Choose an option" screen. Here, click the "Troubleshoot" option.
3. The next step involves the repetition of the steps, as mentioned in the first method. You can select between safe mode, safe mode with networking, and safe mode with command prompt, depending on the requirement.
Method 3. Interrupting the Normal Boot Procedure
An advantage enabled in Windows 10 is the automatic repair mode. If the computer fails to boot generally in three instances, it enters the Automatic Repair mode in the fourth boot. You can use this to enter Safe Mode.
1. To enter the Automatic Repair mode in Windows 10, you can intentionally interrupt the normal boot process three times. This will allow the computer to automatically enter the Automatic Repair mode on the fourth boot attempt. Here's what you can expect to see:

2. After interrupting the normal boot process three times, you will be prompted to select an account to proceed with the Automatic Repair mode. Ensure you choose the account that has administrator permissions. If prompted, enter the password associated with that account. If you don't see this prompt, you can skip this step and proceed to the next one.
3. Allow Windows 10 to make an automatic diagnosis of your computer.
4. When the "Automatic Repair" screen appears, click the "Advanced options" button.

5. Click the "Troubleshoot" button.
6. From here, you can follow the steps mentioned in the first method to enter the safe mode. You can choose the preferred safe mode version using the "F" keys.
Method 4. Entering Safe Mode Using Installation Drive and Command Prompt
Still unable to enter safe mode Windows 10 after using the above two methods. If so, then you can use the installation drive and command prompt to get into the safe mode of your choice. You will need either the installation DVD or USB drive.
1. Insert the DVD or the USB, boot the computer, select the installation language, and keyboard layout, and click the "Next" button.

2. Click "Repair your computer".
3. You will see the "Choose an option" window. From the same, click the "Troubleshoot" option.
4. Select "Advanced options" and click the "Command Prompt" feature.
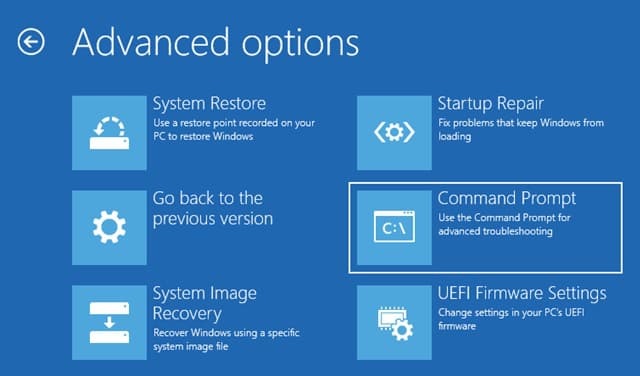
5. Enter the following command line in the command prompt window that appears on the screen and presses the "Enter" key: "bcdedit /set {default} safeboot minimal".
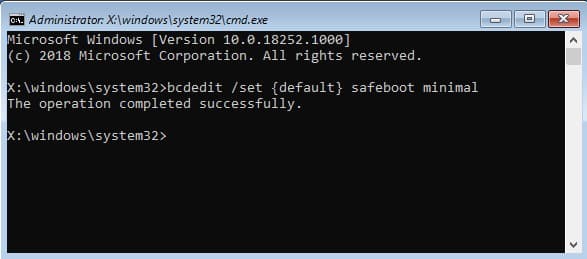
6. Wait until you see the message that states that the operation was successful.
7. Exit the command prompt window and click the "Continue" option.
8. The computer reboots into Safe Mode. Log in with the account that has administrator rights and make the necessary changes.
To enter Safe Mode in Windows 10, you can use the Command Prompt to activate the feature. Once enabled, your computer will automatically start in Safe Mode until you disable the feature.
Method 5. Using the System Configuration Tool
The easiest way to log into Safe Mode on a Windows 10 computer is by using the System Configuration tool, which can be accessed by typing `msconfig.exe` in the search bar. This tool provides a simple and straightforward way to enter Safe Mode, making it a convenient troubleshooting option for resolving issues with your system. By using the System Configuration tool, you can quickly and easily access Safe Mode and start troubleshooting your computer's problems.
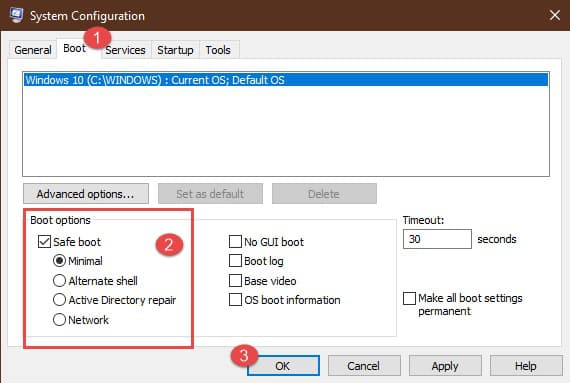
1. Enter "System Configuration" in the search field. Click the "System Configuration" application appearing in the best match list.

2. In the window, select the "Boot" tab. At the bottom, in the boot options menu, select "Safe Mode". Click "OK", and you will see a message that asks you to restart the computer to make the new changes take effect. Upon restarting, Windows 10 will enter safe mode.
Part 2. Unable to Enter Safe Mode in Windows? Solve It!
If you're unable to enter safe mode after following the previous steps, you can try the alternative method below. This method works when you can log into your Windows PC or laptop.
1. Press the "Windows" key + "I" on your keyboard to open the Windows Settings page.
2. On the Windows Settings page, navigate to the left side of the window and select the "Recovery" option.
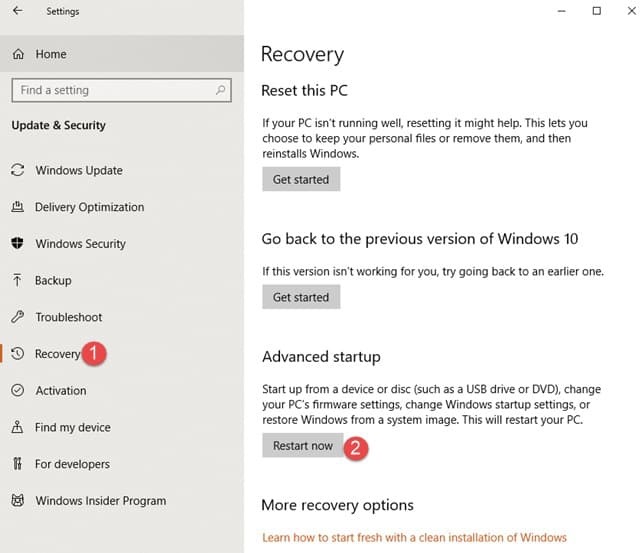
3.The computer will reboot, and you will see the "Choose an option" screen. From the advanced startup menu, click on the "Troubleshoot" option. This will take you to a new menu with various troubleshooting options.
If you're experiencing file loss due to errors on your Windows PC, don't worry! You can try using a reliable file recovery software like How to Fix Windows 10 Preparing Automatic Repair Loop
If you want to work on more than one file at a go on Mac, you'll need to select multiple files. The easiest way to do this is by using specific commands on your keyboard. This article will teach you how to select multiple files on Mac using different shortcut keys. Read on to know them!
When we encounter that sound not working on a laptop, we can't figure out why it may lead us anxious. This article will talk about this question and different answers to it. It may be helpful if you're experiencing sound not working on a laptop.
When a system image recovery failed error occurs, do not worry because you can solve this problem. In this article, you will learn how to fix the system image recovery failed error in every possible way. After reading this post, you can have an overview of the error.