How to Format Memory/SD card for Canon Camera
Quick Navigation:
- Part 1. Recover Data from SD Card on Canon Camera
- Step 1. Select File Types to Recover from SD Card
- Step 2. Locate Canon Camera SD Card to Scan
- Step 3. Recover Photos/Videos from SD Card on Canon Camera
- Part 2. How to Format SD Card on Canon Camera
- Part 3. How to Format SD Card on Computer
- Part 4. How to Fix the Issue "Card cannot be accessed"
Canon camera SD card is the place where all shot videos and photos are saved. Sometimes, to make it work, you need to format SD card on Canon camera. This article is a step-by-step guide, telling you how to format SD card on Canon camera on the device itself or on the computer. Before getting down to the task, if you can't access the photos/videos in the SD card, try Canon camera memory card recovery software to recover them first. After then, feel free to format memory card for Canon camera.
As a Canon camera user, whether you're a beginner or old stager, you need to learn how to format SD card to Canon camera. If you're lucky enough, the moment you insert the SD card to the Canon camera, it works well. If not, you will get the message "card cannot be accessed. Reinsert/change the card or format card with a camera". Anyway, let's learn how to format SD card on Canon camera.
Part 1. Recover Data from SD Card on Canon Camera
If there are some important files on the SD card for Canon camera, you're supposed to think twice before leaping to the formatting. Formatting will remove all files on the SD card, making it hard to recover. And sometimes, the formatting is irreversible, namely, you can't cancel formatting when it begins. To avoid data loss due to formatting SD card for Canon camera, you can try Deep Data Recovery to retrieve all the files first. By the way, it's good if you can copy files from the SD card and save them on your computer. Otherwise, follow the steps below.
Formatting your SD cards for your Canon camera is a straightforward process that ensures optimal performance and prevents data loss. Here's a step-by-step guide to help you format your SD cards:
Step 1. Select File Types to Recover from SD Card
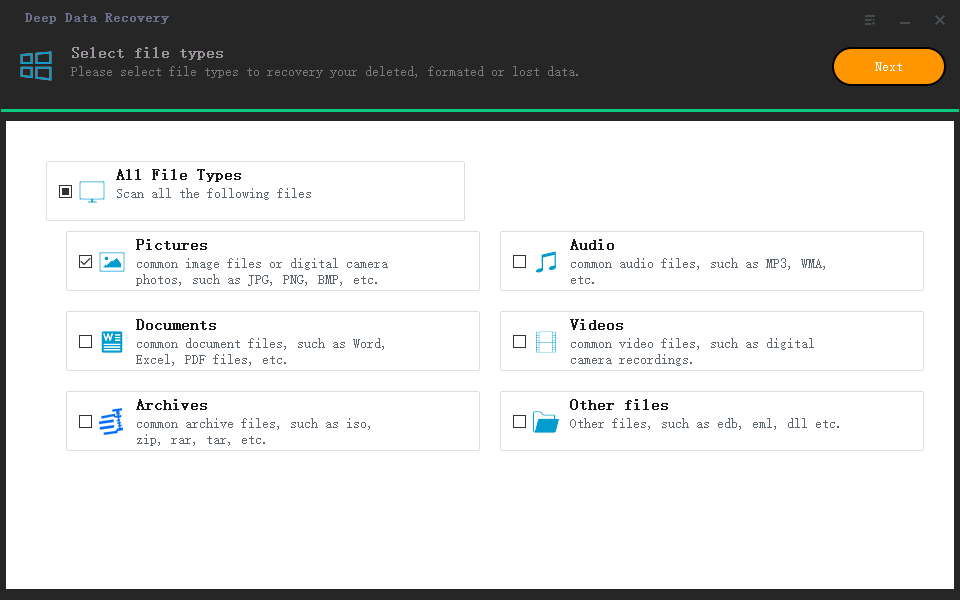
Launch the best SD card data recovery software. From the first window, you can see all supported file types are selected. Keep them or deselect unwanted ones. Click "Next".

Step 2. Locate Canon Camera SD Card to Scan
Connect the SD card with your computer either by connecting your Canon camera with computer or using an SD card adapter, ensuring it is detected by your computer. In the next window on the software, please select the drive that represents the SD card. Select it and click "Scan".

Step 3. Recover Photos/Videos from SD Card on Canon Camera
Last, wait for the whole scanning process to finish. After then, you can see all found files are sorted into categories, listing in the left panel. Filter file types in the left panel and check out the details on the right side. When finding the needed files, select them and click "Recover" to save them on your computer.

Part 2. How to Format SD Card on Canon Camera
Make sure the battery is charged and the SD card is inserted to your Canon camera.
- 1. Turn on your Canon camera and press the Up or Down button to open the menu.
- 2. Select "Setup" or "Utilities" > choose "Format".
- 3. Confirm your action of formatting the SD card on Canon camera and press "Ok". Wait for a few seconds to get the SD card formatted.
Part 3. How to Format SD Card on Computer
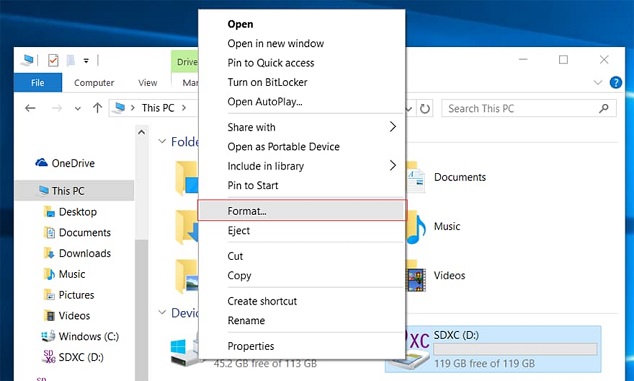
Formatting an SD card on a computer is very easy and simple: connect the SD card with your computer, letting it appears as an external hard drive > right-click on the Canon camera SD card and select "Format" > in the pop-up window, choose a suitable "File System" and Default Allocation Size > click "Start" to let it finish.

Part 4. How to Fix the Issue "Card cannot be accessed"
If you encounter the error message "card cannot be accessed. Reinsert/change the card or format card with the camera" on your Canon camera, don't worry. This issue can be resolved by understanding the possible causes and choosing the right solution.
1). The system of the SD card becomes Raw. You can connect the SD card with your computer. Right-click "My Computer" and click "Manage". Now open "Disk Management" to check out whether the SD card is the Raw system.

Formatting a raw SD card can be a bit tricky, but it's a necessary step to make the card accessible again. Here's a step-by-step guide on how to format a raw SD card:
- 1. Connect the SD card with your computer.
- 2. Click Win + X and select Command Prompt
- 3. Type "diskpart" and press Enter.
- 4. Type list disk and press Enter. Select the raw SD card and type: Disk F format fs=FAT32 (please note the F here represents the SD card. If it is not the case in your computer, replace it with the right one for SD card.) and click Enter to start the formatting.
2). The SD card is virus infected. In this case, to format SD card for Canon camera, you need to use an anti-virus software tool to remove the virus first.
3). The SD card is physically damaged. In this case, call the developer, asking them for a solution.
4). The Canon camera SD card is locked or write-protected. If so, you should figure out how it locked and remove the protection first before formatting it.
Related Articles
- How to Format Flash Drive Using CMD
- Sandisk Cruzer USB Data Recovery Solution
- Recover Lost Data from HP USB Flash Drive
- Best Canon Data Recovery for Mac & Windows PC
Canon Data Recovery software allows you to recover deleted or lost files, including videos, photos, documents and more from Canon camera memory SD card on Mac and Windows PC. - [Solved] Can't Find Recycle Bin in Windows 10/8 – 2 Solutions
Can't find recycle bin in Windows 8 and cannot open recycle bin in Windows 10? Here are the solutions for how to find and open recycle bin on Windows PC. - How to Clone HDD to Seagate SSD
How to Clone HDD to Seagate SSD