How to Recover Temporary Excel Files in Windows 10/7/XP
Quick Navigation:
- Recovering Excel Temporary Files in Two Ways
- Part 1: How to recover temporary excel files in Windows effectively
- Step-by-step guide on how to use Deep Data Recovery to find temporary excel files in Windows
- Advantages of using Deep Data Recovery to recover temp excel files
- Part 2: How to find temporary Excel files in Windows manually
- Where Office stores the temporary files in Windows
- How to recover temporary excel files in Windows
Recovering temporary Excel files is now possible without losing hope. If you've lost original workbooks before saving or experienced a sudden system shutdown, you can restore data from temporary files. This is especially helpful in Windows 10, making it the best way to recover lost data.
Recovering Excel Temporary Files in Two Ways
To recover temporary Excel files, you can use retrieval software or manually. This approach allows you to select the method that suits your preference.
Part 1: How to recover temporary excel files in Windows effectively
You can use the Deep Data Recovery program to easily recover Excel temp files by scanning for their location, selecting the desired data, and restoring it.
The program's robust algorithm enables it to scan for files more thoroughly than other tools, allowing you to recover all versions of an Excel file, including temp files, and even data from different sources and formats, making it easier to choose the desired version to restore.
Your Safe & Effective Data Recovery Software
- Data loss due to clear recycle bin, pressing "Shift + Delete" buttons, hidden/deleted partitions, or cloning a hard disk can be recovered with the right tools and expertise. These scenarios can result in lost files, deleted partitions, or corrupted data, but specialized software and techniques can help retrieve the lost data.
- To recover deleted files and folders, use a data recovery software to scan the affected device, locate the deleted files, and restore them to their original location. Alternatively, check the device's recycle bin or trash to see if the deleted files are still available.
- The goal is to access the formatted drive or identify bad sectors in the RAW drive to recover as many files as possible.
- Files lost due to a virus attack and the subsequent reinstallation of the operating system.
Step-by-step guide on how to use Deep Data Recovery to find temporary excel files in Windows
To recover your Excel temp file, install the software from the official website, and run the trial version to test its capabilities. Once installed, follow the steps to recover your deleted or formatted files in Windows 10, 7, or XP.
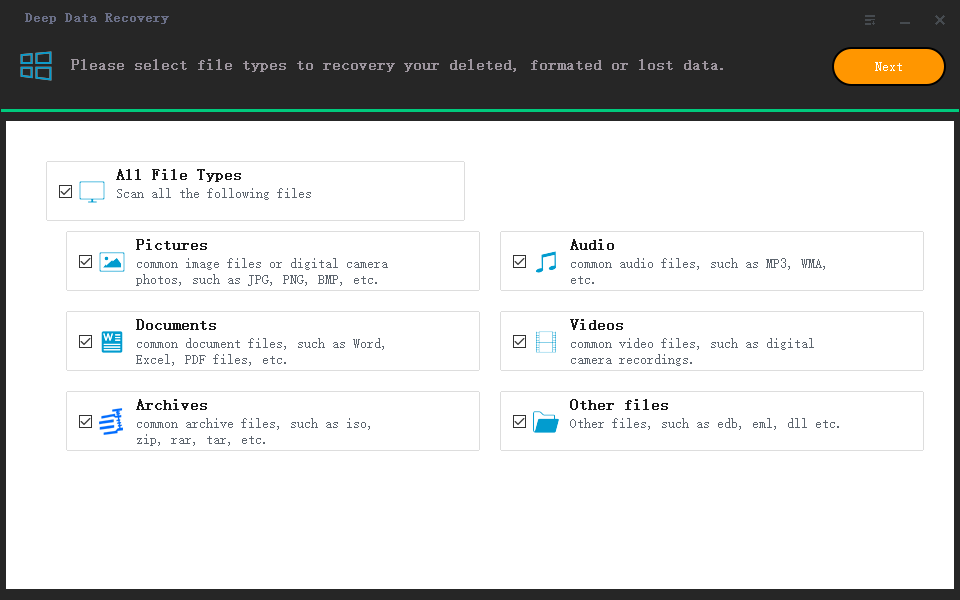
1. To recover temporary Excel files, launch the software by clicking the icon, and a window will appear showing various file formats that it can recover. By default, all formats have checkboxes marked, but you can select only the one you need and press the "Next" key to initiate the recovery process.

2. On the next screen, you will see a list of locations on your hard drive, including any external storage units connected. You can select the location where you want to find temporary Excel files and click "Scan" to identify their presence.

3. The scan time depends on the file format selected, after which the results will be displayed in a new screen. The tree directory allows for quick navigation, with the center pane showing recoverable files and the third column providing a preview of a selected file. You can preview the file, mark it, and click "Recover" to save it to an external location or a different partition on the hard disk in Windows 10/8/7/XP.

Advantages of using Deep Data Recovery to recover temp excel files
- The software efficiently recovers files, including documents, images, videos, and audio files, from various storage devices and formats, making it a reliable tool for data recovery.
- A quick scan and deep scan mode are available to thoroughly recover files from USB drives, SD cards, and other storage media, allowing for the retrieval of lost data in a comprehensive manner.
Part 2: How to find temporary Excel files in Windows manually
Microsoft's AutoRecover feature in Excel allows you to recover a lost workbook due to reasons like power failure, system crash, or accidental file deletion. The recovered file is saved with a temporary name that varies with the version of Microsoft Office being used, but its primary purpose remains the same - to retrieve the lost workbook.
Where Office stores the temporary files in Windows
The auto-recovery feature saves files in a temporary folder created by the software, and saves the file after a few minutes.
Windows 10: C:\Users\AppData\Local\Microsoft\Office\UnsavedFiles
Windows 7: C:\Users\UserName\AppData\Local\Microsoft\Office\UnsavedFiles
Windows XP: C:\Documents and Settings\UserName\Local Settings\Application Data\Microsoft\Office\UnsavedFiles
How to recover temporary excel files in Windows
To recover Excel temp files on Windows 10, you can utilize the "recover unsaved" feature. Simply follow these steps: 1. Open Excel and click on "File" in the top menu bar.
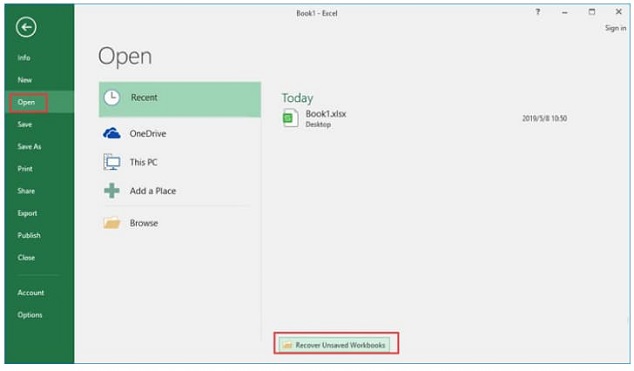
Launch Excel and click on the "Open" tab, followed by "Recent" and then "Recent Unsaved Workbooks" to access previously unsaved workbooks.

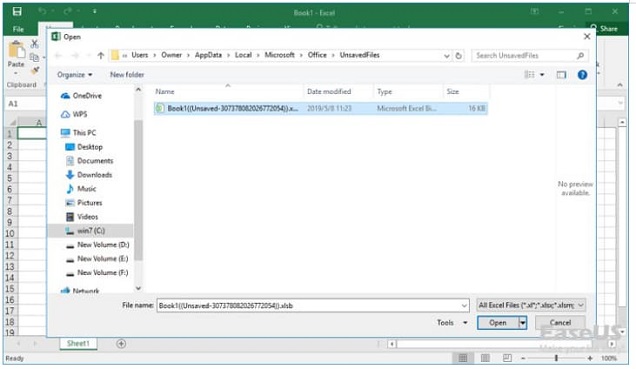
From the opened window, you need to select the unsaved Excel workbook you want to open and press the "Open" button.

After opening the file, Excel will prompt you to save the file first before editing. Simply save the file and then you can proceed with any necessary editing.
Related Articles
- How to Recover Unsaved/Lost/Deleted SketchUp Files
- How to Recover Shift Deleted Photos in Windows 10/7
- How to Factory Reset Samsung Phone[Galaxy S8/9/10/20/21/22]
Factory reset Samsung Galaxy phone will erase all data permanently. You need to perform a factory setting before selling it or giving it to others. This article will provide a step-by-step guide on factory reset the Samsung Galaxy phone, including the model S8, S9, S10, S20, S21, and the latest S22 version. Besides, we will also tell you how to backup data and restore them to your new Samsung. - FAT32 Structure Information - MBR, FAT32 Boot Sector Introduction
This article provides detail introduction of FAT 32 file system structure information, FAT 32 boot sector, FAT 32 partition table, FAT 32 MBR. If you lost data by accident, free download Deep Data Recovery to undelete files and recover lost data, unformat disk, restore formatted or deleted hard drives, partitions under FAT 32 file system. - How Do I Find My Autodesk Utility Design Product Key
Depending on the type of license you purchase, you may be prompted for an Autodesk product key during product activation. Here are methods to find it!