DiskDigger Video Recovery – Undelete Videos from Windows PC/Android/Mac
Quick Navigation:
- Here are the simple steps for how to use DiskDigger alternative to recover videos from the computer and digital devices.
- Step 1. Download and install the DiskDigger video recovery tool on your Windows PC or Mac
- Step 2(optional). Connect computer with digital device
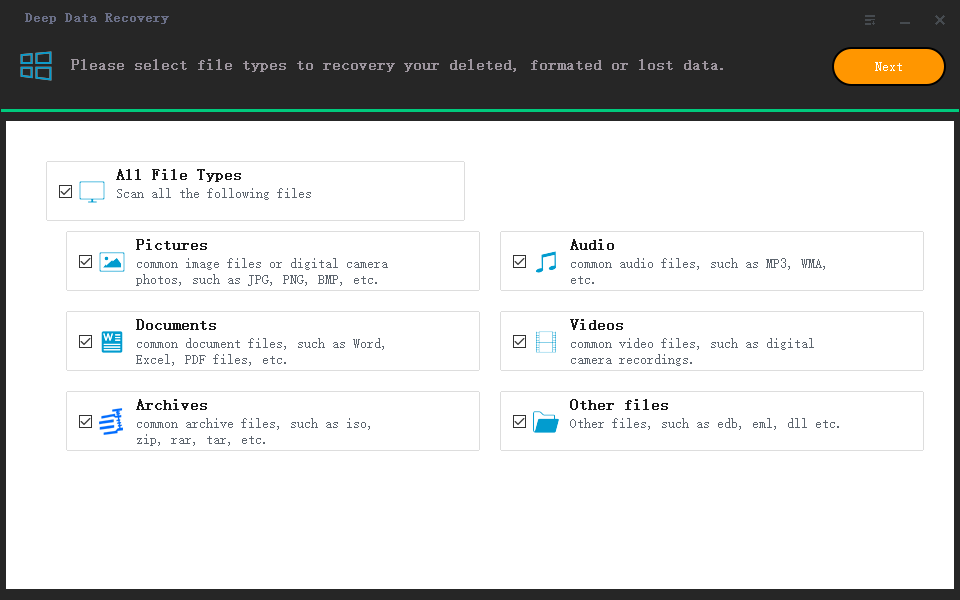
- Step 3. Select file types to scan
- Step 4. Select drive to scan
- Step 5. Preview and Perform DiskDigger Video Recovery
DiskDigger is a powerful tool for recovering deleted files, including photos, documents, music, and videos. It supports a wide range of file types, including less common formats like TIFF, ANI, CR2, SR2, NEF, DCR, PEF, RAF, and 21 types of video files, such as APE, R3D, APE, OFR, PPM, and WEBM.
DiskDigger offers a separate version for Windows PC and an app version for Android devices, allowing users to download the right version according to their needs. The process is relatively easy, requiring only a simple download and installation.
If you're looking to recover deleted videos on your Mac, I have some bad news - DiskDigger doesn't have a version for Mac. However, I'd recommend trying Deep Data Recovery instead, which is a great alternative that can recover deleted or lost videos from devices, offering similar features to DiskDigger.
Your Safe & Effective DiskDigger Video Recovery Tool
- It supports videos in 29 formats, including AVI, WMV, ASF, MP4, MOV, M4V, 3GP, MXF, MKV, MTS, DIVX, OGM, MOI, VOB, MPEG, MPG, AVS, DVM, QT, ANM, SMJPEG, SCR, FLC, CLK, ANI, FLA, SWF, FLV, and M4P.
- This software enables users to recover deleted or lost videos from various devices and storage media, including Windows PC, Mac, Android phones, flash drives, cameras, and hard drives.
- The software has separate versions for Windows PC and Mac, and its simple interface makes it easy to use, requiring no computer technology expertise.
To recover lost video files, you can click on the download link provided for the DiskDigger Video Recovery Tool.
Here are the simple steps for how to use DiskDigger alternative to recover videos from the computer and digital devices.
Step 1. Download and install the DiskDigger video recovery tool on your Windows PC or Mac
This software is compatible with both Windows PCs and macOS, and is completely virus-free, making it safe to use on your computer.
Step 2(optional). Connect computer with digital device
To undelete and recover videos from a digital device, such as an Android phone or tablet, camera, flash drive, or hard drive, you'll need to connect the device to your computer using either a card reader or a USB digital cable. This will ensure the device is recognized by the software, allowing you to proceed with the video recovery process.
Step 3. Select file types to scan
Launch Deep Data Recovery, selecting only the Videos category from the startup window to avoid unnecessary scanning. This will focus the scan on deleted or lost videos, saving time and energy, and then click "Next".

Step 4. Select drive to scan
In the next window, select the target hard drive, digital device, or memory stick to scan, then click "Scan" to let the software scan for the target video files.

Step 5. Preview and Perform DiskDigger Video Recovery
After scanning, the software lists all found videos under the Video category, allowing you to filter by file format and preview the target video. If it's the desired video, you can select it and click "Recover" to retrieve it on your computer.

Related Articles
- Top 6 Android Apps to Recover Data From a Corrupted SD Card
- How to Recover Deleted YouTube Videos
- How to Recover Files from Formatted SD Card
- Monster Hunter Rise Save File Location [Detailed Information]
Monster Hunter Rise is an action game worth spending a lot of energy on exploration. However, in order to prevent all our efforts from being lost, it is very necessary to find Monster Hunter Rise save file location and carry out a backup plan for game data. This article will give you a detailed guide! - Step-by-Step Guide to Backup Drivers Windows 10 [Powerful Solutions]
This article will introduce two ways to backup drivers Windows 10. So, you can quickly restore the drivers when reinstalling Windows 10 to enable the operating system to communicate with other devices. And I will also provide a way to backup the entire computer to help you better protect your data. - How to Backup Outlook Emails to Gmail [2023 Detailed Tutorial]
Do you know how to backup outlook emails to Gmail? This article will tell you three ways to back up emails from Outlook to Gmail. After reading this post, you can choose a way to move emails from Outlook to Gmail on your own.