How to Disable AutoSave in Word and Excel
What Is AutoSave in Word/Excel
Recently, Microsoft has included an autosave feature that is turned on by default. This feature is available when a file is saved to Microsoft OneDrive or SharePoint in Microsoft 365. AutoSave can be useful because there may be a time when you want to make changes to a file without saving it. But there is a problem, any change you make is automatically saved - meaning your original document is overwritten, even if you don't want it to be. Thus, we are going to talk about how to turn it off.
| Workable Solutions | Step-by-step Troubleshooting |
|---|---|
| Disable AutoSave on Windows | Open an Office 365 program that can open a Word, Excel, PowerPoint, etc. file and...Full steps |
| Disable AutoSave on macOS | Open Excel or Word or any of the Office programs and click (in our case) Excel...Full steps |
| Recover Lost Word/Excel Files | Choose the Word file location. If it's on a USB flash drive or SD card, connect it to your computer...Full steps |
Part 1. How to Disable Word/Excel AutoSave on Windows
If you are using Windows 10/8.1/8/7, you can disable Word/Excel AutoSave by the steps below.
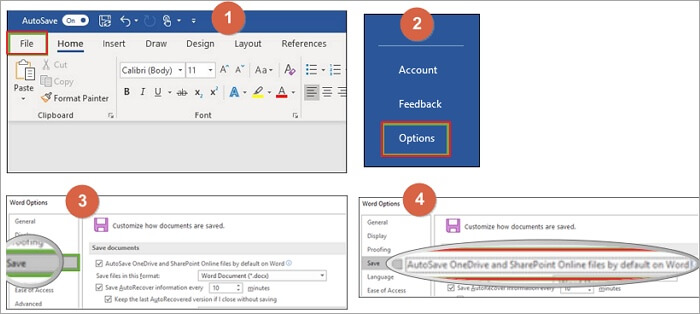
Step 1. Open an Office 365 program that can open a Word, Excel, PowerPoint, etc. file and click "File".
Step 2. Select "Options" from the left navigation.
Step 3. In the "Options" window, select "Save" from the left navigation.
Step 4. Uncheck the "Autosave OneDrive and SharePoint Online files by default" option.

Part 2. How to Disable Word/Excel AutoSave on macOS
If you turn AutoSave Off for an individual file the application will remember to keep it off every time you reopen that file. Things could be a little bit different if you are going to turn off AutoSave on Mac.
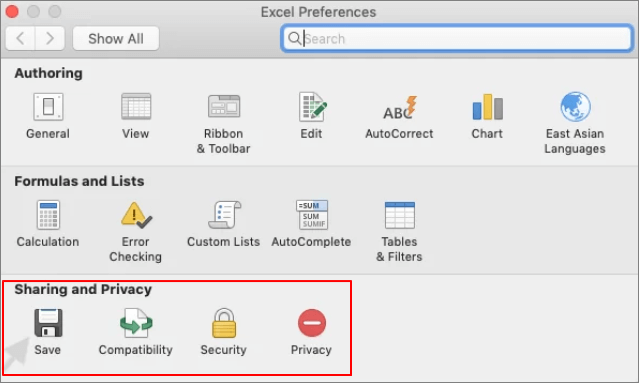
Step 1. Open Excel or Word or any of the Office programs and click (in our case) Excel in the toolbar on top of the screen.
Step 2. Click "Preferences".
Step 3. In the Preferences Dialog box, click the "Save" button in the "Sharing and Privacy" at the bottom of the box.
Step 4. Unselect the "Turn on AutoSave" by default.

Part 3. How to Recover Lost Word/Excel Files on Your PC
Microsoft Office comes with an AutoSave button turned on by default. It is a very good idea for data protection. Since you have turned off the AutoSave option with the steps below, you must take the risk of data loss. But you can restore the deleted or lost files with professional data recovery software - Deep Data Recovery. This file recovery software can recover unsaved or deleted Word, Excel, and PPT files with simple steps.
Deep Data Recovery
- Recover lost or deleted files, documents, photos, audio, music, emails effectively.
- Recover files from SD card, emptied recycle bin, memory card, flash drive, digital camera, and camcorders.
- Support data recovery for sudden deletion, formatting, hard drive corruption, virus attack, system crash under different situations.
Follow the steps below to recover lost Word or Excel files.
Step 1. Select file types
Launch Deep Data Recovery. Select file types and click "Next" to start.

Step 2. Choose the Word file location
Choose the drive or a specific folder and click the "Scan" button.

Step 3. Locate your Word files
The software will start immediately scanning all lost data on the selected drive. After the scan, click the "Documents" option in the left panel. Choose "Word" from the category bar. Then, click "Preview".

Step 4. Recover Word files
After previewing the lost Word files, select the desired Word files and click "Recover". Then, select a folder to store the Word files.
Conclusion
AutoSave is a new feature available in Excel, Word, and PowerPoint for Microsoft 365 subscribers that saves your file automatically. You are advised to keep the AutoSave turning on to protect your Office data. But sometimes it can cause some issues, you can also disable the option with the methods above. If you are faced with Office data loss, you can also turn to Qiling data recovery software.
Related Articles
- Where Is the Recycle Bin in Windows 10/11, How to Find and Open Recycle Bin
- [Official and Latest] Deep Data Recovery Crack, Serial Key, License Code 2022
- Free Undelete Software for Windows 10/11
- How to Activate Windows 10/11 with Product Key/Digital License/CMD