5 Ways to Fix BSOD Error 0x00000133
| Workable Solutions | Step-by-step Troubleshooting |
|---|---|
| Fix BSOD Error 0x00000133 |
Fix 1. Change SATA AHCI Controller Driver...Full steps Fix 2. Rollback Your Driver...Full steps Fix 3. Fix System Files with SFC...Full steps Fix 4. Perform a Disk Check/Repair...Full steps Fix 5. Restore Windows 10...Full steps |
| Restore Data from a PC | Create a bootable disk; Boot from the bootable USB; Recover data from a hard drive that won't boot...Full steps |
Did you come across the BSOD Error 0x00000133 while booting the system? This particular BSOD or Blue Screen of Death error is the DPC_WATCHDOG_VIOLATION error. It is a recent bug that has been encountered in Windows. Here, DPC is an acronym for Deferred Procedure Call.
The BSOD Error 0x00000133 is a common problem reported by several users. That is why Microsoft is working actively towards resolving this particular error. Luckily, there are some fixes you can try to get rid of this error. However, it is vital to know the causes that might lead to this error before that.
For instance, a compatibility problem with the software or hardware can cause the BSOD Error 0x00000133. Besides, there can be issues within the CPU or the graphics card. Driver problems can also explain the emergence of this error. Here, we will discuss different ways you can fix the BSOD Error 0x00000133.
How to Fix BSOD Error 0x00000133 in Windows 10
The BSOD Error 0x00000133 is a prevalent error in Windows 10. Fortunately, the error is easy to fix, and one can leverage different methods to resolve the problem. Take a look at the different ways listed here.
IMPORTANT NOTE: Enter Safe Mode First
Windows can encounter different issues even with regular updates and a constant error-checking process. That is why entering the Safe Mode of the system is a great way to resolve problems that you are facing. Are you wondering what the Safe Mode is?
The Safe Mode is an in-built diagnostic mode designed by Windows. You will get an essential Windows state in this mode with a few drivers and files. Checking the problem in the Safe Mode will enable you to pinpoint the actual cause. Moreover, it also aids in resolving the issues with ease.
There are three distinct types of Safe Mode. You can opt for the one that suits your needs the best. Besides, it is essential to note that the occurrence of the system_service_exception error causes issues with booting. That is why entering Safe Mode to check and resolve the problem is necessary. You can adopt the fixes listed below in the Safe Mode.
Fixes list:
- 1. <Change SATA AHCI Controller Driver
- 2. <Rollback Your Driver
- 3. <Fix System Files with SFC
- 4. <Perform a Disk Check/Repair
- 5. <Restore Windows 10
Fix 1. Change SATA AHCI Controller Driver
One of the primary causes of the DPC_WATCHDOG_VIOLATION bug error in Windows 10 may be the SATA AHCI drivers. In that case, changing the SATA AHCI controller driver may resolve the problem.
Take a look at the steps that you need to follow –
Step 1: Press the Windows + R keys simultaneously. It will open the Run dialog box. Type devmgmt.msc in the Run dialog box. Click on the OK button.
Step 2: It will open the Device Manager. Next, Expand the IDE ATA/ATAPI Controllers option. Click on SATA AHCI Controller.
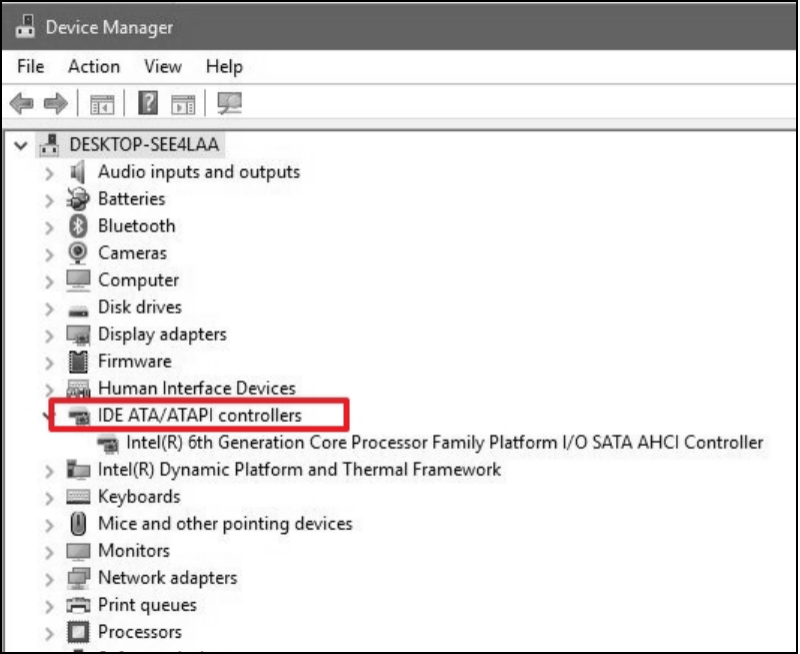
Step 3: Now, press Update driver. It will lead to a dialog box. Here, you need to click on Search automatically for updated driver software. Alternatively, you can also select Browse my computer for driver software.
Step 4: Click on Let me pick from a list of device drivers on my computer. Select the Next button. Click on the Standard SATA AHCI Controller. Click on the Next button. Wait for some time and let the process be completed. Restart the system and see if the error is resolved.
Fix 2. Rollback Your Driver
Did you recently check if the drivers on your computer have been updated? If it is updated, you need to ensure that the latest version is compatible with your computer. You may receive a Blue Screen of Death error 0x00000133 if that is not the case.
What to do if the latest driver version doesn't work with your current system? The only way to resolve the issue is to roll back the driver. Rolling back is getting the previous version of the driver. For that, you need to take a look at the steps listed below -
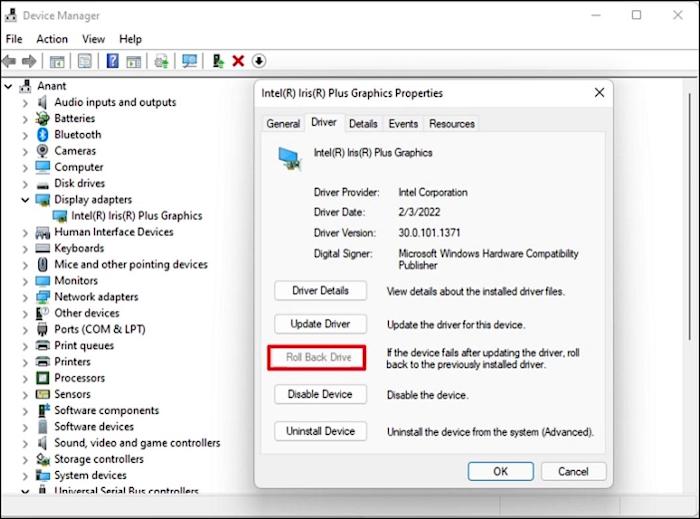
Step 1: Press the Windows + R keys simultaneously. It will open the Run dialog box. Enter devmgmt.msc in the Run dialog box. Click on the OK button to open the Device Manager.
Step 2: Now select Display adapters. Right-click on this option. Select Properties. Go to the Driver tab. Here, you need to select the Roll Back Driver option.
Step 3: After that, click on OK. Restart your computer and check if the error still occurs.
Fix 3. Fix System Files with SFC
You might not be aware bit faulty or corrupt system files can also lead to the blue screen error. You can run SFC (System File Checker). It is an excellent command-line utility that helps identify and repair corrupt or faulty files in the system. This utility command can resolve different problems present inside the operating system.
To run the SFC command, follow these steps –
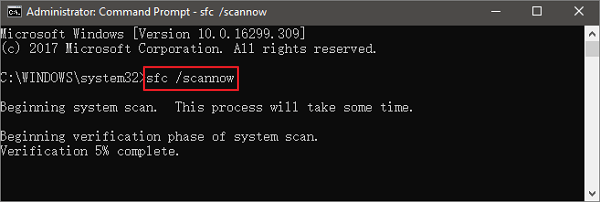
Step 1: Press the Windows + R keys simultaneously to open the Run dialog box.. Enter cmd in the box. Press Shift+ Ctrl+ Enter at the same time to open Command Prompt as administrator.
Step 2: Type sfc /scannow in the command line window. Press Enter on the keyboard. Wait for the message – verification is 100% complete.
Step 3: After that, you can close the command window. Reboot the system and see if the error is resolved.
Fix 4. Perform a Disk Check/Repair
Sometimes, the BSOD Error 0x00000133 occurs due to corruption in the hard drive. In that case, you can use the Check Disk Utility or chkdsk.exe. It is an excellent Windows tool that checks out the hard drive for potential problems and resolves them.
These are the steps you can follow to perform a disk check or repair –
Step 1: Press the Windows + R keys simultaneously to open the Run dialog box. Enter cmd in the box. Press Shift+ Ctrl+ Enter at the same time to open Command Prompt as administrator.
Step 2: Enter chkdsk x: /f in the command-line window. Here, x refers to the drive that you want to scan. Press the Enter key.
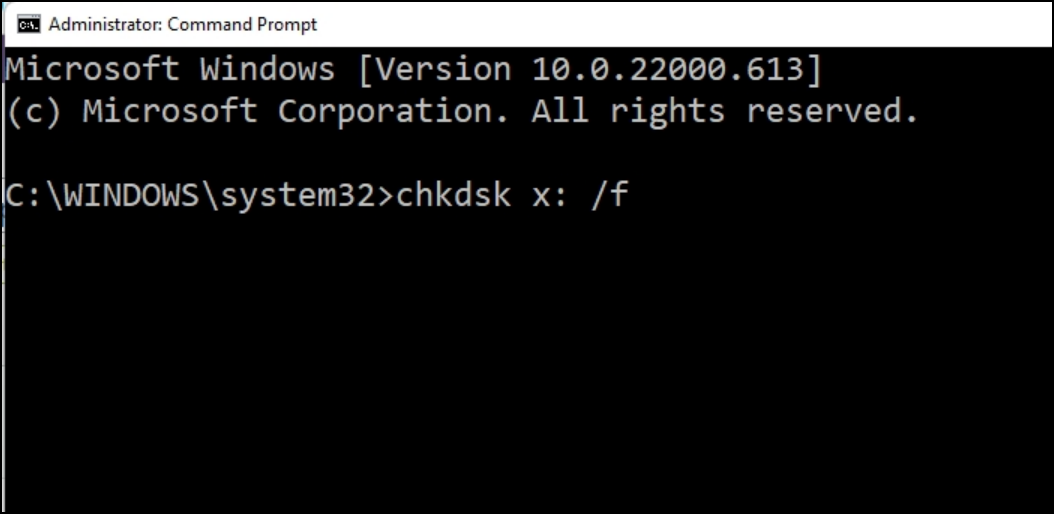
Step 3: Next, enter Y. Wait for the scan to complete. After that, restart the system.
Note: Keep in mind that this scan and repair process is time-consuming. So, you need to schedule the task when you have spare time.
Fix 5. Restore Windows 10
Lastly, you can restore the system if nothing else resolves the BSOD Error 0x00000133. Keep in mind that restoring the system will lead to a rollback of the software and drivers. You will get the previous state of the OS, which may miss some of the latest updates and files. That is why it is advisable to have a backup of the personal files before opting for the Windows 10 restoration process.
The following steps will guide you through the process of restoring Windows 10 :
Step 1: Press the Windows + Pause keys at the same time. Select the "System Properties". Now, click on the "System Restore" button.
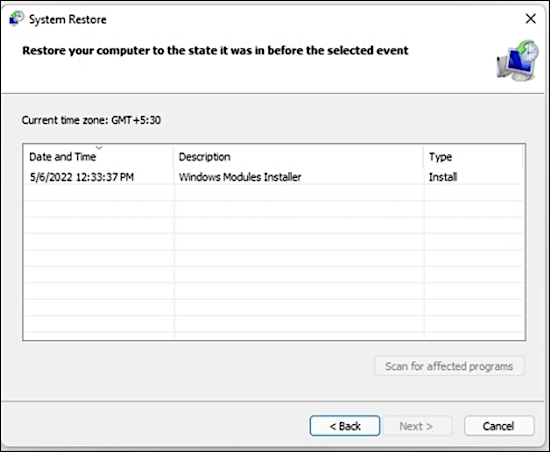
Step 2: Click on "Next". Choose a particular restore point. It means you have to select a specific date and time. Click on "Next".
Step 3: After that, follow the instructions given on the screen. Restart the system and verify if you still have the BSOD Error 0x00000133.
How to Restore Data from a Computer with a Booting Problem?
Have you had trouble gaining access to the data? Are you having issues accessing your computer? Have you lost important data due while opting for Windows restoration? All these problems have a straightforward solution.
If you have a booting problem and want to restore data, you can choose reliable data recovery software, such as Deep Data Recovery with Bootable Media. It is an excellent choice for easily restoring deleted or lost data.
When the operating system encounters issues that lead to it crashing or failing to start, you can use Deep Data Recovery with Bootable Media. It is specifically used to recover data when you are having system crashes. With this app, you can gain access to lost files while the system is having issues launching.
Moreover, the software creates bootable media, which allows the operating system to run. That leads to the recovery of lost data with ease.
Another unique feature is that you can preview data (audio files, photos, etc.) before recovering them. See what you want to recover and then start the process.
Step 1. Create a bootable disk
Prepare an empty USB. If you have important data on it, copy the data to another device. When you create a bootable disk, the data on the USB will be erased. Deep Data Recovery WinPE Edition will help you create a bootable disk.
Connect the USB drive to PC, launch Deep Data Recovery WinPE Edition. Select the USB drive and click "Create" to create a bootable disk.
Step 2. Boot from the bootable USB
Connect the bootable disk to PC that won't boot and change your computer boot sequence in BIOS. For most users, it works well when they restart their computer and press F2 at the same time to enter BIOS.
Set to boot the PC from "Removable Devices" (bootable USB disk) or "CD-ROM Drive" (bootable CD/DVD) beyond Hard Drive. Press "F10" to save and exit.
Step 3. Recover data from a hard drive that won't boot
When you boot from the USB, you can run Deep Data Recovery from the WinPE bootable disk. Select the drive you want to scan to find all your lost files.

Click "Scan" to start the scanning process.

Recover data from the computer or laptop. After the scan completed, you can preview all recoverable files, select the targeted files, and click the "Recover" button to restore your files. You'd better save all of the recovered data to another place to avoid data overwriting.

Conclusion
The BSOD Error 0x00000133 is a typical Windows 10 error. Compatibility issues between the software and drivers and the system can lead to this error. However, there are various solutions that you can adopt to fix the error. You can roll back the drivers or restore Windows.
What if the system doesn't boot? In that case, the ideal solution is to use Deep Data Recovery. You can use the software by following the simple steps above. Besides, you can even preview photos and audio before opting for the recovery.
Related Articles
- Best Hard Drive Recovery Solutions | Recover Data from Hard Drive
- [Solved] 2018-11 Update For Windows 10 Version 1803 For X64-Based Systems (Kb4023057) – Error 0x80070643
- Fix Windows 11/Windows 10 Is Not Shutting Down or Won't Shut Down
- What Is Dynamic Disk | Everything About Windows Dynamic Disk