How to Fix Folders Turned into Shortcuts
Are you experiencing the same issue that the folders saved on your computer hard drive, external hard drive, USB, or SD card suddenly turned into shortcuts?
When you open your USB or hard drive partition in Windows Explorer, folders suddenly turn into shortcuts, and saved files become inaccessible, your device has been infected with the Shortcut virus.

Overview of Shortcut Virus Infection
Shortcut virus is a triggered issue. Once your device gets connected to the shortcuts virus, its malware will creep into your PC, USB pen drive, memory card or other removable storage devices. And then it will immediately create a shortcut of your folders with the same names, hiding the real folder and files.
You can neither open the shortcut folder nor access the saved files. What's worse, the virus will request money for decryption the folder.
If you suddenly find your folders turned into shortcuts, please take it easy! It is not horrible. Many users who have had a similar experience have found a solution. Next, we will show you how to fix folders turned into shortcut without losing data in two phrases.
Phrase 1. Remove Shortcut Virus [3 Ways]
There are three ways that you can apply to restore encrypted folders from shortcuts. You can try any one of the provided methods listed here to convert the shortcut file into the original file with ease.
Method 1. Clear Shortcut Virus with Antivirus Software
Yes, the most effective and easiest method to remove shortcut virus is to apply Antivirus software for help.
Here is a list of highly ranked antivirus software that can clear this virus from your PC and storage devices:
- Shortcut Virus Remover
- Shortcut Virus Fixer
- USBFix
- Hitman Pro
You can also search online to find reliable software to remove this virus from your device.
Method 2. Run attrib Command
When you ask for help on how to fix folders changed into shortcuts, many experienced users will mention the CMD command prompt as a solution. And at most times, it does work to remove the shortcut virus and recover data.
Step 1: Create a Notepad document on the Desktop of your computer.
Step 2: Copy these content into the Notepad and save the file.
- attrib -r -a -s -h /s /d
del /f /s /q *.infMKDIR autorun.inf\Kill........\
attrib +r +a +s +h *.inf /s /d
Step 3: Close the notepad document and rename it as "UPAN.cmd". (.cmd is the file extension.)
- Copy the file to the device where your folders became shortcuts.
Step 4: Double-click the .cmd file and run it. Wait for the process to complete.
After this, the shortcuts will be removed and you should be able to access the folders and saved files again.
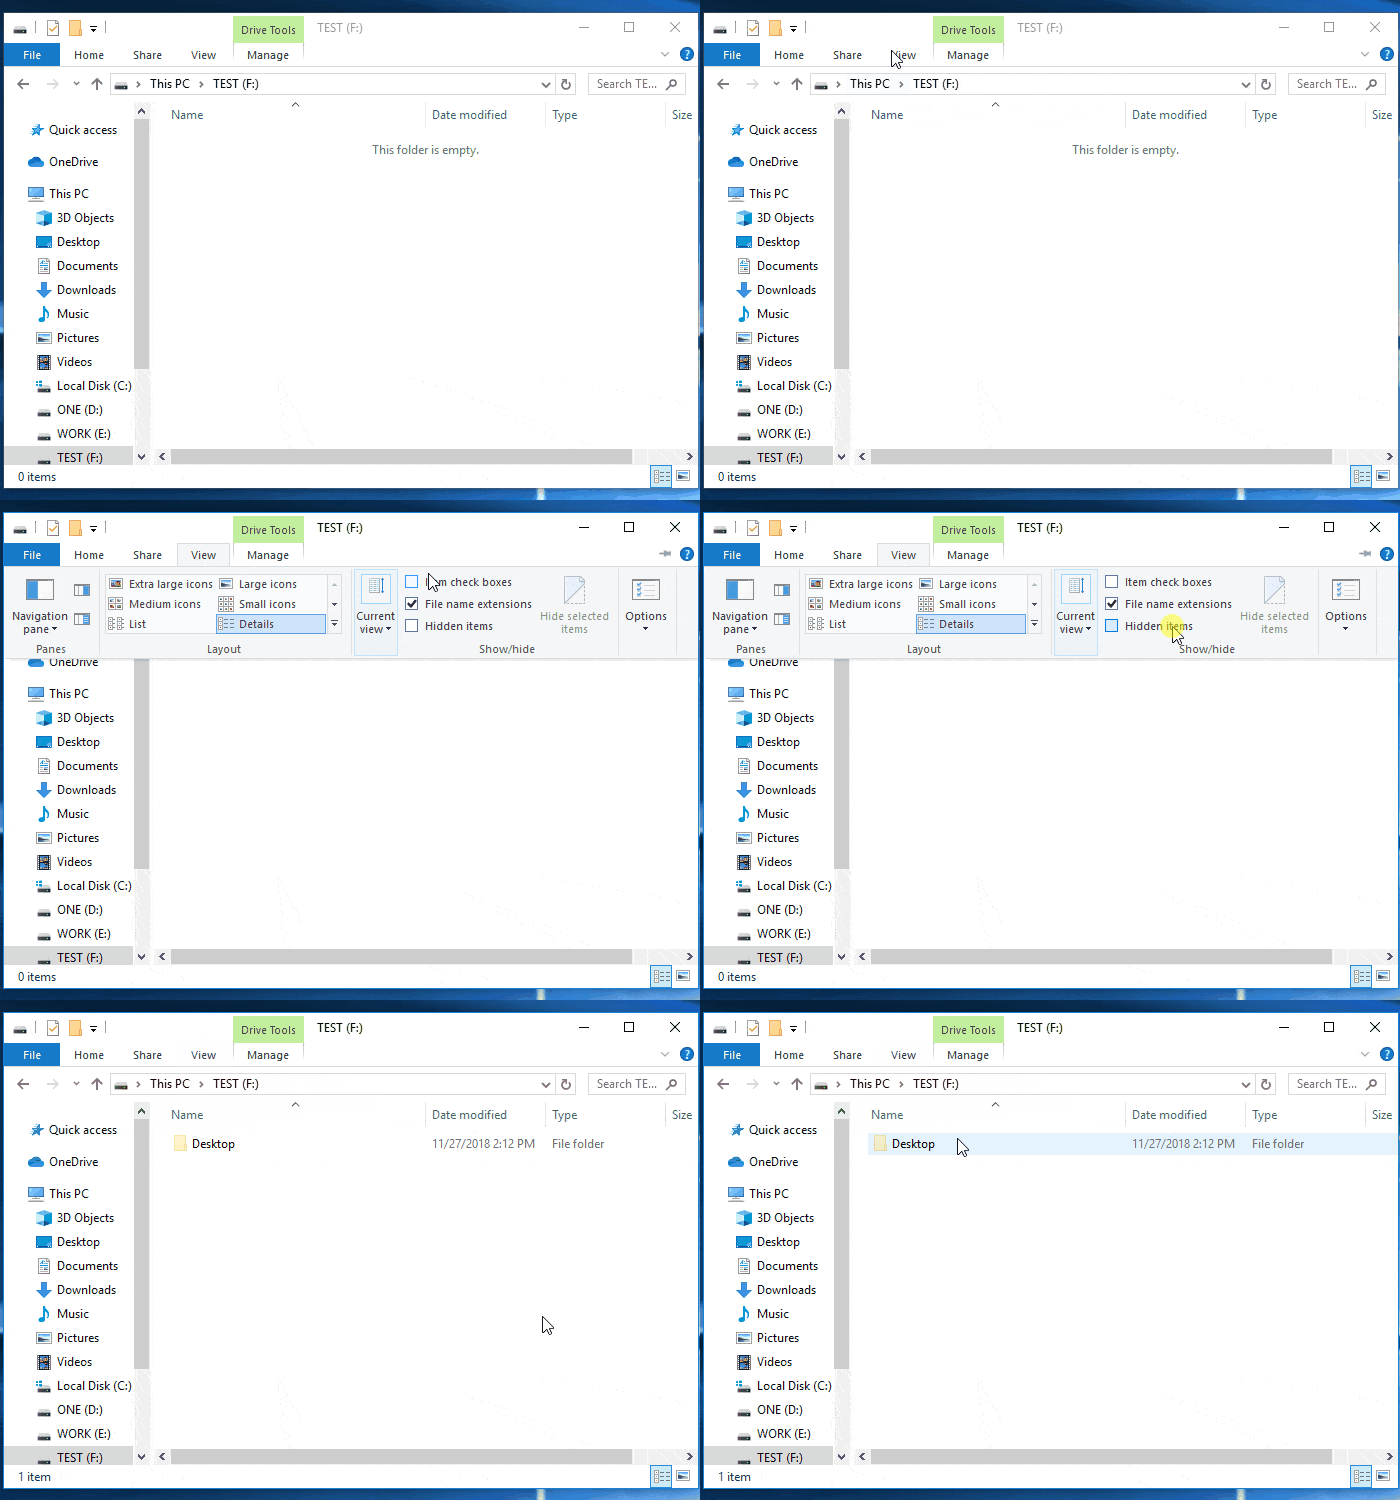
Method 3. Show Hidden Files
By changing the File Explorer settings, you will be able to view the files and folder that have been hidden by the shortcut virus:
Option 1. Show Hidden Files and Folder in File Explorer
Step 1: Connect the device with the folder turned into shortcuts to your PC.
Step 2: Open Windows File Explorer and open the USB or hard drive partition with shortcut folders.
Step 3: Go to the "View" tab and uncheck "Hidden items".

Option 2. Show Hidden Files with Windows Control Panel
Step 1: Open Windows Control Panel, locate and right-click on "File Explorer Option", and select "Open".
Step 2: At the View tab, under Hidden files and folders section, check "Show hidden files, folders and drivers".

: Click "OK" to confirm.
After this, you will be able to view all hidden files and folders on your device.
Phrase 2. Restore Data After Removing Shortcuts
After removing the shortcuts from your device, you can open the folders to check if the data are securely saved there.
If the data are still inaccessible, or you can't see any saved data, don't worry. Read on, you'll learn how to recover lost data after removing the shortcut virus.
First, download professional data recovery software
Qiling file recovery software is a popular tool which enables users to fully scan and restore lost files due to deletion, formatting and even virus attack.
It also supports you to restore files that have been hidden or removed by the shortcuts virus.
Next, perform full data recovery
It will only take 3 steps to restore data from the device after removing shortcuts folders by using Deep Data Recovery:
Step 1. Select file types and click "Next" to start
Launch Deep Data Recovery. Select file types and click "Next" to start.

Step 2. Select a drive and start scanning
Hover over the partition where you lost data. This could be an internal hard disk, external disk, USB, or SD card. Then, click "Scan".

Step 3. Check and preview scanned files
Use the file format filter on the left or upper right corner to narrow the scan results until you find the files you need. Then, you can click the "Preview" button or double-click a file to preview its content, if you'd like.

Step 4. Recover lost data to a secure location
Click the checkbox next to the file and click "Recover" to restore the lost data to a secure place. We recommend that you do not store the recovered data on the disk where you lost it earlier.
Related Articles
- How to Recover Files Lost While Moving
- Windows Photo Viewer Can't Display This Picture Windows 11/10/8/7
- Recover Files Deleted Long Time Ago
- How to Repair Corrupted Files After Recovery in Windows 10, 8, 7