macOS Update Ultimate Guide: How to Update OS on All Models of Mac
Every June, Apple holds its WWDC conference, where they announce their team's software and technology progress from the past year. During this event, Apple typically introduces the new versions of operating systems across its ecosystem, including macOS, iOS, iPadOS, watchOS, and tvOS. These new OSs are usually released three months later, so you can expect to see the latest features and UIs this Fall.
Ⅰ. What Is the Latest macOS?
For Mac users, updating to the latest macOS can add new features, improve power efficiency, and fix software bugs, but it's not always clear which version is the latest and which one to update to. The macOS releases are as follows: macOS High Sierra (10.13), macOS Mojave (10.14), macOS Catalina (10.
- - macOS Ventura (13)
- - macOS Monterey (12)
- - macOS Big Sur (11)
- - macOS Catalina (10.15)
- - macOS Mojave (10.14)
- - macOS High Sierra (10.13)
- - macOS Sierra (10.12)
- - El Capitan (10.11)
- - Yosemite (10.10)
macOS Ventura (macOS 13) was first announced at WWDC 2022, but its official release didn't occur until Fall 2022, so if you're reading this before October 2022, your only updating choice is macOS Monterey.
*The Features of macOS Monterey
Compared with its predecessor -macOS Monterey, the successor to Big Sur, brings a relatively minor update compared to its predecessor. However, one notable feature is the universal control, which allows users to share a single mouse, trackpad, and keyboard across multiple Mac devices, enhancing the connectivity of Apple devices within the ecosystem.
More macOS Monterey new features including:
- Extensive sharing features let you play music and video in messages
- Media sent to you in Messages now available in other apps
- VPN-like relay hides your IP address when browsing
- Mail security features hide your IP address from advertisers
- Stereo-placement effects in FaceTime
- A new Focus feature fine-tunes Do Not Disturb options
Reference by: PCMag - Apple macOS Monterey Review
*macOS Monterey Compatibility
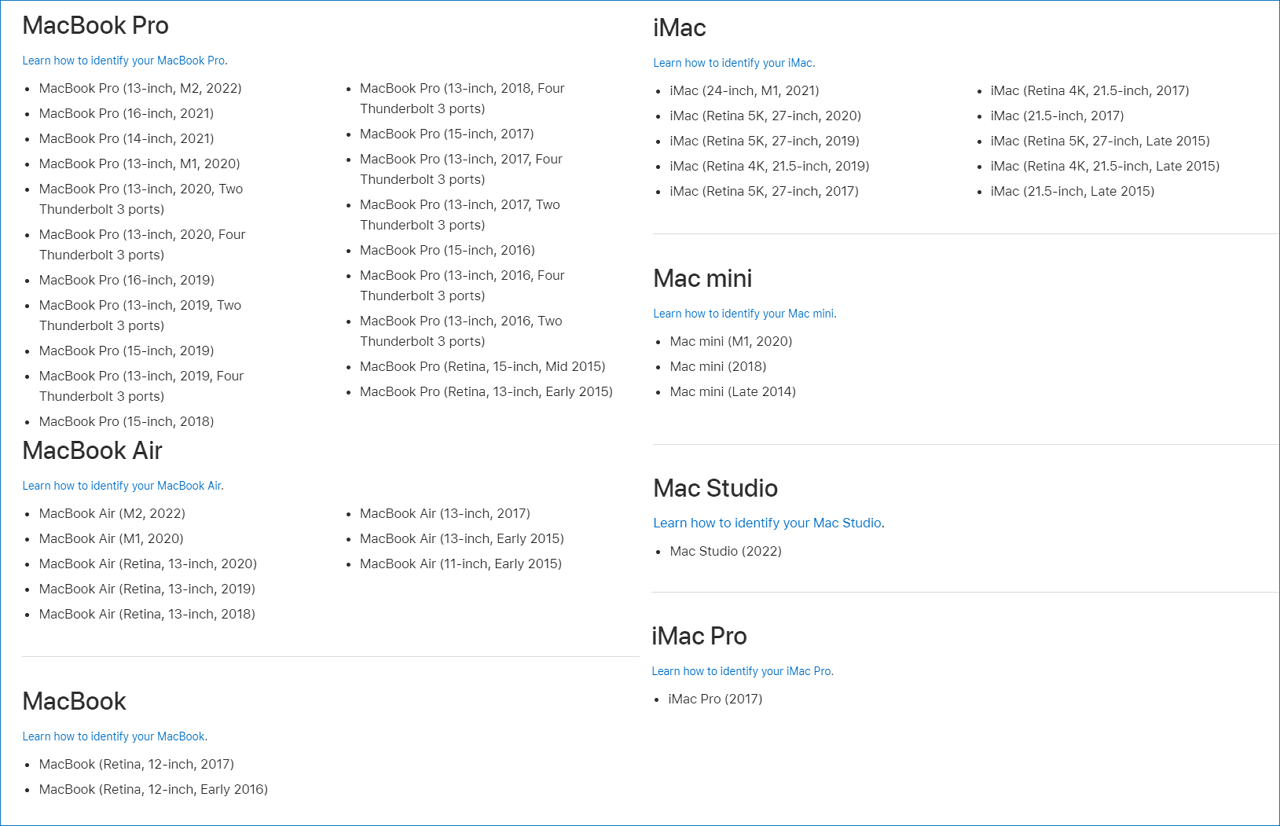
To ensure a smooth transition to macOS Monterey, it's essential to check if your device is compatible with this version. Fortunately, Apple has listed several common Mac models that are compatible with Monterey, so you can verify if your Mac is on the list. This will give you peace of mind and prevent any potential issues during the upgrade process.
LEARN MORE
You should consider more differences compared to macOS Monterey with macOS Big Sur. Click here to learn about the ultimate comparison between macOS Monterey and Big Sur.
Ⅱ. macOS Update Process 1. Prepare Mac for OS Update
To prepare your Mac for a successful update, it's essential to organize your files, ensure all system settings are correct, and back up important files before upgrading. Additionally, you should check if your Mac is eligible for the update, and follow the first step of checking the general requirements.
Step 1. Check General Requirements
To ensure a smooth transition to macOS Monterey, you need to check two things: whether your Mac computer is compatible with the new operating system, and whether your current macOS version, memory, processor, and graphics card are eligible for the update. To get your Mac's specs, you can follow these two steps.
- 1. Click the Apple icon on the top left of your Mac menu bar.
- 2. Select "About This Mac" from the drop-down menu.
![]()
Here you can see your Mac's model, the chip, and the RAM (Memory). Switch to the 'Storage' tab to check how much free space your Mac has, which is crucial for upgrading to macOS Monterey, requiring 26-44GB of available storage depending on your current release.
Step 2. Clean Your Mac
Now that you've confirmed your Mac is compatible with macOS Monterey and meets the system requirements, it's time to prepare for the upgrade. Start by cleaning up your Mac by removing junk files, which will ensure a smooth transition and avoid any potential issues. This preparation will help you upgrade to macOS Monterey without any hiccups.
Here are some tips on how to clean your Mac:
- 1. Uninstall any apps you no longer use.
- 2. Delete old files and backups you no longer need.
- 3. Clean out your downloads folder.
- 4. Remove any new widgets from the Dashboard.
- 5. Empty the trash.
Step 3. Backup Your Mac
Once you've cleaned up your Mac, it's time to backup your important files and data by using Time Machine or creating a bootable clone.
Time Machine is macOS's built-To use the Time Machine backup feature, connect an external hard drive to your Mac and then open System Preferences > Time Machine. Click 'Select Backup Disk' to save copies of your files to the external hard drive.
Creating a bootable clone of your macOS installation is another way to back up your Mac, allowing you to boot from an exact copy in case something goes wrong with the update process. This can be done using programs like Carbon Copy Cloner or SuperDuper.
LEARN MORE
Mac users are advised to back up their computers before updating to a new OS because some users experience data loss after a macOS update. Updating macOS replaces the operating system on the computer, which can cause data loss if the user has not backed up their files.
Ⅲ. macOS Update Process 2. How to Update macOS - 4 Methods
Updating macOS ensures your Mac stays current with the latest features, maintains security, stability, compatibility, and performance, and keeps your software up to date. Apple recommends using the latest compatible macOS version to take advantage of these benefits.
There are various scenarios for macOS upgrading, including updating from the previous version to the latest one, jumping to the latest version from a previous one, or upgrading to the latest version on unsupported Mac models for security reasons.
This guide covers all macOS update methods, providing a comprehensive resource for updating your Mac to the latest macOS, regardless of your specific situation.
Method 1. Update macOS from Software Update
Note: When upgrading your Mac, keep it on and avoid closing its lid. The process may involve multiple restarts, displaying a progress bar or blank screen, so it's a good idea to start the upgrade in the evening, allowing the installation to complete overnight.
(For macOS Catalina and later)
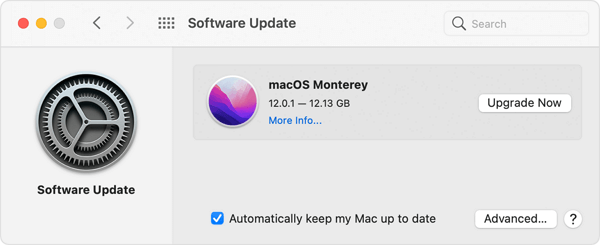
To update macOS, simply click on the Apple menu, select System Preferences, and then click on Software Update. This will check for any available updates and guide you through the installation process. It's the easiest method and recommended for all users, requiring an internet connection.
Step 1. Open System Preferences from the Apple menu.
Step 2. Select "Software Update" from the list of options.
Step 3. macOS will automatically check for updates and prompt you to install them if they're available.
Step 4.Click "Upgrade Now" and follow the prompts to install any available updates.
Method 2. Update macOS from App Store
(For macOS Mojave or earlier)
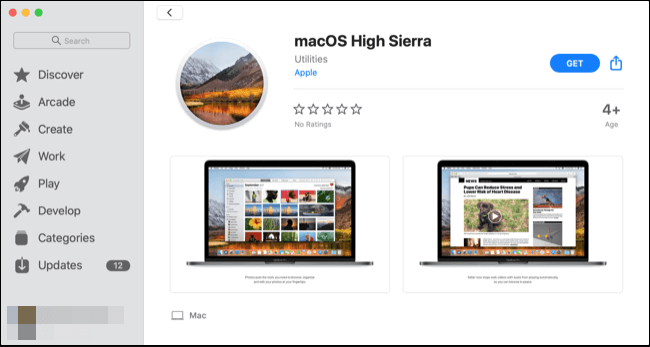
If you're using macOS Mojave or earlier, you can't see the available new OS version information in the Software Update on your Mac. To update, go to the App Store instead.
Step 1. To update your operating system, open the App Store on your device and search for the name of the OS you want to update, such as macOS Monterey.
Step 2. To update to macOS Monterey, click on the best match search result, enter your Apple ID and password, and the update process will begin. Alternatively, you can download macOS Monterey from the provided link.
Method 3. How to Update from Old Version of macOS
When updating the macOS, if you can't update to the latest version directly, you can upgrade to an earlier version first and then to the newest one, which works for Macs lower than OS X 10.9 (Mavericks).
Step 1. To directly download OS X El Capitan 10.11, follow the instructions provided in the link How to get old versions of macOS. This link will guide you through the process of obtaining older versions of the macOS operating system.
Step 2. To update your Mac to El Capitan, follow the on-screen wizard which will guide you through the process.
Step 3. To upgrade to the latest macOS, go to the App Store and search for the latest version. Follow the steps in Method 2 to complete the OS upgrade.
Method 4. Install Latest macOS on Unsupported Mac
While Apple's new macOS releases typically drop support for specific Mac models, leaving them incompatible with the latest operating system, the silver lining is that these older Macs can still benefit from greater speed, system stability, and robust security protection provided by the newer macOS versions, albeit with some limitations.
To create a macOS installer, you can use the OpenCore Legacy Patcher software. First, download the latest version of OpenCore Legacy Patcher from the provided site, making sure to select the "GUI" version. Next, prepare a USB drive that is erasable and has a capacity of more than 16GB, as this will be used to create the installer. With these preparations complete, you can proceed with using the OpenCore Legacy Patcher to create your macOS installer.

After downloading and installing the utility, you can follow the steps in this article to install the latest macOS on an unsupported Mac. The process may seem tedious, but taking one step at a time with patience can make it manageable.
Detailed Guide:
Bonus Update Tip: Enable/Disable Automatic macOS Update
To enable automatic macOS updates, go to System Preferences, click on "Software Update", then select the "Automatically keep my Mac up to date" checkbox, and finally click "OK" to save the changes. This will allow your Mac to automatically check and install updates when they're released, keeping your operating system up to date and secure.
Step 1. Open System Preferences from the Apple menu.
Step 2. Select "Software Update" from the list of options.
Step 3. To keep your Mac automatically up to date, check the box next to "Automatically keep my Mac up to date" in the System Preferences, Software Update section. This will allow your Mac to automatically download and install software updates, ensuring it stays secure and runs smoothly.
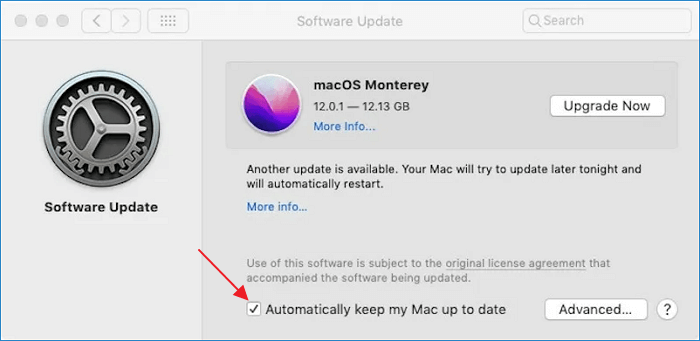
Note: To receive updates for apps, click the Advanced button and select the option "Install app updates from the App Store."
Disable Automatic Updates on Mac
To disable automatic updates on a Mac, simply untick the option. However, if you delve deeper into the "Advanced" settings, you'll find that enabling automatic updates actually enables five separate features, which may be worth considering.
- Check for updates
- Download new updates when available
- Install macOS updates
- Install app updates from the App Store
- Install system data files and security updates
On a Mac, users have the freedom to choose what they want to update automatically. They can opt to update the operating system or individual apps, by unchecking the relevant option, giving them control over the update process.

If you want to stop an in-progress updating on Mac, you can force quit the installation by pressing Command + Option + Esc, then select the "macOS Update" process and click "Force Quit". Additionally, you can disable macOS updates permanently by going to System Preferences > Software Update, then clicking on the "Advanced" button and unchecking the box that says "Automatically keep my Mac up to date". This will prevent your Mac from automatically updating in the future.
Stop macOS Installation in Progress
Step 1. Press and hold Command + Option + Esc.
Step 2. A Force Quit Application window will appear.
Step 3. Now click on Force Quit to stop the macOS installation.
Disable macOS Update Permanently
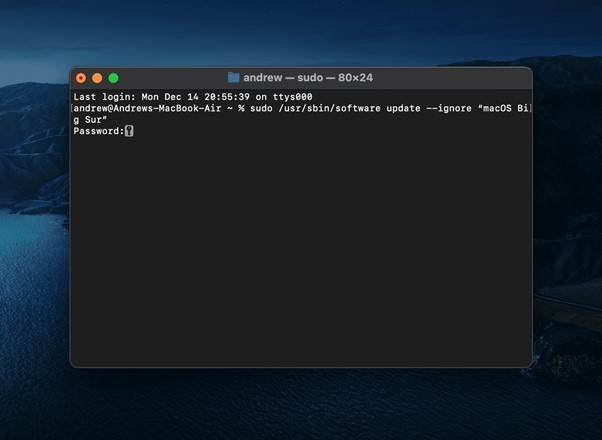
Step 1. To open the Terminal app, you can either press Command + Space to open Spotlight search, or search for Terminal through Spotlight search.
Step 2. Once the Terminal is opened, type `openssl rand -base64 512` and press Enter.
sudo /usr/sbin/softwareupdate --ignore"macOS [name of update]"
Step 3. Enter your Mac password and press the Enter key again.
Deep Data Recovery for Mac - No Data Loss after macOS Update
- Recover lost or deleted files, documents, photos, audio, music, and emails with ease, using effective recovery tools and techniques to retrieve valuable data that was thought to be gone forever.
- If you've lost files from a formatted external hard drive, emptied Trash, SD/memory card, flash drive, digital camera, or camcorder, there are still ways to recover them. You can use data recovery software like EaseUS Data Recovery Wizard, Recuva, or Disk Drill to scan the device and retrieve lost files.
- Support data recovery for sudden deletion, formatting, hard drive corruption, virus attack, system crash under different situations
Ⅳ. macOS Update vs. Clean Install: Should I Clean Install My Mac?
When considering an upgrade to macOS, users often debate whether to perform a clean install or directly update the operating system. Understanding the difference between these two options is essential. A clean install involves completely erasing the existing operating system and reinstalling a fresh copy, whereas a direct update involves installing the new version of macOS on top of the existing one. The choice between the two ultimately depends on individual preferences and needs.
- Clean install Installing macOS will erase all existing data and settings on your Mac, requiring a fresh start with a clean installation of the operating system.
- macOS update means directly upgrading from an older macOS to a newer version. This process does not harm your existing files, Apps, or system settings.
A clean install of macOS can resolve various issues, such as system slowdowns and glitches, but it requires a longer time and results in data loss. In contrast, macOS updates are quicker and do not involve data loss, but they consume more storage space than a clean install.
If your Mac is experiencing performance issues, it's recommended to make a full backup and then perform a clean install to resolve the problem. Alternatively, you can try updating your Mac through its Software Update feature, which can often resolve issues without the need for a full reinstall.
MacOS Update VS. Clean Install: Which One to Choose?
Deciding whether to upgrade or perform a clean install of your macOS can be a dilemma, especially when your OS starts to slow down over time. While upgrading can be a convenient option, it may not always be the best choice, and a clean install might be the way to go. In this guide, we'll explore the differences between the two options and help you decide which one is right for you.
We have introduced four ways to update macOS, but for users who prefer a clean install, we have a detailed guide on how to make a clean install on macOS from a USB drive. This method is ideal if you've already downloaded the installation file and don't want to wait for hours to resume the download.
Preparation:
- A 16GB or larger erasable USB flash drive.
- Admin privileges for the Mac.
- A backup, just in case something goes wrong.
Step 1. Download macOS
To create a macOS installation USB drive, download the installation files for the desired macOS version, such as macOS Monterey, from the provided links.
Step 2. Create the Bootable Installer
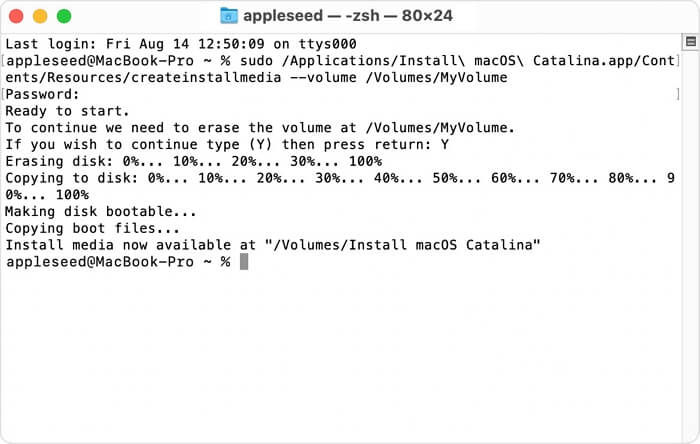
To install macOS Monterey on your Mac, connect your prepared USB drive and open Terminal. Then, copy and paste the command line specific to your macOS version (e.g. Monterey) into Terminal.
Monterey:
sudo /Applications/Install\ macOS\ Monterey.app/Contents/Resources/createinstallmedia --volume /Volumes/MyVolume
Note:To find the size of your USB flash drive, connect it to your computer, open Command Prompt as an administrator, and type the command "wmic diskdrive get model" to find the model name. Replace "MyVolume" in the command line with the model name, then type "wmic diskdrive where model="MyVolume" get size" to find the size.
After entering the command line, press Enter to start the process. The computer will then require your password, and the Terminal will warn that it will erase the drive. Press Y or Return to confirm and wait for the bootable drive to be prepared.
Step 3. Install macOS from the Bootable Installer
To complete the process, boot your Mac from the created bootable installer. The method to do this varies depending on your Mac's processor: if it's an Apple silicon-based Mac, follow one set of steps, and if it's an Intel processor-based Mac, follow another set of steps.
- Tip
- In Mac's "About this Mac", you could see whether your Mac is Apple Silicon or Intel processor.
| Intel Macs | Apple Silicon Macs |
|---|---|
|
|
|
|
LEARN MORE
To install macOS Monterey, you can follow the steps above for a clean install. However, if you're running an earlier version like Big Sur or Catalina, you can also update directly to the latest version. For a more comprehensive guide on clean installing macOS from USB, you can click here to get more information.
Ⅴ. macOS Update Troubleshooting
macOS updates can sometimes go awry, with common issues including getting stuck in a process or displaying error messages, such as installation failure or disk compatibility issues.
The update error message indicates that the upgrading failed at a particular point in time due to some reasons. To troubleshoot, try restarting your Mac, checking for corrupted system files, running a disk cleanup, and ensuring your internet connection is stable. If the issue persists, consider resetting the System Management Controller, running a System Report, or seeking further assistance from Apple Support.
1. Restart your Mac and try again
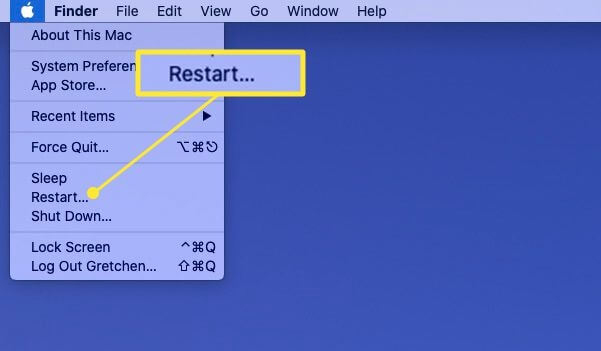
To resolve the issue, restart your Mac by clicking the Apple icon on the menu bar and selecting "Restart". After rebooting, try clicking the "Upgrade Now" button from Software Update again to see if it works.
2. Check Free Storage Space
The success of a macOS update depends on having enough free space on the disk, with at least 50GB of available space required for a smooth upgrade.
To check free space on your Mac:
To view storage information on a Mac, click the Apple icon on the menu bar and select "About this Mac". Then, switch to the "Storage" tab on the opening window.

What Is the Other in My Mac Storage
The "Other" storage on a Mac is a catch-all category that includes various types of data, such as system logs, cache files, and other temporary files. These files are created by various system processes and apps, but are not always immediately visible or easily removable. To free up space, you can try deleting system logs, emptying the cache, and removing other temporary files. You can also use the "Storage" tab in the About This Mac window to see which apps are using the most space and consider uninstalling any unnecessary ones. Additionally, you can use the "Optimize Storage" feature to automatically remove unnecessary files and free up space. By following these steps, you can help reduce the size of the "Other" storage category and free up space on your Mac.

3. Reset the Time and Date Settings
A wrong system time and date can prevent your system from connecting to the Apple server. To resolve this issue, you can try resetting your system time and date to the correct settings. This should allow your system to reconnect to the Apple server.
To set the date and time automatically, go to System Preferences > Date & Time, select your time zone, and check the box next to "Set date and time automatically".
4. Update macOS in Recovery Mode
Step 1. To restart your Mac device, press the power button or select "Restart" from the Apple logo in the menu bar.
Step 2. Hold the Command and R keys together while the computer is rebooting, until the Apple logo appears, then release them.
Step 3. In the macOS Utilities window, select Reinstall macOS, click Continue, and follow the onscreen instructions.

5. Clean Install macOS
If a clean install of macOS is needed, it will erase all existing files, data, apps, and settings on your Mac, so it's essential to back up the whole Mac before updating.
To clean install macOS, refer to Part 4 of the guide, which provides step-by-step instructions on how to do so.
LEARN MORE
If your macOS installation fails due to a disk error, you can try running the installer in verbose mode, checking the disk for errors, and then attempting the installation again. If the issue persists, you may need to erase the disk and start over. Additionally, if you're experiencing issues with the installation process, you can try running the installer from a different disk or using a different installation method. If you're still having trouble, you may want to consider seeking further assistance or contacting Apple support for more specific guidance.
News about macOS Ventura - 2022 Latest macOS
macOS Ventura, the next generation of macOS, was announced on June 6th, 2022, and is expected to arrive in late October 2022. The new operating system will only be compatible with Macs from 2017 and later, and Apple has already seeded the second beta of macOS 13 for developers to try out, although a public release is not yet available.
Features of macOS Ventura
Stage Manager: The AI-powered tool automatically organizes open apps and windows so users can focus on their work and see everything in a single glance, reducing visual clutter and increasing productivity.
Continuity Camera: You can use your iPhone as a webcam for your Mac, allowing you to access iPhone-exclusive camera features like Portrait Mode, Center Stage, and Studio Light.
Handoff comes to FaceTime: This feature allows you to start FaceTime on one Apple device and transfer it to another Apple device nearby, such as a Mac.
9to5mac is a technology news website that provides in-depth coverage of Apple products and services. The website is known for its detailed analysis and hands-on reviews of Apple's operating systems, including macOS Ventura.macOS 13 Ventura: New features, compatibility, release date.
Related Articles
- Word Recovery for Unsaved, Deleted, and Corrupted Word Documents [Professional Guide]
- (July 2022) Ultimate Guide to Mac Time Machine Backup
- Windows Repair Tools and Services [Windows 10/11]
- Ultimate Guide on SD Card Recovery in 2022