3 Methods: Recover Unsaved or Lost Excel File on Mac
Overview of Recover Unsaved Excel on Mac
If you've lost an unsaved Excel file on your Mac, don't panic! There are three reliable methods to help you recover it. If you've accidentally deleted the file or it was lost due to a software glitch, you can try using one of the methods listed on this page to bring your lost Excel file back.
| Workable Solutions | Step-by-step Troubleshooting |
|---|---|
| Method 1. Recover TMP Folder | Go to "Applications" > "Utilities" > "Terminal" > Type $TMPDIR and hit Return...Full steps |
| Method 2. Recover from AutoSave | Go to "Applications" >" Utilities" > "Terminal" > Type "defaults write com.apple.Finder..."...Full steps |
| Method 3. Use Recovery Software | To recover deleted or lost Excel files, run Qiling file recovery software, scan the device, and retrieve the desired files.Full steps |
Excel files can be lost due to various reasons such as program crashes, unexpected Mac shutdowns, accidental deletions, hard drive formatting, or virus attacks. If the files are unsaved, solutions in Part 1 can help recover them. However, if the files are permanently deleted or saved documents are lost due to other reasons, using professional and free data recovery software like Qiling Data Recovery for Mac (recommended in Part 2) may be the only way to retrieve them.
Part 1. How to Recover Unsaved Excel File on Mac
If you've ever encountered an issue where Excel suddenly freezes and fails to respond on your Mac, you know the frustration of losing unsaved work. Whether it's due to a program crash or an unexpected Mac shutdown, the result is the same: hours of work lost. However, all hope is not lost, as there are ways to recover Excel files not saved on Mac.
Method 1. Restore Unsaved Excel File from the Temporary Folder
To restore an unsaved Excel file on a Mac, follow these steps: navigate to the Temporary or Temp folder, which can usually be found in the user's Library > Caches > com.microsoft.
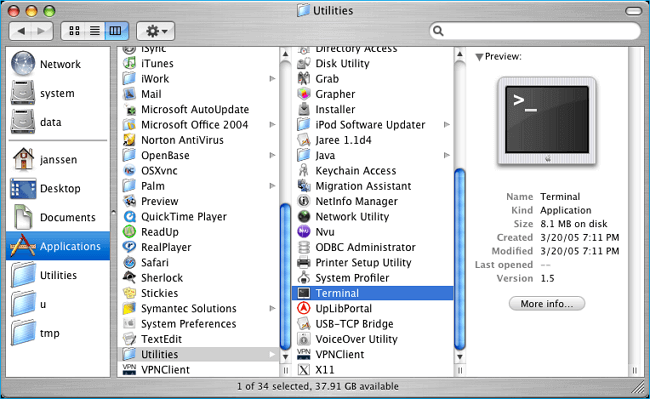
1. Go to "Applications" > "Utilities" > "Terminal".

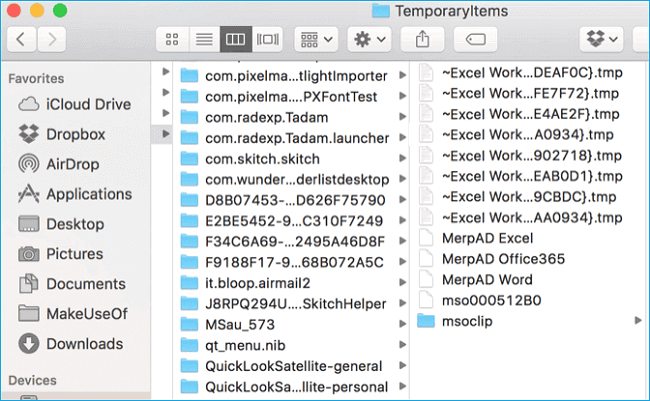
2. Open the Temporary files folder by typing open $TMPDIR and pressing "Return", then select the "TemporaryItems" folder within it.
3. Find the unsaved Excel file under "TemporaryItems" and restore.

Method 2. Recover Lost or Unsaved Excel File from AutoSave on Mac
Excel offers useful features such as AutoSave and AutoRecover to safeguard your files in case of an unexpected event, like a program crash or accidental closure, on both Windows and Mac platforms.
- It automatically saves a new Excel document that has been created but not saved yet, preventing data loss in case of a system crash or unexpected shutdown.
- AutoRecover is a feature in Excel for Mac that helps users recover unsaved files. It periodically saves a backup of the file being worked on, allowing users to retrieve the file if they accidentally close Excel without saving or experience a system crash.
If both AutoRecovery and AutoSave are enabled in Excel on a Mac, you can likely recover an unsaved file from Excel 2016 to 2010. The AutoRecovery file is usually hidden, so you'll need to make it visible to recover the unsaved file.
1. Go to "Applications" >" Utilities" > "Terminal".

2. To make all items visible in the Finder, type `defaults write com.apple.Finder AppleShowAllFiles true` into Terminal and press "Return".
3. Click "Finder" > press "Return" on your Mac.
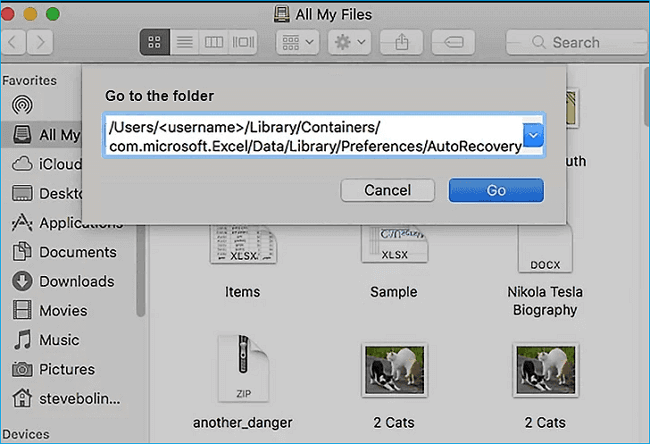
4. Type /Users/username/Library/Containers/com.microsoft.Excel/Data/Library/Preferences/AutoRecovery and click "Go" to open Excel's AutoRecovery folder.

5. To recover unsaved spreadsheet files on a Mac, first, locate the file in the "AutoRecover" folder within the application's support folder, typically found in the user's Library folder. The file name will be preceded by "AutoRecover" and the date and time it was last saved. Copy the file to a safe location, such as the desktop or documents folder, and rename it to its original name. This will recover the unsaved spreadsheet file.

Method 3. Recover Lost or Unsaved Excel File with Qiling
Now Qiling Data Recovery for Mac To recover unsaved Excel files, download software that supports you in this process. Follow a 3-step guide to complete the recovery, which can be initiated by downloading the software and starting the process.
Step 1. Launch Deep Data Recovery for Mac, select the desired file types, and click "Next" to initiate the recovery process.

Step 2. To recover unsaved files, hover the mouse over the device where the file was last saved, and click "Scan" to initiate a file recovery process. This will scan the device for any recoverable files, including unsaved documents.

Step 3. After the scan, click "Type" and expand "Unsaved Documents". Then, select the exact file type you lost without saving, such as Word, Excel, Powerpoint, Keynote, Pages, or Numbers.

Step 4. Double-click to preview your unsaved file, then select the right version and click "Recover" to save the file to a secure location on Mac.
Part 2. How to Restore Deleted/Lost Excel File on Mac in 3 Steps
If you accidentally deleted an Excel file, you can try using the "Recover Unsaved Workbooks" feature or the "File Recovery" tool to get it back. However, these methods won't help if the file was lost due to a system crash, hard drive formatting, or storage device corruption. In such cases, you can use Qiling Mac File Recovery Freeware, a data recovery tool that can recover Office documents, emails, photos, and other types of files.
Now, install it and follow the following tips to restore deleted or lost Excel files on Mac in 3 simple steps.
Step 1. Launch Deep Data Recovery for Mac, select the desired file types, and click "Next" to initiate the recovery process.

Step 2. To recover your lost Excel files, go to the location where they were stored, click the "Scan" button, and start the recovery process.

Step 3. Deep Data Recovery for Mac starts a quick scan and a deep scan on the selected disk volume, displaying the scanning results in the left pane.

Step 4. To recover your lost Excel files, select them by path and type, and then click the "Recover Now" button to get them back immediately.
You can use this Mac data recovery software to recover a lost Excel file, and once recovered, you can continue working with the file again. This software can also be used to restore deleted photos, music, videos, and other data on Mac for free.
Related Articles
- What is Other on Mac Storage? Clear Other Storage Without Deleting Wrong Data
- How to Recover Data on macOS High Sierra (10.13)
- Top 5 Best Mac Data Recovery Software in 2022
- 6 Best Free Disk Drill Alternatives for Mac Data Recovery in 2022