[Solved] Antimalware Service Executable High Disk Usage Windows 11/10 2022
If you're experiencing high disk usage from the Antimalware Service Executable on Windows 11/10, you're not alone, as many users have encountered this issue.
This article covers everything you need to know about the Antimalware Service Executable and how to resolve the issue of high CPU usage by this service.
At the end of this article, we recommend a free partition management tool to help you easily create, resize, clone, move, merge, and format partitions to improve computer performance.
| Workable Solutions | Step-by-step Troubleshooting |
|---|---|
| Fix 1. Disable Real-Time Protection | Turn off the real-To solve the Antimalware Service Executable high CPU usage issue, you can try the following one-time protection to disable the Windows Defender service: Press the Windows key + R to open the Run dialog, type "services.msc" and press Enter. In the Services window, find the "Windows Defender" service, right-click on it and select "Stop" to disable it. Alternatively, you can also use the Task Manager to disable the service by right-clicking on the Antimalware Service Executable process and selecting "End task" or "Open file location" to disable the service.Full steps |
| Fix 2. Change Windows Defender's Scheduling Options | To resolve the Antimalware Service Executable issue, you can try rewriting Windows Defender's schedule by following these steps. This may help resolve the problem.Full steps |
| Fix 3. Add Antimalware Service Executable to Exclusion List | Press the Windows logo key + I at the same time to open the Settings window, then click "Update & security".Full steps |
| Fix 4. Disable Windows Defender | You wanted me to rewrite the text in one paragraph shortly. Here it is:regedit and click "OK"...Full steps |
| Fix 5. Update All Device Drivers | You can also try to fix Antimalware Service Executable high CPU issue by updating all your device drivers to their latest versions, as outdated drivers can cause compatibility issues and high CPU usage.Full steps |
Antimalware Service Executable High CPU/Disk/Memory Usage
The Antimalware Service Executable (Msmpeng.exe) process is part of Windows Defender, a built-in antivirus feature in Windows 11/10, and can be found on the Details tab in the Task Manager.

Antimalware Service Executable runs in real-time, scanning files for malware and performing background system scans to detect and remove dangerous software, and also updates antivirus definitions.
Antimalware Service Executable consumes high CPU, disk, memory, RAM, and network bandwidth, draining computer resources, especially after Windows updates.
Windows 10 Free Partition Manager
Qiling Partition Master Free is a user-friendly disk management tool that allows both beginners and experts to easily manage partitions and extend their capabilities.

5 Ways to Fix Antimalware Service Executable High Disk Usage
If the Antimalware Service Executable process is taking up a high CPU on your Windows 10, there are several easy solutions to fix the problem. One possible cause is a corrupted or outdated Windows Defender, which can be resolved by running the Windows Defender Troubleshooter or updating it to the latest version. Another solution is to disable the Windows Defender Firewall, which can sometimes cause the Antimalware Service Executable process to consume high CPU resources. Additionally, you can try restarting your Windows 10 in Safe Mode to see if the issue persists, and if so, it may indicate a malware or virus issue that needs to be addressed.
Fix 1. Disable Real-Time Protection
The Antimalware Service Executable causes high disk usage due to its real-time scanning feature, which constantly scans the computer and consumes significant CPU and memory resources.
The most probable fix to the Antimalware Service Executable high CPU issue is to temporarily turn off the real-time protection, which would leave your computer vulnerable, but would resolve the high CPU issue.
Step 1. Click the "Start menu > Settings > Update & security".
Step 2. Select "Windows security > Virus & threat protection > Manage settings".
Step 3. Switch the "Real-time protection" setting to Off.

Fix 2. Change Windows Defender's Scheduling Options
Change Windows Defender's schedule is an effective way because the real-time protection feature mainly causes the error. Follow the details below and fix the Antimalware Service Executable high disk usage issue.
Step 1. To open the Task Scheduler, press the Windows key + R at the same time to invoke the Run box, then type taskschd.msc and press Enter.
Step 2. Double-click on "Task Scheduler Library" > "Microsoft" > "Windows".
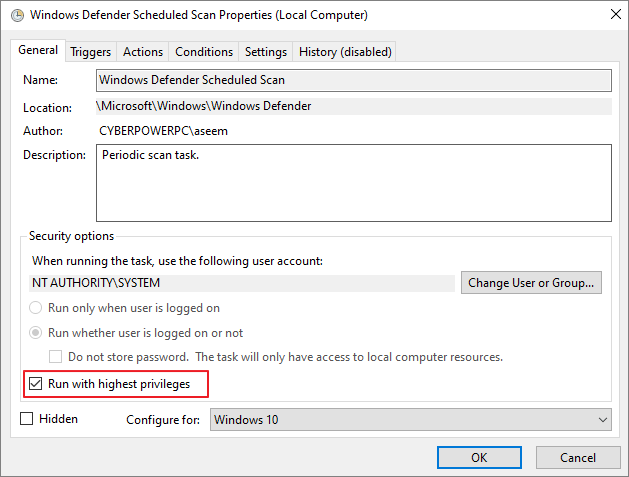
Step 3. Windows Defender is a built-in security software in Windows that provides real-time protection against malware, viruses, and other online threats. It scans the computer and its files for any potential security risks, and can also be configured to perform scheduled scans at specific times or intervals. To access the scheduled scan feature, users can find and expand the "Windows Defender" section in the Windows Settings, and then double-click on "Windows Defender Scheduled Scan" to configure the scan settings.

Step 4. Uncheck "Run with highest privileges" on the property window.

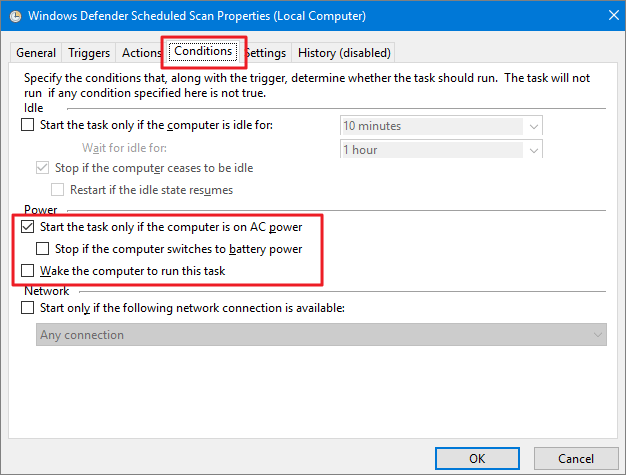
Step 5. To reset the conditions, uncheck all the items in the "Conditions" section and then click "OK".

If you're experiencing issues with your computer, try restarting it. If that doesn't work, try updating your operating system and any installed software. If you're still having trouble, try running a virus scan to check for any malware.
Fix 3. Add Antimalware Service Executable to Windows Defender's Exclusion List
Step 1. To open the Settings window, press the Windows logo key + I at the same time, then click on "Update & security".
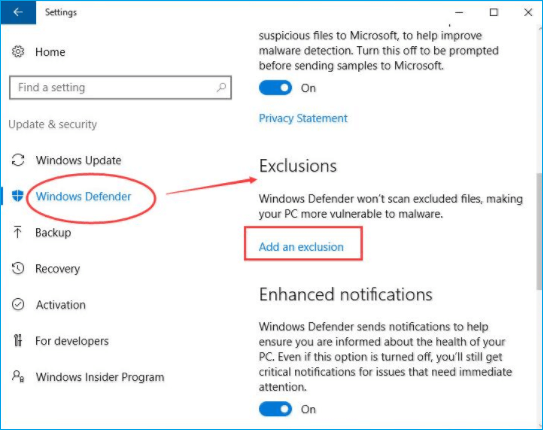
Step 2. Click "Windows Defender". Then click "Add an exclusion" in Exclusions.

Step 3. Click "Exclude a .exe, .com or .scr process".

Step 4. Type MsMpEng.exe. Then click "OK".

Fix 4. Disable Windows Defender in Registry
When Windows Defender becomes overworked and causes high CPU usage, disabling it can resolve the issue with the Antimalware Service Executable.
Step 1. To open the Run dialog box, press the Windows key + R on your keyboard. This will open a small window where you can type a command or path to open a specific application, file, or folder.
Step 2. To open the Registry Editor, go to the Run Dialog Box, type regedit, and click "OK".
Step 3. To navigate to HKEY_LOCAL_MACHINE\SOFTWARE\Policies\Microsoft\Windows Defender, double-click the folders in the navigation pane on the left until you reach this location.
Step 4. If you find a registry entry named DisableAntiSpyware, double-click it and set its value data to 1.

Note:If the registry entry named DisableAntiSpyware does not exist, create a new DWORD (32 bit) value in the main Registry Editor pane, name it DisableAntiSpyware, and set its value data to 1.
Fix 5. Update all Available Device Drivers
If your Windows 10 is still running slow after trying the previous suggestions, updating all available device drivers to the latest versions can also help keep your computer running stable and quickly.
To manually update your device drivers, visit the manufacturer's website and search for the exact device's most recent correct driver, ensuring it's compatible with your Windows system version.
Run Your Computer Without Antimalware Service Executable High CUP Issue
Windows Defender, a free and valuable tool, can protect your computer from virus attacks, but it can also consume CPU resources. By following the methods outlined in this article, you can resolve the Antimalware Service Executable high disk usage issue and maintain your computer's full speed.
Bonus Tip: How to Partition Hard Drives on Windows 11/10/8/7 for Free
When using a computer, it's ideal to have it run at its best. Disk management is a key way to boost system performance. Qiling Partition Master Free allows for effortless hard drive partitioning and maximizes disk space usage. It also offers other one-stop partition and disk management solutions for Windows 11/10/8/7.
- The software allows for various partition management tasks, including resizing and moving partitions, creating, formatting, deleting, and merging partitions. The Pro version even enables direct space transfer between drives, such as moving space from the D drive to the C drive.
- The hard drive should be completely wiped clean of all data to prevent any confidential information from being leaked or recovered.
Download and install MiniTool Partition Wizard, a powerful partition manager that supports resizing and moving partitions without losing data.
Step 1: Locate the drive/partition
Select the drive/partition you want to adjust its size and choose "Resize/Move".

Step 2: Resize or move the partition
1.To shrink the partition, simply drag one of its ends to free up unallocated space. Once done, click "Proceed".

2. To extend the partition, ensure there is unallocated space available. If not, create some. Then, drag the mouse into the unallocated space and click "Proceed".
3. To move a partition, you need to have unallocated space next to the target partition. If there isn't any, you'll need to free up some space first.
To resize a partition, click on the target partition, select the "Resize/Move" option, and then drag the partition left or right to adjust its position. Once you've made the desired adjustments, click "Proceed" to confirm the changes.
Read More About Antimalware Service Executable High CPU
Here are the top 5 frequently asked questions related to the antimalware service executable high disk usage issue, summarized in one paragraph:
Why is antimalware service executable using so much?
The Antimalware service executable is consuming high disk and CPU resources due to its real-time scanning feature, which constantly checks downloaded files, software, and applications for potential threats, leading to high memory and CPU usage.
Can I end the antimalware service executable?
If you're experiencing high CPU usage, disk, and memory usage issues on your Windows due to the Antimalware Service Executable, you can try turning off the real-time protection to resolve the problem.
Disabling Windows Defender and the Antimalware Service Executable can leave your computer unprotected and vulnerable to viruses. This is not a recommended course of action, as it can allow malicious software to easily infect your system.
How do I disable antimalware service executable from disk?
- To access the Task Scheduler, type "Task Scheduler" in the Search bar and click to expand the "Task Scheduler Library > Microsoft > Windows" option.
- To schedule a scan with Windows Defender, click on "Windows Defender" in Windows, then double-click on "Windows Defender Scheduled Scan".
- Uncheck "Run with highest privileges".
- Uncheck all the items in the Conditions section and click "OK".
Why is my disk usage at 100?
High disk usage is often a sign of an underlying issue. To troubleshoot, open the Task Manager in Windows 10, where you'll find a quick overview of CPU, memory, disk, and network utilization on the main process tab.
To fix Windows 10 100% disk usage issue, you can:
- Restart your system
- Check anti-virus software
- Update windows 10
- Check disk error
- Stop the superfetch service
- Clean up junk files and running memory
- Reset virtual memory and increase the ram
- Perform a clean boot on windows 10
- Upgrade the hard drive to a larger one
Related Articles
- How to Merge C and D Drive in Windows 11/10 Without Losing Data - Qiling
- D Drive Not Showing Up in Windows 10/11 | 4 Methods to Fix
- The Pros and Cons of Partitioning Hard Drive | Why Partition A Hard Drive
- [2022 Tips] How to Remove Ubuntu from Dual Boot