What Is Disk Management and Its Features? Your Windows 11 Guide
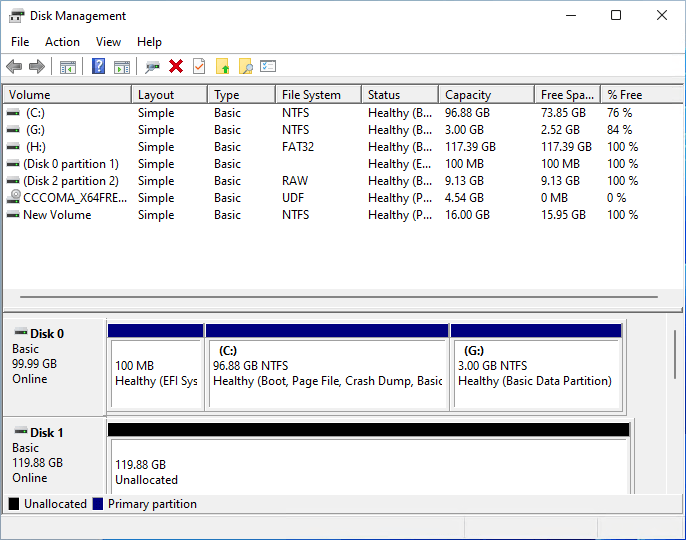
Disk Management is a tool in Windows that allows users to partition hard drives and perform basic partition management operations.
While Disk Management is a powerful tool for managing disk space and storage, many users are unaware of its full features and benefits. However, with its ability to create, delete, format, and resize partitions, as well as perform disk checks and conversions, it offers a range of functionalities that make it a valuable asset. Despite its capabilities, users may find alternative tools that are easier to use and replace Disk Management, but for those who need its features, it remains a reliable and essential tool.
| Workable Solutions | Step-by-step Troubleshooting |
|---|---|
| 1. Features of Disk Management | Create new simple volumes, Extend or shrink volumes, Delete volumes...Full steps |
| 2. Open Disk Management in Windows 11 | Open Disk Management Using Quick Access or Power User Menu...Full steps |
| 3. Use Disk Management in Windows 11 | Guide 1: How to Partition Hard Drive in Disk Management...Full steps |
| 4. Disk Management Alternative | Qiling Partition Master is a user-friendly software that simplifies the process of partitioning a hard drive in Windows, making it easier for users to manage their disk space and optimize their computer's performance.Full steps |
What Is Disk Management - Explanation

Definition: Microsoft's Disk Management utility allows users to perform advanced storage tasks in Windows, including setting up a new drive, extending volume, shrinking a partition, and changing drive letters or assigning a new drive letter on a target disk.
Supported OS: Disk Management is a feature available in most versions of Windows operating systems, including Windows 11, 10, 8, 7, and all Windows Server systems, allowing users to manage and configure their hard drive storage.
The Disk Management tool offers various benefits and functions beyond the operations mentioned, such as creating, deleting, and formatting partitions, as well as converting between different partition types. It also allows for disk mirroring, disk stripping, and disk spanning, providing redundancy and flexibility in data storage. Additionally, Disk Management enables users to configure and manage disk quotas, which can help prevent disk space overuse and ensure fair usage among users.
What Are the Benefits of Disk Management - Features
The Disk Management tool in Windows allows you to perform various tasks, including creating, deleting, and formatting partitions; extending or shrinking volumes; and converting dynamic disks to basic disks. It also enables you to initialize disks, create and manage RAID configurations, and check for bad sectors on a disk. Additionally, you can use Disk Management to assign drive letters, change drive labels, and change the disk type from basic to dynamic or vice versa.
| Basic Disk Management Features | Advanced Disk Management Features |
|---|---|
|
|
You can perform various operations on a local hard drive, including creating, formatting, and deleting volumes, as well as extending or shrinking partitions, using Disk Management on your computer.
- Warning
- Formatting volumes and performing advanced operations in Disk Management can lead to data loss, so it's essential to back up all data before making any changes to your disks using this tool.
- Qiling Partition Master is a reliable disk manager that offers a range of features for safe and efficient disk management. It allows users to create, delete, and resize partitions, as well as migrate operating systems and clone disks.
To open Disk Management and partition your disk drives in Windows 11 or older computers, follow these steps: Press the Windows key + X and select Disk Management from the menu. Alternatively, you can search for Disk Management in the Start menu. Once open, select the disk drive you want to partition and click on the "New" button to create a new partition.
How to Open Disk Management in Windows 11
Here are the ways to open Disk Management in Windows 11 or older computers:
#1. Open Disk Management Using Quick Access or Power User Menu
Right-To access the Disk Management tool on a Windows computer, click the Start icon or press the "Windows + X" keys to open the Quick Access menu, and then select "Disk Management".

#2. Open Disk Management Using Search Menu
To open Disk Management, press the "Windows + S" keys to launch the "Search" menu, type "Create and format hard disk partitions", and click the search result to open Disk Management.

#3. Open Disk Management Using Run Dialog
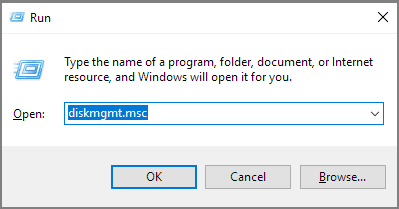
To open Disk Management, press the Windows key + R to open the Run dialog, type diskmgmt.msc, and click OK. This will open the Disk Management window, where you can view and manage your computer's disks.

#4. Open Disk Management Using PowerShell or Command Prompt
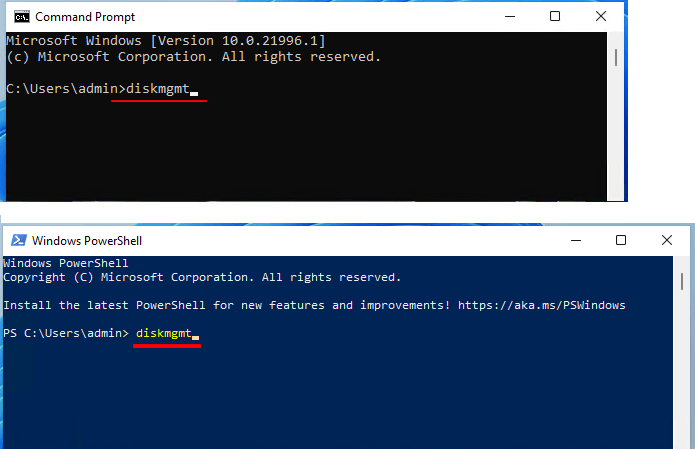
Right-To access the Disk Management tool, click the Start icon and select "PowerShell" or type "cmd" in the search box, then right-click Command Prompt and select "Run as administrator". Alternatively, you can type "diskmgmt" and hit Enter in the command window.

#5. Open Disk Management Using Computer Management
Right-To access Disk Management, click the Start icon and select "Computer Management" from the result, then expand the "Storage" section and click "Disk Management" to open it.

#6. Open Disk Management Using Control Panel
To access the "Create and format hard disk partitions" feature, type "Control Panel" in the Search menu, click "Control Panel" from the result, and then click "System and Security". Under Windows Tools, click on "Create and format hard disk partitions" or search for it directly in Control Panel to open it.

To partition and manage hard drives on your computer using Disk Management, follow this guide. With Disk Management, you can make the most of your computer's drive space for free.
How to Use Disk Management in Windows 11 - Tutorials
To use Disk Management in Windows 11, open the Start menu, type "Disk Management" in the search bar, and click on the result. In the Disk Management window, you can see a list of all connected disks, including internal hard drives, external drives, and USB drives.
- #1. Partition a drive - create a new volume
- #2. Format a drive
- #3. Extend or shrink a drive
- #4. Change drive letter
- #5. Delete a partition
- #6. Initialize a new disk
- #7. Convert basic to dynamic
- #8. Convert MBR to GPT, or convert GPT to MBR
Let's see the details.
#1. How to Partition Hard Drive in Disk Management
- Open Disk Management, right-click the unallocated space, and select "New Simple Volume...".
- After clicking "Next" in the Disk Management console, set the volume size by dragging the slider to the desired size. Then, assign a new drive letter by selecting it from the dropdown menu.
- Set the file system, volume label, and select "Perform a quick format" before clicking "Next".
- Click "Finish".

#2. Format a Drive in Disk Management
Open Disk Management > Right-To format a volume, select it and click on "Format..." from the context menu. Then, set the volume label, file system, and check the box for "Perform a quick format" to speed up the process.

#3. Shrink or extend a drive in Disk Management
To shrink a volume, go to Disk Management, right-click on a partition with free space, select "Shrink Volume...", enter the desired size to shrink, and click "Shrink".

To extend the volume of a target drive with unallocated space adjacent, follow these steps: In Disk Management, right-click the target drive and select "Extend Volume". Then, click "Next" and adjust the space to be used for the extension by clicking "Next" again.

#4. Change Drive Letter in Disk Management
- Open Disk Management > Right-To change the drive letter of a partition, click on the partition you want to modify and select "Change drive letter and its path..." from the context menu.
- To change the drive letter for a drive, select the drive in the list, click on the "Change" button, select a new drive letter from the dropdown menu, and click "OK" to confirm the change.

#5. Delete a Partition in Disk Management
- Open Disk Management > Right-To delete a partition, click on the partition you want to delete and select "Delete Volume...".
- Click "OK" to confirm.

If you're looking to delete all partitions on an HDD or SSD in Windows 10, 8, or 7, you have three methods to try. These methods allow you to remove all partitions on your own, providing an easy way to start fresh with your storage device.

#6. Initialize a New Disk in Disk Management
- To connect the new disk to the computer, plug in the SATA and power cables. Then, open Disk Management to locate the new disk.
- Right-click on the new disk and select "Initialize Disk".
- Set the partition style as MBR or GPT.
- 1. The MBR can create up to 4 partitions on a disk that is 2TB or smaller in size.
- 2. Create a 4th partition on a 3TB or bigger disk by using a partition manager like EaseUS Partition Master.

#7. Convert Basic to Dynamic in Disk Management
Open Disk Management > Right-To convert a basic disk to a dynamic disk, click on the disk you want to convert, then select "Convert to Dynamic Disk" from the context menu.

Disk Management can only convert a basic disk to dynamic, but if you need to switch a dynamic disk to basic, you can follow the instructions found here to do so without losing any data.
#8. Convert MBR to GPT, or convert GPT to MBR
Converting MBR to GPT or GPT to MPT requires partition deletion, which is done through Disk Management. It's crucial to back up all important data before proceeding with these operations.
- Open Disk Management > Right-On the target drive, click on the partition that contains the Windows installation, click the "Delete" button, and then click "Yes" to confirm. This will delete the partition and free up space on the drive.
- Repeat the operation to delete all partitions.
- Right-To change the disk type from MBR to GPT or vice versa, click on the target disk in the Disk Management utility and select the option to convert it to either a GPT or MBR disk.

If you need to convert from MBR to GPT or vice versa, you can try the following lossless solutions:
- Convert MBR to GPT without Data Loss;
- Convert GPT to MBR without Data Loss.
Disk Management Alternative in Windows 11
Apart from Disk Management, there are alternative tools in Windows 11 that allow computer beginners to easily manage hard disk partitions. These tools provide a convenient way to perform various disk-related tasks, making it simpler for users to manage their hard disk partitions.
If you're looking for an alternative to Windows Disk Management for partitioning your hard drive in Windows 11/10, Qiling Partition Master is a great option. It's a user-friendly tool that can help you manage your hard drive partitions with ease.
Aside from the above-Qiling Partition Master offers a range of features, including disk partition management, data recovery, and disk cleanup. It allows users to resize, split, merge, and convert partitions, as well as create, delete, and format partitions. The software also provides a bootable media creator, which enables users to create a bootable USB drive or CD/DVD that can be used to boot up a computer in case of an operating system failure.
- Clone the old drive and replace it with a newer, bigger HDD or SSD. This process involves creating an exact copy of the old drive's data and then transferring it to the new drive, ensuring that all files, programs, and settings are preserved.
- Migrate OS to HDD/SSD without reinstallation.
- Convert MBR to GPT, GPT to MBR without data loss.
- Merge adjacent or non-adjacent partitions.
- Split partitions, adjust new disk layout in 1-click.
- Fix low disk space error in 1-click.
- 4K align SSD.
Tutorial: Partition and Manage Disks with Qiling Partition Master
The "Resize/Move" feature allows you to adjust the size of a selected disk partition as desired, enabling you to shrink a volume, extend another one, or create unallocated space for specific use.
The "Clone" feature is used to create an exact copy of a hard disk or partition, duplicating its layout and content, making it useful for tasks such as upgrading a hard disk, replacing a failing one, or backing up drive data.
"Delete" is a method to remove an unwanted disk partition, turning it into unallocated space.
Formatting a drive partition can alter the file system, fix corruption issues, and sometimes remove viruses and malware, allowing for a fresh start.
Allocating space from a larger drive partition to a smaller one can be helpful when the smaller partition runs out of space, making it useful for managing disk space.
The "Migrate OS" feature allows users to transfer a Windows installation from one drive to another without having to reinstall Windows, making it a convenient option for upgrading or replacing a hard drive.
Qiling Partition Master users are increasingly converting between GPT and MBR, as well as between NTFS and FAT32, and from Basic to Dynamic, taking advantage of the program's benefits and exploring its additional features.
Using Disk Management to Partition Hard Drive Is Easy, Go and Try Now
This page provides an overview of Disk Management, including its basic and advanced features, and offers guidelines on how to open and use the tool to manage hard drives in Windows 11.
The operating steps of Disk Management in older operating systems like Windows 10/8.1/8/7 are almost the same, allowing you to follow the same tips to manage a hard drive on your PC.
If you prefer a more efficient tool to replace Disk Management, consider using Qiling Partition Master for a more streamlined experience.
Related Articles
- How to Partition SD Card for Android
- Windows 11 Download Without TPM 2.0 [Windows 11 Installation Guide]
- Diskpart Has Encountered an Error Access Is Denied | How to Fix
- How to Format Hard Drive Windows Server