Fix "We could not complete the Updates/Undoing changes" Error Windows 11
If you're experiencing the "We couldn't complete the Updates/Undoing changes" error on your Windows PC, it's likely due to a corrupt system file or low storage space on the System drive. To resolve this issue, you can use various tools such as Qiling Partition Master to increase the storage space, thereby resolving the problem.
| Workable Solutions | Step-by-step Troubleshooting |
|---|---|
| 1. Apply system restore | To boot your PC, insert the Windows installation media, such as a CD or DVD, or create a bootable USB drive using the Windows media creation tool. Then, restart your PC and enter the BIOS settings by pressing the designated key (usually F2, F12, or Del). In the BIOS settings, set the boot order to prioritize the Windows installation media or USB drive. Save the changes and exit the BIOS settings.Full steps |
| 2. Fix Problem by Startup Repair | To access the Settings app on Windows, press the Win + I keys simultaneously, which will open the Settings app. From there, navigate to the System section.Full steps |
| 3. Run System File Checker | To open the Windows Terminal, use the shortcut Win + X to open the Power menu, and then select Windows Terminal from the list of available options.Full steps |
The Culprit of "We couldn't complete the updates undoing changes"
If you're experiencing a "We couldn't complete the updates undoing changes" error on your Windows 11 or Windows 10 PC, there are seven methods that can resolve the issue. This error typically occurs when Windows updates fail to install or after the first restart post-installation. To resolve the issue, you can try one of the seven methods, which can help you get back to normal operation.
This error occurs due to insufficient free disk space, interrupted updates, or corrupted files, causing frustration for many users. To resolve the issue, you can try various methods such as checking available disk space, restarting the update process, or running a System File Checker to repair corrupted files. These techniques can help you fix the "We couldn't complete the updates undoing changes" problem and get your system back to normal.
1. Apply system restore

System restore is an in-1. Open the Start menu and select Settings. 2. Click on Update & Security.
Note:If you can't boot into your PC, use the Advanced Recovery method. If you can, search for System Restore in the Start menu and launch the wizard.
Cannot log in to your Account
Step 1: Boot your PC using Windows installation media or a bootable USB Drive. Once the Windows recovery section appears, click on Troubleshooting > Advanced options.
Step 2: To use System Restore, go to the Advanced options menu and click on System Restore. You will be prompted to enter the recovery key, but you can skip it or enter your account password. Clicking Next will then open a pop-up window.
Step 3: If there are multiple restore points available, including the automatic one and any manually created ones, select the desired restore point and click Next.
Step 4. To restore your PC, select a restore point from the list, then click the Next button. Confirm your choice by clicking the Finish button, and your PC will be restored to an earlier date when everything was working.
Can log in to your account
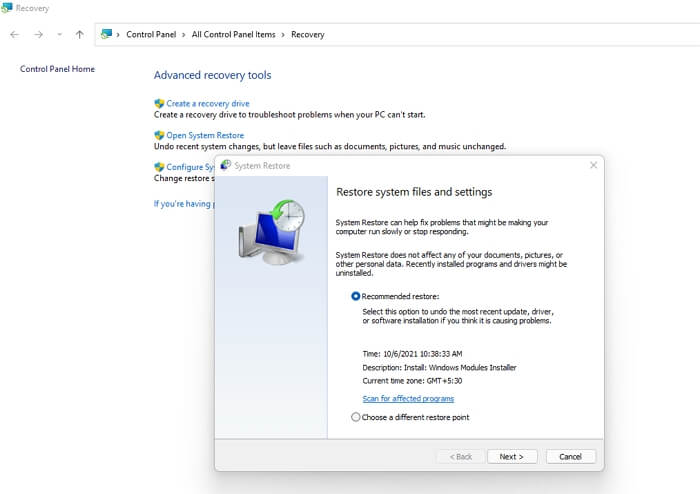
Step 1: To restore your system, press the Start menu and type System Restore. Once it appears in the list, click on Recovery.
Step 2: To restore the system, click on the Open System Restore link, which will then prompt you to choose between a recommended restore point or select a different one.
Step 3: To resolve the issue, you can try the following steps: First, restart the PC in safe mode to isolate the problem. If it boots normally, it could be a software issue. If it doesn't, it might be a hardware problem.
2. Fix Problem by Startup Repair

Startup Repair is a Windows tool that helps diagnose and repair issues with the operating system, allowing you to log in and resolve problems with corrupted or missing system files.
Corrupted system files may cause the error "We couldn't complete the updates undoing changes". To resolve this issue, you can run a Startup Repair by following the given steps, which can help resolve the problem.
Step 1: To access the Windows Recovery Environment, open the Settings app (Win + I) and navigate to the System section, then select the Recovery tab. From there, click Restart Now under Advanced Startup.
Step 2: You'll have two options: Troubleshoot and Restart. Selecting Troubleshoot will then give you the option to choose Advanced options, which can help you resolve most Windows issues by revealing additional troubleshooting options.
Step 3: To fix your PC automatically, go to the Advanced options window, select Startup Repair, and let it scan and fix your files without restarting your PC in between. It's a lengthy process that requires patience.
Post restart, check if the PC still has issues.
3. Run System File Checker

The System File Checker (SFC) scan is another method that can help scan and restore corrupted system files, which can be useful when dealing with Windows update errors. To perform this method, follow the exact given steps.
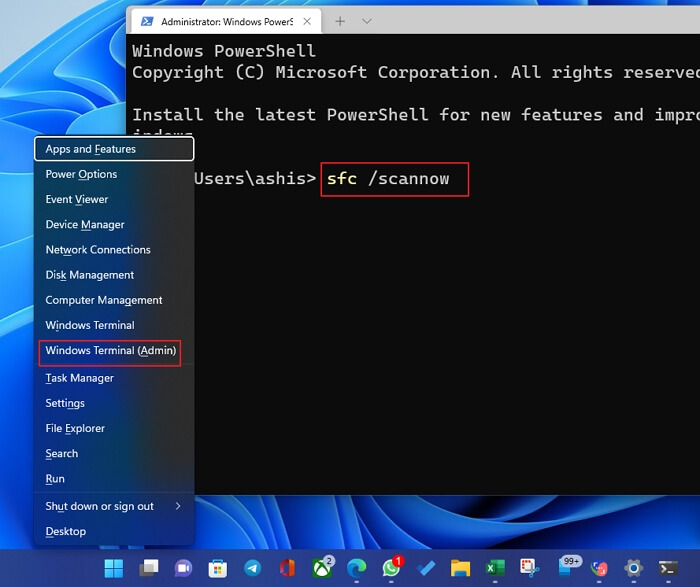
Step 1:To open the Power menu, press the Windows key + X, and then select either Windows Terminal (Admin) or Windows Powershell (Admin).
Step 2: In the window, type sfc/scanow command and press the Enter button.
Step 3:The tool will scan the PC and replace corrupt files with a new one from the Windows repository.
This process may take some time to complete. After the SFC scan completes, you can check if you can update Windows.
4. Extend C Drive with Qiling Partition Master
The primary reason for the error is the limited storage space on the system drive, which cannot be easily extended like other partitions. To resolve this, the QilingPartition Master tool can be used.
A highly recommended third-party tool allows for partition management and disk optimization, improving performance. It features a Resize/Move function, enabling users to expand a partition to a larger size.
Option 1. Extend System C drive with unallocated space
- 1. Click on the System C: drive and select "Resize/Move".
- 2. Drag the system partition end into the unallocated space so to add it to the C: drive.
- 3. Click "Proceed" to execute the operations and extend the C drive.
Option 2. Extend System C drive without unallocated space
- 1. To resize a partition, click on the big partition with enough free space on the system disk, then select the "Resize/Move" option.
- 2. To create unallocated space, drag the end of the big partition to the left to shrink it, making room for the unallocated space. Then, click "Proceed" to confirm the change.
- 3. Select the system drive at the Disk management page, and select "Resize/Move".
- 4. To extend the C drive, drag the end of System C drive into the unallocated space and click "OK" to save the changes. This will extend the C drive into the unallocated space.
This tool offers a range of features, including merging and cloning partitions, formatting and copying partitions, migrating an OS to an SSD, converting between MBR and GPT, recovering partitions, and creating a WinPE bootable disk.
5. Disable Automatic Windows Updates

To fix the issue, try disabling automatic Windows Updates, which will allow you to manage them more effectively.
Follow the exact steps given below.
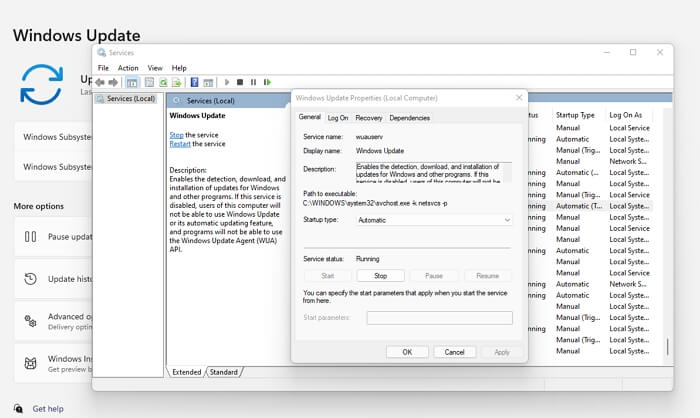
Step 1: To open the Windows services snap-in, press the Win+R keys to open the Run box, type `servces.msc`, and press Enter. Then, locate the Windows Update service in the list and double-click it to open its Properties.
Step 2: To disable the Windows Search service, navigate to the Services window, find the Windows Search service, right-click on it, select Properties, set the Startup type to Disabled, and click Stop if the service is currently running.
Step 3: Click on the "App" icon, usually found on the taskbar or start menu. 2. Click "OK" to confirm the change.
6. Enable App Readiness service

The App Readiness service is crucial for running a Windows update, as it helps prepare the system by setting up apps for the first time or when the user signs in, making the PC ready for the update.
To enable the App Readiness service, follow these steps: making sure it's enabled has worked for many. This feature is designed to improve the overall user experience by ensuring that apps are ready and functioning properly. By following the given steps below, you can ensure that this feature is active and working correctly.
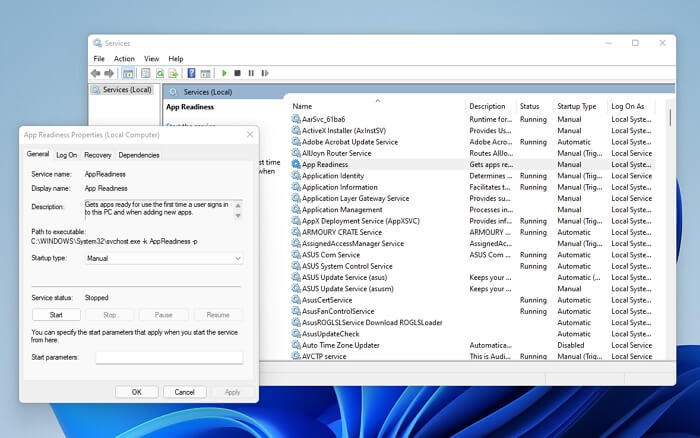
Step 1: To open the Services window, press the Windows key + R to open the Run dialog, type "services.msc" in it, and then press the Enter key.
Step 2: Go to the App Readiness service and double-click it to open its Properties.
Step 3: Open the Services console by searching for it in the Start menu or by typing services.msc in the Run dialog box (Windows key + R).
Step 4. Click on the OK button to execute this change. 2.
7. Reset this PC

If all of the above-To reset this PC, access the Advanced Startup screen by pressing the Windows key + X and selecting the Power button. Then, click on the Restart while holding the Shift key. After that, click on Troubleshoot and then select Reset this PC. Follow the on-screen instructions to complete the process.
Step 1: Select Troubleshoot> Reset this PC option in order
Step 2: If you're using a Windows computer, go to Settings > Update & Security > Recovery. 2. Click on "Get started" under the "Remove everything" section.
Step 3: You will need to reinstall Windows and then download and apply the update.
Conclusion
To resolve the error "we couldn't complete the updates/Undoing changes," try restarting your device, checking for updates, running the Windows Update Troubleshooter, disabling and re-enabling the Windows Update service, running the System File Checker, checking for corrupted system files, and resetting Windows Update components. If these steps don't work, consider reinstalling Windows or seeking professional help.
Related Articles
- Free Partition Manager for Windows 7/Windows 10 64 Bit
- Format SanDisk SD Card|How to Format SanDisk SD Card on Windows 10 and Mac
- How to Solve Windows 10/7 C Drive Red Bar (Low Disk Space) Problem
- How to Wipe or Erase Hard Drive in Windows Server - Qiling