How to Fix System_Service_Exception in Windows 10/11 Without Data Loss
Fix system_service_exception BSOD error in five ways:
| Workable Solutions | Step-by-step Troubleshooting |
|---|---|
| Fix 1. Update Drivers | Outdated or problematic drivers may lead to system_service_exception error. Update drivers...Full steps |
| Fix 2. Update Windows 10/11 | Unexpected errors may also cause by outdated system files. Update Windows to the latest version...Full steps |
| Fix 3. Fix Corrupted System Files | Fix and replace damaged system files with SFC commands. Go to the Start menu and type cmd...Full steps |
| Fix 4. Uninstall Installed Programs | Programs running in your system may become the reason for causing a system_service_exception...Full steps |
| Fix 5. Reset Your PC | Go to the "Settings," enter the "Update & Security", then click the "Recovery" and "Reset PC"...Full steps |
Windows 10 and 11 are considered the latest operating system for desktops. Windows 10 and 11 were released on July 29, 2015, and October 05, 2021, respectively. Since the release of these Windows, millions of users have been converted to these operating systems. These are used worldwide, but some potential errors and problems have also been seen in these operating systems. One of the most common errors in Windows 10 and 11 is the system_service_exception BSOD Error.
What Is System_Service_Exception
If you face a system_service_exception BSOD Error in your system or windows, you are not alone. There are lots of Windows users who are currently facing the same problem. These types of Windows errors are so annoying because they force your system to restart suddenly, making everything unsaved be lost. For example, imagine you are working on a critical PowerPoint document you need to submit the next day. It is almost done, but something goes wrong, and suddenly System Service Exception BSOD error occurs while the Autosave feature is off. It will surely be so annoying.
Most BSOD errors are associated with system-related issues sending a stop code to windows, leading to an instant system crash. The bad news is that the error occurs without any warning, making your data lost, and files can infrequently get corrupted. If you face such a problem, do not panic and follow the given tips that will surely help you fix the system service exception or blue screen of death error for windows 10/11. However, before going to discuss the solution to fix this error, we would like to share with you the potential reasons causing System Service Exception BSOD Error.
Generally, the System Service Exception BSOD Error occurs by windows 10/11 itself. For example, outdated drivers or a cluster of apps trying to access and run the windows protected codes. As well as this, there are certainly other reasons leading to this error, including;
- Damaged, incompatible, or outdated drivers for windows 10/11.
- Malware or other cyberattacks can cause this error
- An error or bug in the Windows 10/11
- Corrupted files in your windows or systems
- Inaccessible or damaged windows registry
- Bad divisions in the hard disk
- RAM issues
The technical explanation of Microsoft revealed that such a BSOD error occurs when your systems' running process attempts to move from non-privileged to privileged code. There are a number of examples of such error messages that may be fitting your case:
- SYSTEM_SERVICE_EXCEPTION Windows 10/11: This error usually occurs in Windows 10/11. However, it is also common in other operating systems, such as Windows 7.
- SYSTEM_SERVICE_EXCEPTION 00000000'c0000005: This is an error code that is caused by the problem in the system_service_exception.
- SYSTEM_SERVICE_EXCEPTION 0x0000003b: This is another type of error code accompanying the error once you see the blue screen.
- SYSTEM_SERVICE_EXCEPTION (Netio.sys): This error occurs when the Netio.sys system file is causing Windows 10/11 to crash.
How to Fix System Service Exception BSOD Error in 5 Ways
There are a number of methods to fix the problem of System Service Exception BSOD Error easily. However, as the system won't boot properly when the error occurs, you need to go to safe mode to check and fix the problem. You know how to activate a safe mode before fixing the System Service Exception BSOD Error.
Enter Safe Mode First
There are several ways to start windows 10/11 in Safe Mode. However, the easiest way is to go through the Settings. Then, follow the given steps and start running your windows in a Safe Mode.
Step 1. Open Windows "Settings" through the Search bar or press the Windows + l buttons to open Windows Settings.
Step 2. Go to the "Update & security" section. Choose "Recovery", and click "Restart now". After Windows restarts, choose "Troubleshoot".

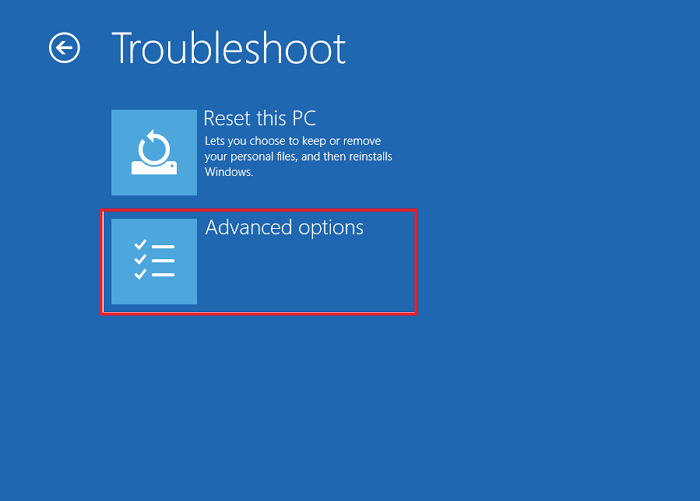
Step 3. Once entering the troubleshoot option, go with the "Advanced options".

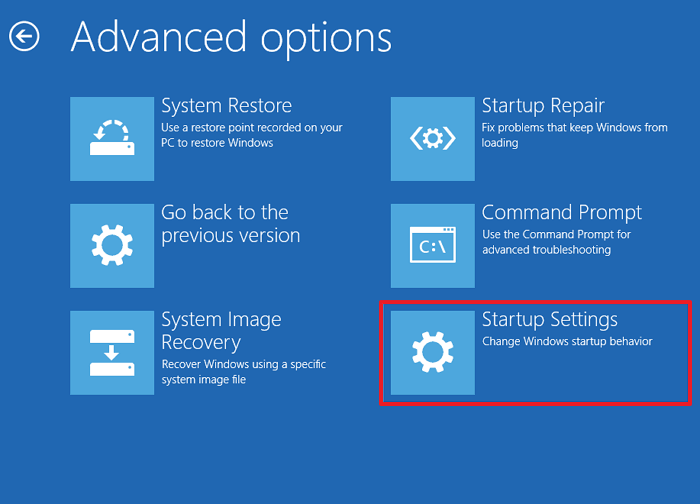
Step 4. Now, it's time to click on the Startup Settings – the section will allow you to change Windows startup behavior.

Step 5. Press on the "Restart" button – it will restart your PC with the Safe Mode.

Now start fixing your problems by following the given steps:
1. Update Drivers
Windows updating system helps keep your system drivers up to date. Updating drivers through an automated system means your system or Windows drivers are according to the recommended version. However, that does not mean that all the apps are updated through the recommended version. On the other hand, sometimes Windows does not use the correct version of drivers.
To check the latest automatic driver updates, you need to follow the given steps:
Go to "Settings" > "Update and Security", then click on the "Windows update" > "view update history". Here you will find the recently updated drivers.

Step 1. Type Device Manager in the Start menu and select the best match.
Step 2. Scroll down the list and find the error symbol. If you find nothing here, it means the drivers are not likely the source of the errors. If you find there a symbol of yellow alert, use the dropdown arrow and open the section. Then, you can start the driver's update by right-clicking the problem driver.
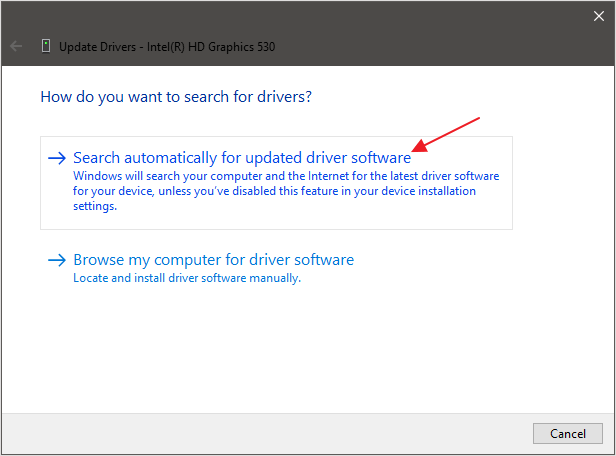
Step 3. Select "Search automatically for updated driver software". It will help windows automate the process of drivers update for you.

On the other hand, you can also use a third-party source or tool that helps you update all your system drivers simultaneously.
2. Update Windows to the Latest Version
To diagnose the problem or fix the errors, you also check if a Windows update is required. Unexpected errors may also cause by outdated system files. The prompt and easy way to figure out the source or cause of the error is to check for pending updates. Follow the below-given steps to know if there are pending updates:
Step 1. Press Windows key + l to open the "Settings". Hit for the "Update & Security" section to check if there are any pending updates.
Step 2. If you find any pending updates, save all your files, and click on "Install Now". During this process, your system will reboot.

3. Fix Corrupted System Files
The Windows system tool that helps check for corrupt and missing Windows system files is System File Check. SFC specifically checks for the Windows system. Before starting the SFC files, it is advisable to double-check whether it is completely functional or not. Now follow the given steps to check whether it is functional or not:
Step 1. Go to the start menu and type CMD. Now, right-click Command Prompt and select "Run as administrator" to open an elevated Command prompt.
Step 2. Type the command sfc /scannow and hit Enter.

Now, wait for the command to be processed. Depending upon your systems' health, it may take up to 20 minutes to complete the process. The process may stick at certain times, but you have to wait for it until it completes.
4. Uninstall Recently Installed Programs
Now it comes to checking the recently installed programs or apps. Unfortunately, sometimes, several programs running in your system may become the reason for causing a system_service_exception Windows 10 error.
They may vary in type. For example, some users report an error after installing a new antivirus suite. At the same time, some users claim that installing a new VPN may be an issue. Whether the SYSTEM_SERVICE_EXCEPTION error occurs after installing a new program or not, you need to uninstall the recently installed programs, helping you know what program became the reason for an error.
5. Reset Windows 10
If nothing else works, you need to reset Windows 10 to refresh your windows or system files. Resetting the Windows will replace your system files with a completely new set of files. Theoretically, it is approved that keeping most of your important files intact is a lingering issue related to an SYSTEM_SERVICE_EXCEPTION error. Therefore, follow the given steps to reset your windows:
Step 1. Go to the "Settings," enter the "Update & Security", then click the "Recovery" section. There you will find the section "Reset PC", and now get started.

Step 2. Your system will restart right after hitting the button. So, make sure that you have the backup of all of your important files and data.
Step 3. Once your system restarts, you will have the option "Keep my files" or "Remove everything".

How to Restore Data from a Computer with a Booting Problem
If the system_service_exception problem or other booting issues don't allow to access the computer and data, or if you lose crucial data due to Windows resetting, there is no need to worry because we suggest you use a professional data recovery software – Deep Data Recovery to efficiently restore lost data from unbootable computer/HDD in WinPE.
It is an all-in-one data recovery solution. For example, this software helps you recover deleted files, formatted files, raw files, NAS files, and more. As well as this, this software also helps users recover 1000 different types of files, including documents, graphics, videos, emails, audios, and data in other formats. The software is easy to use and works quickly and efficiently to restore all your necessary data.
Step 1. Create a bootable disk
Prepare an empty USB. If you have important data on it, copy the data to another device. When you create a bootable disk, the data on the USB will be erased. Deep Data Recovery WinPE Edition will help you create a bootable disk.
Connect the USB drive to PC, launch Deep Data Recovery WinPE Edition. Select the USB drive and click "Create" to create a bootable disk.
Step 2. Boot from the bootable USB
Connect the bootable disk to PC that won't boot and change your computer boot sequence in BIOS. For most users, it works well when they restart their computer and press F2 at the same time to enter BIOS.
Set to boot the PC from "Removable Devices" (bootable USB disk) or "CD-ROM Drive" (bootable CD/DVD) beyond Hard Drive. Press "F10" to save and exit.
Step 3. Recover data from a hard drive that won't boot
When you boot from the USB, you can run Deep Data Recovery from the WinPE bootable disk. Select the drive you want to scan to find all your lost files.

Click "Scan" to start the scanning process.

Recover data from the computer or laptop. After the scan completed, you can preview all recoverable files, select the targeted files, and click the "Recover" button to restore your files. You'd better save all of the recovered data to another place to avoid data overwriting.

Conclusion
So, throughout our discussion, we find that facing a system_service_exception BSOD Error is not so surprising. There are several reasons mentioned above that can cause this error. These reasons can be drivers' updates, bug files, malware, corrupted files, damaged Windows registry, hard disk bad divisions, or RAM issues.
Well, this article helps you diagnose the causes of the errors. As well as this, this article is a detailed account of how to fix system_service_exception Windows 10 BSOD Error. So, go through this article carefully to manage your problems.
However, if your computer can't boot easily and you want to restore your important files, we recommend using Deep Data Recovery to quickly restore your important files.
Related Articles
- Qiling Data Recovery Software Full Review [Tested in 2022]
- Windows 10 Free Download Full Version 32 or 64 Bit ISO
- Best Way to Store Digital Photos Long Term
- Fixed: USB Flash Drive Not Showing Up in Windows 10/11