How to Recover Files from USB Flash Drive with or Without Software
How to Recover Files from USB - Page Content
- 1. Recover deleted files from USB Using Qiling data recovery software (Recommended)
- 2. Recover files from USB flash drive using CMD (Only recover hidden files)
- 3. Retrieve files from USB from previous versions (File backups required)
- 4. Restore USB files from Windows Backups (File backups required)
Data loss on a USB flash drive or pen drive can occur due to several reasons, including unintentional file deletion, hard drive formatting, storage device failure, and virus attacks. However, accidental deletion is the most common cause of data loss from USB drives.

Where do deleted files from USB go?
Files deleted from a USB flash drive are deleted permanently and do not go to the recycle bin, making it impossible to recover them through the recycle bin. However, there are still ways to recover deleted files from a USB drive, which will be outlined in this tutorial.
Note: Stop using the USB flash drive immediately to prevent data overwriting if you've accidentally deleted files on it.
How to Recover Files from USB Using Data Recovery Software
The most effective way to recover deleted files from a USB is to use professional data recovery software, such as Deep Data Recovery, which can recover deleted files from various devices, including USB flash drives, pen drives, SD cards, HDDs, SSDs, camcorders, and digital cameras.
Effective Data Recovery Software
- Perform a deleted and formatted USB data recovery from various data loss situations, such as accidental deletion, formatting, or corruption. This process involves using specialized software to scan the USB drive and recover lost data, including files, folders, and other digital content.
- You can recover all types of lost files, including photos, documents, videos, audio files, emails, compressed files, and more.
- Boot with a downloadable WinPE when your system fails to start or crashes.
To recover deleted files from a pen drive/USB drive, follow these steps. You can recover deleted files with a few clicks by using a data recovery software. First, download and install a reliable data recovery software on your computer.
Step 1. Choose the file types
Launch Deep Data Recovery and choose file types. Click "Next" to start.

Step 2. Choose the USB drive to scan
Connect the USB drive to your computer and launch the software. Choose the USB drive where you lost your important files and click "Scan" to initiate the recovery process.

Step 3. Check and preview USB drive data
When the scanning is finished, you can quickly locate a specific type of file by using the Filter feature and the Search option.

Step 4. Restore flash drive data
After finding lost USB drive files, click "Recover" to restore them, and save the found files to a safe location on your PC, not the USB drive.
How to Recover Deleted Files from USB Flash Drive Without Software
If you're not a fan of using third-party software to recover files from a USB drive, there are alternative methods to try. You can use the Command Prompt to retrieve files, or rely on Windows Backup to restore your data.
However, these solutions have limitations and requirements, with data recovery software being the only option if the USB hasn't been backed up in advance.
Recover Files from USB Using CMD (Only Recover Hidden Files)
If your files are missing from a USB flash drive or pen drive, you can use the Command Prompt in Windows to recover hidden files. The Command Prompt is a Windows application available in all Windows Operating Systems, and following this method can help you retrieve your missing files.
To recover deleted files from a USB flash drive using CMD, first, you need to connect the drive to a Windows computer and open the Command Prompt as an administrator. Next, navigate to the drive using the `cd` command, followed by the drive letter (e.
Step 1. Connect the USB flash drive to your computer.
Step 2.To run Command Prompt as an administrator, click the Search button, type "cmd", and right-click on Command Prompt in the search results. Then, select "Run as administrator" from the context menu.
Step 3. Run the following command lines in order.
Type chkdsk X: /f The command to format a USB drive in the Command Prompt is: `format X:`. This command will erase all data on the drive and prepare it for use. To run this command, open the Command Prompt, type `format X:`, and hit Enter.
Type attrib -1. Go to the command prompt.
To recover your files, open the Command Prompt as an administrator. Navigate to the folder where your files are located using the 'cd' command. Then, type the command 'chkdsk /f' and press Enter.
Restore Deleted Files from USB from Previous Versions
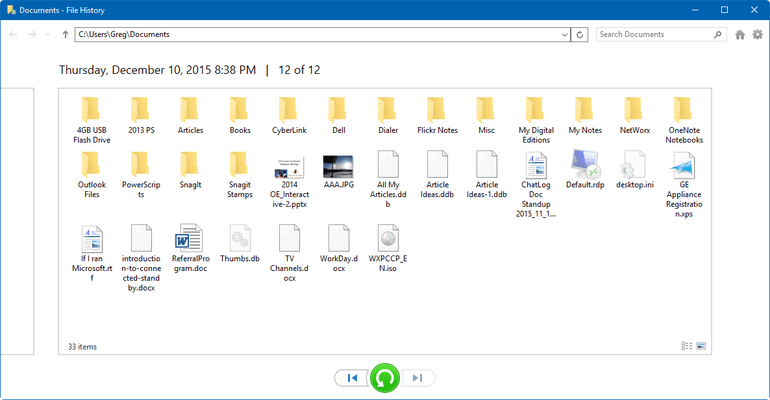
In Windows 10/8.1/8/7, you can restore an older version of files by using File History if you have previously set it up to automatically back up files. However, if you haven't turned on this feature, you can try using USB drive recovery software to recover permanently deleted files from your USB drive.
Step 1. Right-click on the folder that contains your deleted files on USB and select "Properties".
Step 2. To view previous versions of a file, click on the "Previous Versions" tab. This will show you that previous versions were saved either through File History or from restore points.
Step 3. A list of older versions of the file will be displayed. Choose the file edition you're looking for, and click the "Restore" button to retrieve the file.

Restore Deleted Files from USB with Windows Backups
If you've backed up your data before, you can check the backups, and also check your online or cloud storage service, as you may have synced your files to a service like Microsoft OneDrive, Dropbox, or Google Drive. If you've turned on Windows backup, you can use it to retrieve your data from a USB drive.
Step 1. To access the "Backup and Restore (Windows 7)" feature, go to the "Control Panel", then click on "System and Maintenance", and finally select "Backup and Restore (Windows 7)".
Step 2. Click "Restore my files".

Step 3. Select the previously created backup by clicking "Browse for files" or "Browse for folders" to upload it.
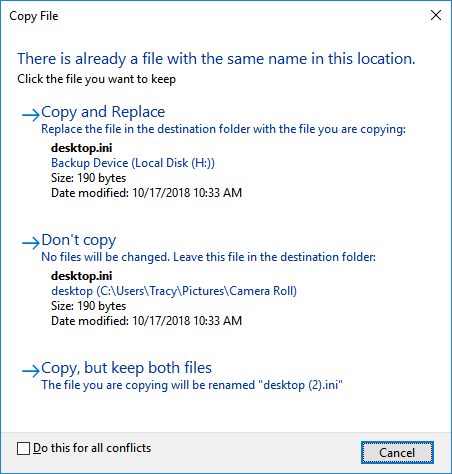
Step 4. Choose a location to save the backup - either in the original location, or in a specific location, and decide what to do if there's a conflict, such as copying and replacing, not copying, or keeping both files.

Step 5. Once the restoring process is complete, all permanently deleted files or folders will reappear on your PC at their original or new location.
Conclusion
Deleting files on a USB drive doesn't necessarily mean permanent data loss, as four methods can be used to recover deleted files, with or without software. Qiling data recovery software offers the greatest chance of recovery, supporting deleted file recovery, formatted recovery, and raw drive recovery, among other features.
How to Avoid USB Flash Drive/Pen Drive Data Loss
Protecting your USB data is crucial to avoid loss. To prevent data loss, follow these tips:
Regularly Back Up Files
Backing up files automatically with the help of file backup software is a great choice. I recommend using Qiling Backup, which allows even non-technical users to create an image. With Qiling Backup, you can easily back up your data without needing extensive technical knowledge. Just follow the details provided to use this software and ensure your files are safely backed up.
Step 1. When first using Qiling Backup to back up files, click on "File backup" from the "Backup and Recovery" page .

Step 2. You can select any type of file to back up, such as pictures, videos, documents, and more, when backing up files and folders on your computer.

Step 3. 1. Determine what you want to back up.
Step 4. Select a backup location to save and retain the backup. This can be an external hard drive, cloud storage, or another internal drive.

Step 5.Qiling Backup allows users to save backup files to various devices, including local hard drives, external USB drives, SD cards, network drives, and NAS drives, as well as Qiling's cloud drive. We recommend choosing the cloud drive for important backups due to its greater accessibility, flexibility, and safety.
To access Qiling cloud, simply register with an email address and log in.
Step 6. If you want the software to automatically schedule the next file backup task, go to the "Options" setting and customize the backup scheme to specify the time for the next backup. There, you can also encrypt confidential files or compress the backup image size.
Customize an advanced and automatic backup task here:

Step 7. Click "Proceed" to start the file backup process, and your completed backup files will be displayed in a card style on the left area.
Plug and Unplug the USB Flash Drive Correctly
When you plug in or disconnect a USB from your computer or laptop, use it properly. To disconnect, right-click the USB and use the "eject USB" option. This helps prevent data loss and damage to the device.
Scan and Remove Virus on USB
Use anti-Install and regularly update anti-virus software to protect your computer from viruses, Trojans, and other malware. Ensure the software is updated with the latest patches and signature files for maximum security.
Related Articles
- Free SanDisk Recovery Software Recovers Lost Sandisk Data
- How to Format SD Card Without Losing Data
- Top 10 Best Hard Drive Recovery Software for Windows and Mac
- Free Hard Disk Repair Software for Hard Disk | Step-By-Step Guide