[DIY Guide] Where Do I Find My Scanned Documents on Windows/Mac
Learn several effective ways to find scanned documents on Windows and Mac:
| Workable Solutions | Step-by-step Troubleshooting |
|---|---|
| 2 Ways to Locate Scanned Documents on Windows 10 |
Method 1. Check the Pictures folder in Windows 10. Open "This PC" on your desktop...Full steps Method 2. Find the scanned files by checking the scan app. Click the search button and input Scan...Full steps |
| How to Scan and Find the Scanned Documents on Mac | First, learn how to scan a document on Mac, then find the scanned files in this way. Open "Finder > Go > Home". Locate the "Pictures" folder. Double-click the icon to open it. Then, you can find the scanned files...Full steps |
How to Locate the Scanned Documents on Windows 10
"Hi Everyone - Possibly a very simple questions to those who know, previously on Windows 7 when I scanned a document from my wireless printer to my laptop the scan used to go into "my documents folder". Now on Windows 10, it seems to put the scan into any obscure folder attached to "my document" folder. It's hard to find after scanning. How do I determine which folder the scans go to?"
It's annoying to be unable to find your newly scanned documents on your hard drive. Here, we will explore the best way to deal with this issue, and how to change the settings so that this issue never occurs again. Read on to find out how to do it.
Method 1. Check the Pictures Folder in Windows 10
Usually, when you connect a scanner to your computer, Windows PC saves scanned documents in either the "My Documents" or "My Scans" folder by default.
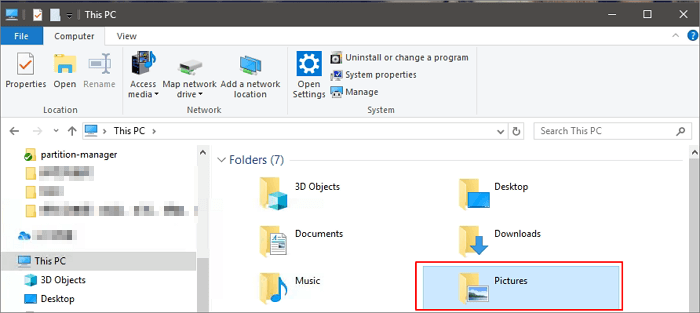
But for a Windows 10 user, you may find the files in the "Pictures" folder, especially if you saved them as images, such as .jpg, .jpeg, or .png.
Step 1. Open "This PC" on your desktop.
Step 2. Select the "Pictures" folder and find the scanned files. in this folder.

If you fail to find the scanned files, you can also search your entire hard drive for them.
Method 2. Find the Scanned Files by Checking the Scan App
When you are not sure about the file type of your scanned files, you can check your scan app to find the default storage folder. Then, you are able to locate the scanned documents. Here are the steps to check the built-in scan programs on Windows 10.
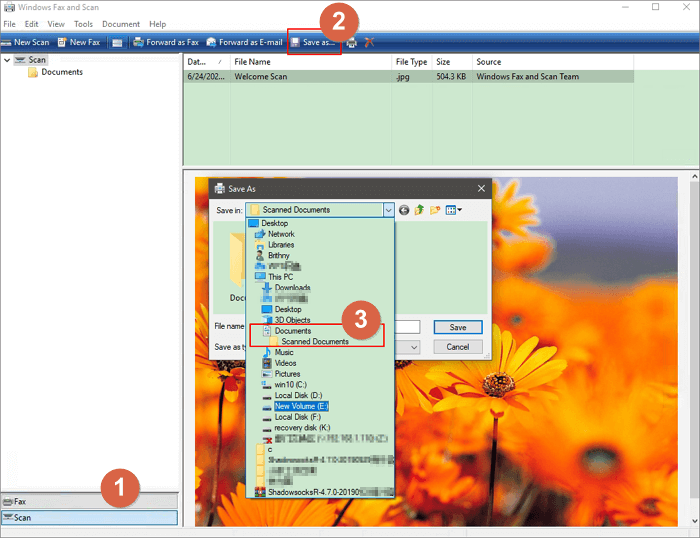
Step 1. Click the search button in your Taskbar and input Scan.
Step 2. Choose "Windows Fax and Scan" by clicking it.
Step 3. Inside the Windows Scan application, select the "Scan" button found at the bottom left corner of your screen.
Step 4. Here, choose the "Save as" option. The default save location for scans is normally named as the Scanned Documents subfolder of the Documents folder. (If you want to change that manually, you can simply move the entire Documents folder to a new location.)

Then, you can navigate to "This PC > Documents > Scanned Documents" to find the scanned files on your Windows 10/8.1/8/7 PC. Depending on the scanner you're using, you might have specialized software installed on your PC. (For example, if you are using an HP scanner, you need to find scanned files from HP Solution Center). If you have any difficulty in finding your files using the above-mentioned method, it is recommended that you check the original software of your scanner as well.
How to Find Your Scanned Documents on Mac
Before you are going to locate the scanned files on your Mac, you can learn how to scan a document on Mac with Image Capture.
Method 1. Scan a Document on Mac
Step 1. Turn on your scanner and connect to Mac, place a document you want to scan in the scanner.
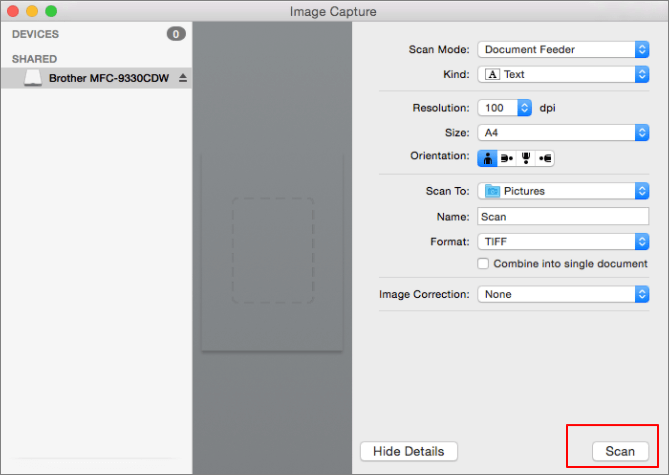
Step 2. Open "Image Capture" on Mac.
Step 3. Select your scanner from the pane at the left of the main window.
Step 4. In the Pictures drop-down menu, select a destination for the scan. Here, I select the "Picture" folder.
Step 5. Select a size for the bounding box. US Letter is the default, and you can opt to draw several bounding boxes to scan several portions of the document. Then, click "Scan" to start the scan. It is saved to the location you chose.

Method 2. Go to the Location You Choose
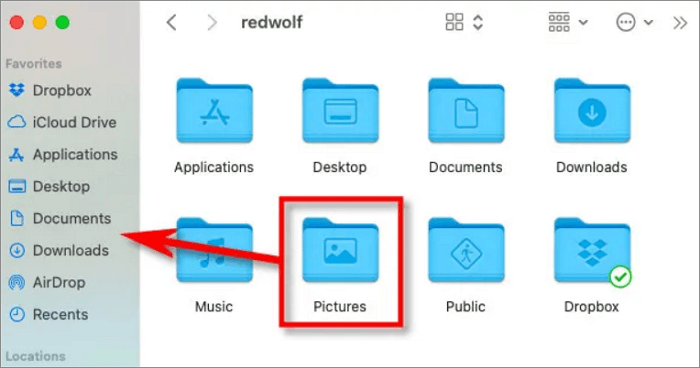
As I have mentioned before, when you try to scan a document on Mac, you will be asked to choose the storage folder. All you need to do is to remember the location you chose. Then, navigate to the location on Mac. By default, scanned images, documents, etc. are saved automatically in the "Pictures" folder on your Mac. To open the "Pictures" folder on Mac:
Step 1. Open "Finder > Go > Home".
Step 2. When your Home window opens in Finder, locate the "Pictures" folder. Double-click the icon to open it.

Then, you can view the Scanned files on Mac.
Extra Tips: How to Find Scanned Files with Software
If you cannot find the scanned files with the methods above, you can use third-party software. Qiling data recovery software can scan your Windows and Mac hard drive to find the existing and lost documents. What's more, if you lost scanned documents, you can recover them with simple steps. Follow the details below to find the scanned files and recover them on Windows 10/8.1/8/7.
Step 1. Launch Deep Data Recovery. Select file types and click "Next" to start.

Step 2. Choose the drive where you lost files and start scanning. This software allows you to recover lost data from all devices, including HDD, SSD, USB drive, SD card, pen drive, camera, etc.

Step 3. Browse the full scan results. You can choose the file type you need by clicking on the file type filter. Qiling data recovery software supports 1000+ file types like photos, videos, documents, emails, audio files, and many more.

Step 4. Select the files you want to preview. Click "Recover" and set a storage location to save the recovered data.
Conclusion
Your scanned files can show up in different places depending on what brand of scanner you use, and the storage location you choose. If you fail to find the scanned files, you can also turn to Qiling hard drive recovery software. It can scan your whole disk or partition to help you find the lost or existing files.
Related Articles
- EFS Decryption Guide: How to Recover Encrypted Files on NTFS Drive Without Effort
- Undo ESD-USB | Convert 32GB ESD-USB Hard Drive/External Hard Drive to Normal
- Best Free Windows 10 Data Recovery Software
- How to Recover Data from Diskpart Cleaned Disk by Accident