SSD System Reserved: How to Remove System Reserved Partition
- 1. What is A System Reserved Drive?
- 2. Can I Delete The System Reserved Partition on SSD?
- 3. What to Do If System Reserved Partition is Not on SSD?
- 4. How to Remove System Reserved Partition?
Many computer users have no idea about the System Reserved partition, so a general understanding of the term is helpful. In this article, you will know everything about the SSD system reserved partition.
What is SSD System Reserved?
The System Reserved partition is created during a clean/fresh install of Windows 7/8/8.1/10, and it takes up a particular amount of hard disk space. For example, 100MB on Windows 7, 350MB on Windows 8, and 500MB on Windows 10. The partition goes closely related to the system boot process since it holds the Boot Configuration Database (BCD), Boot Manager Code, Windows Recovery Environment, and reserves space for the startup files which may be required by BitLocker, in case you use the BitLocker Drive Encryption feature.

In conclusion, the System Reserved partition contains either of the two important things:
- Windows bootable data
- Bitlocker startup files
Can I Delete The SSD System Reserved Partition?
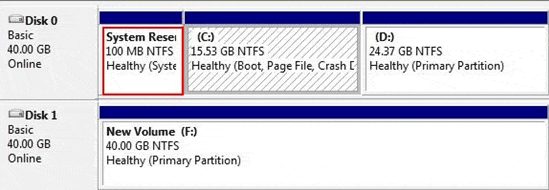
You cannot directly delete the System Reserved partition under Windows Disk Management since it's hidden and protected with no drive letter. As you've learned, this partition has all the boot information. If it is on the same disk as the OS SSD (as the above image shows the System Reserved and C is on the same Disk 0), do not delete it, or your computer won't boot.
In addition, if the purpose of deleting this partition is to free up free space, it's void because the System Reserved partition only takes up a small disk space from 100MB ~ 350MB. Why not leave it to be what it is?
What to Do If System Reserved Partition is Not on SSD?
Sometimes, the chance is the System Reserved partition and the OS partition may be on two different hard drives. Usually, the result is caused by two hard drives are connected to the computer while installing the OS, and the Windows installer is confused to decide which one is the system drive.
- How to protect Windows from creating such a System Reserved partition?
When you do your Windows OS install, make sure that there are no drives connected apart from the one you're going to install onto. If another drive is available, the install kit will put the reserved partition there instead of on the OS drive.
How to Remove System Reserved Partition?
So, is it safe to remove the partition in both cases? There are some situations in which you can remove the SSD System Reserved partition from PCs without worrying boot failure.
Sometimes an SSD partition labeled as "Reserved" may not be the real one that contains system boot files. To check whether it is the partition or not, you can try to use the built-in Windows Disk Management (This PC>Manage>Disk Management) to test by the following methods.
- Check the partition contents
Right-click on the partition and click Change Drive Letter and Paths. Add an unused drive letter and browse the contents. It should be easy to search for any files you found and see if they're related to a system reserved partition.
- Disconnect the drive from your machine
See if the machine has any trouble in booting after the disconnection. Test it, and if you have no issues, it's safe to assume it's not going to harm removing the one partition.
It's ok to remove such an SSD partition labeled as "Reserved" on the occasions listed above. As Windows Disk Management won't allow operating on the labeled SSD reserved partition, you'd better employ a free partition manager to delete the system reserved partition, which won't damage a normal system boot process. Free download Qiling Partition Master, and learn how to delete the partition.
Step 1. Launch Qiling Partition Master on your computer.
Step 2. Select to delete partition on hard drive.
- Delete single partition:click on a partition that you want to delete and choose "Delete".

Make sure that you've backed up the important data on the selected partition because this manner will compeletely remove data.
Step 3.Then you will see a warning window, click "OK" to confirm the deletion.
However, if the test went not so smooth with the two mentioned situations, then trying to remove SSD reserved partition becomes a real tough task, which might be too complicated to handle for ordinary people with a little technical background. In this case, we do not recommend removing the partition, just let it be there on your solid-state drive, as any improper handle with it may cause serious booting problems.
Related Articles
- Fixed: WD My Passport Ultra Not Showing Up/Detected
- How to Use DiskPart to Merge Partitions
- How to Extend C Drive in Windows 7/8/10
- How to Bypass Secure Boot And TPM on Windows 11