Follow Our Tips to Resolve A Collection of Mac No Startup Disk Issues
When your Mac can't find a startup disk, it won't boot up, and updating macOS won't proceed. The startup disk is usually an internal hard drive that holds the operating system and applications. If you're experiencing this issue, especially during a macOS update, you'll need to find or replace a functioning startup disk to access your computer. To resolve this, you can try to locate the missing startup disk or replace it with another one that is properly functioning.
![]()
Although the symptoms are similar, the situations that lead to the error of a startup disk not being found are distinct. You can refer to the table for various scenarios and directly jump to the corresponding solutions.
| Workable Solutions | Step-by-step Troubleshooting |
|---|---|
| #1. Repair Startup Disk in macOS Recovery | Turn on your Mac and continue to press and hold the power button until the startup options window appears. From there, select your language and click on the "Options" icon, then click on "USB" or "Disk" to select the installation media. Select your language and click on "Continue" to begin the installation process. If you are prompted to select a disk to install macOS on, select the correct disk and click on "Install" to start the installation.Full steps |
| #2. Make startup disk appear in Disk Utility | ...then press and hold the power button for 10 seconds to discharge any residual power.Full steps |
| #3. Reset MVRAM on your Mac | ...Command (⌘) + R.Full steps |
| #4. Change another startup disk | To turn off your Mac, press the power button and select "Shut Down" from the dropdown menu. Then, press and hold the power button again to startup your Mac. This will allow you to boot your Mac normally. If you need to boot in a different mode, you can hold down the Shift key or Command + R keys to enter Safe Boot or Recovery Mode, respectively.Full steps |
| Tip: Recover data from unbootable Mac | Download Deep Data Recovery for Mac and create a bootable...Full steps |
Before proceeding, make sure you have a current backup of your important files and purchased programs, as this will allow you to reinstall and reactivate them with ease. If you don't have a backup, you may need to rely on third-party software to recover missing files.
Deep Data Recovery for Mac
- Recover lost or deleted files, documents, photos, audio, music, and emails with ease using data recovery software. This technology allows you to restore accidentally deleted or lost files from various storage devices, including hard drives, solid-state drives, memory cards, and more.
- Losing important files can be frustrating, but there are options to recover them. If a hard drive has been formatted, files can still be retrieved using specialized software.
- Data recovery services can help recover lost data from sudden deletion, formatting, hard drive corruption, virus attacks, and system crashes. This can occur under various circumstances, including accidental deletion, hardware failure, or software issues.
Solution 1. Repair Startup Disk in macOS Recovery Mode
Since your startup disk is not showing, you can't access Disk Utility through the usual method. Instead, you'll need to enter macOS Recovery mode to access Disk Utility.
Step 1: On a Mac with an Apple silicon processor, you can enter this mode by pressing the Power button and the Volume down button at the same time. If you have a Mac with an Intel processor, you can enter this mode by pressing the Power button and the Command (⌘) + R keys at the same time.
- Apple silicon: Turn on your Mac and press and hold the power button until the startup options window appears. Click the gear icon labeled Options and select Continue.
- Intel processor:To boot your Mac in recovery mode, turn it on and immediately press and hold the Command (⌘) and R keys until you see an Apple logo or other image.
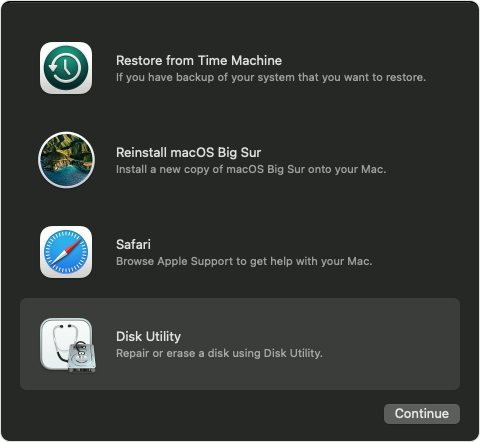
Step 2: Select a user, then enter the password to continue. You'll be taken to the macOS Recovery mode, where you'll choose Disk Utility and click Continue.
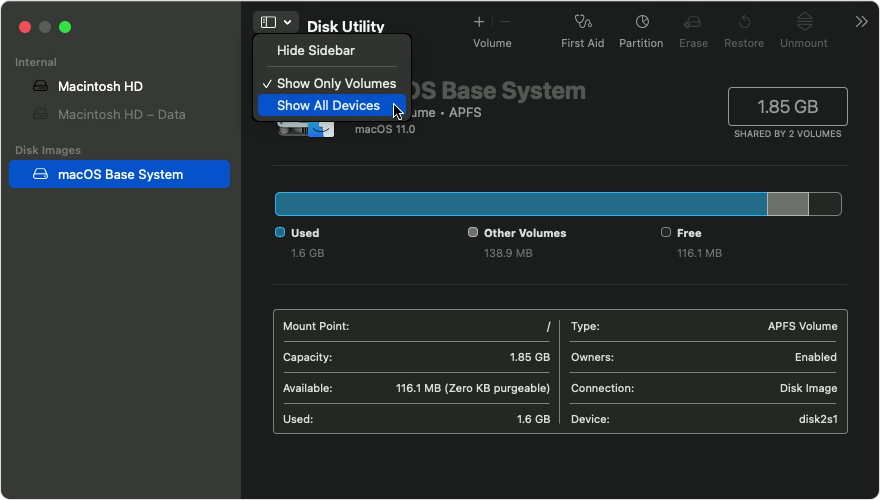
Step 3: In the Disk Utility window, navigate to View > Show All Devices. If no disks are showing, jump to solution 2.
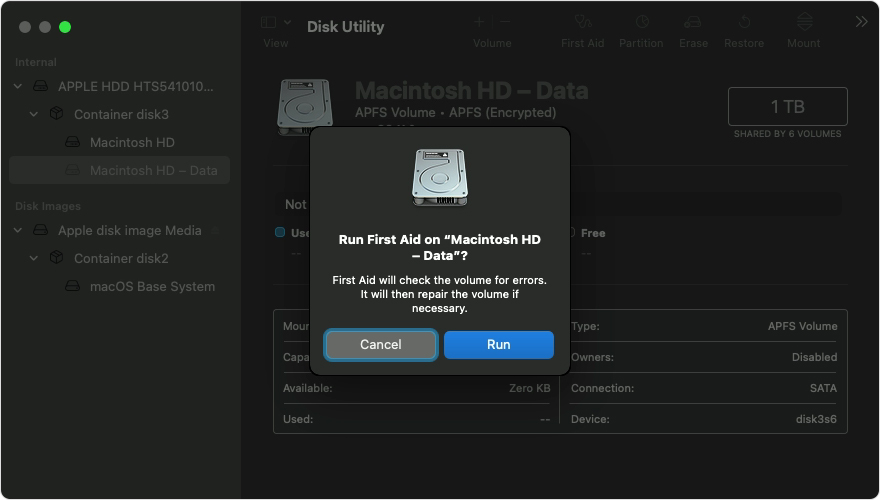
Step 4: If the startup disk appears in the Disk Utility window, select it and click the First Aid button, then click Run. First Aid will check the selected volume for errors and attempt to repair them if any are found.
Solution 2. Make startup disk appear in Disk Utility
If a startup disk isn't showing up in Disk Utility, first try restarting your Mac in Recovery Mode, then open Disk Utility from there. If it still doesn't appear, try booting from an external drive or a different startup disk, and then open Disk Utility. If it still doesn't show up, try running the built-in Disk Utility repair tool, or if you're comfortable, try running a third-party disk repair tool. If none of these steps work, it's possible that the disk is damaged beyond repair and may need to be replaced.
Step 1: Shut down your Mac and disconnect all peripherals that are connected to your Mac.
Step 2: If you installed macOS on an external hard drive, ensure the connection cable is secure and the connection is stable. Try turning off the drive and then turning it back on.
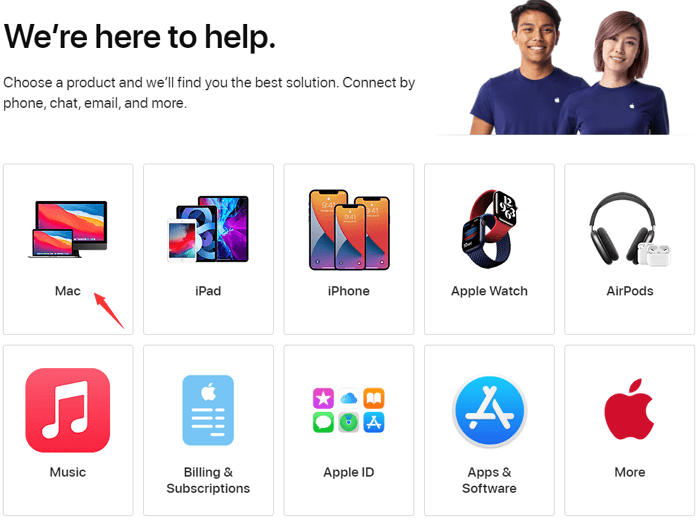
Step 3: If you're having trouble accessing Disk Utility in macOS Recovery, follow the Solution 1 guide. If you still can't see your drive, try contacting Apple support at getsupport.apple.com for assistance with your Mac.
Solution 3. Reset MVRAM on your Mac
If your Mac won't boot from the startup disk and displays a flashing question mark, it means the startup disk is unavailable or doesn't have a working operating system. To resolve this, you'll need to repair the startup disk using Disk Utility in macOS Recovery mode.

If your Mac displays a question mark instead of the normal startup screen, try resetting the NVRAM to resolve the issue. This may resolve the problem if the question mark only appears momentarily before the Mac starts up normally. Resetting NVRAM can help as it stores settings such as startup disk selection.
Step 1: Shut down your Mac, then turn it on and immediately press and hold the keys together, which are Option, Command, P, and R. This will clear the NVRAM, which can resolve issues such as a frozen cursor, incorrect time and date, or other system glitches.

Step 2: When your Mac boots up, verify that your preferred startup disk is selected in the Startup Disk preferences.
Solution 4. Change Another Startup Disk
Your current startup disk may have failed, causing macOS to no longer recognize it. If you have alternative options like a CD/DVD, a network volume, or a different physical disk, you can try to change your startup disk to a working one.
Change a startup disk at one time:
Step 1: Turn off your Mac
Step 2: Press and hold the power button to start up your Mac, or if using Apple silicon, press and hold the power button until "Loading startup options" appears.
Step 3: When you see all the available startup disks, click the Up arrow on Mac or the Continue button on Mac with Apple silicon to select the new startup disk.
Change a startup disk for every startup:
Step 1: To access the Startup Disk settings on a Mac, go to the Apple menu, select System Preferences, and then click on Startup Disk.
Step 2: Select the desired disk by clicking on its icon and then click Restart.
Can You Recover Data from Unbootable Mac Hard Drive?
Don't worry about losing data on your inaccessible Mac. You can use Mac hard drive recovery software to recover your desired data and transfer it to a safe location by booting your Mac from its bootable version.
How to Create a USB Bootable Media
Step 1.To recover lost data on a Mac, install Deep Data Recovery for Mac on another Mac computer, select the option to create a bootable USB drive, and choose a USB drive to create the bootable disc.

- Warning
- Before proceeding, back up all USB files. The creator will then prompt to erase the drive to reallocate space, and then write bootable files to the drive.
Step 2. The program creates a 2GB space on the USB and saves the boot files there, leaving the remaining space available for storage.
Step 3. Once the process is complete, follow the guide to boot the corrupted Mac from a bootable disc and initiate the recovery process. It's recommended to restore data to an external hard drive for safekeeping.
How to Recover Data from Mac Hard Disk
Step 1. Select the disk location where you lost data and files, then click the "Scan" button.

Step 2. Deep Data Recovery for Mac will immediately scan your selected disk volume and display the scanning results on the left pane.

Step 3. To recover the selected file(s), simply select them in the scan results and click the "Recover Now" button. This will retrieve the files and make them accessible again.
Related Articles
- Mac USB Recovery: Recover Deleted Files from USB Flash Drive
- Help! Mac Trash Bin Won't Let Me Empty it, How to Fix?
- Recover Deleted Safari Bookmarks on Mac with/without Time Machine [Big Sur Compatible]
- Lost Unsaved PowerPoint Document - How to Recover?