How to Recover Unsaved, Lost and Deleted Word Document Mac
If you've accidentally closed Microsoft Word on your Mac without saving your document, there are a few ways to recover it. You can check the AutoRecovery folder, Temporary folder, or Recovered item in Trash, which may contain the unsaved document. Alternatively, if you've lost or deleted your Word document, you can use Qiling Word file recovery software to recover it.
| Workable Solutions | Step-by-step Troubleshooting |
|---|---|
| Recover Unsaved Word Document |
#1. Recover from the AutoRecovery folder...Full steps |
| Recover Deleted Word Document | #4. Recover with Word file recovery software...Full steps |
How to Recover Unsaved Word Document on Mac
Microsoft Word is a popular choice among Mac users, especially with Office 365, which allows creating Word files on Mac. It offers standard DOC or DOCX file formats compatible with most OS platforms. Additionally, Word 2022 and earlier versions feature auto-saving, allowing users to recover documents before saving.
If you've lost an unsaved Word document on your Mac, don't worry - there are three potential ways to recover it, and these methods can also be applied to recover unsaved Excel files. Based on the features of Microsoft Word for Mac, you can try to recover your lost document using these methods.

#1. Recover Unsaved Word Docs on Mac with AutoRecovery
The Word for Mac app automatically saves a copy of an open document every 10 minutes, allowing you to recover unsaved work if the app freezes or the computer crashes. This feature is turned on by default, enabling you to retrieve your changes or additions made during your last session.
Guide: How to recover an unsaved Word document
Unlike recovering unsaved Word documents in Windows, recovering files from the AutoRecovery folder on a Mac is different.
Step 1. To access the "Go to Folder" option, open the "Finder" on your Mac and navigate to the "Go" menu, then select "Go to Folder" from the dropdown options.
Step 2. Type: ~/Library/Containers/com.microsoft.Word/Data/Library/Preferences/AutoRecovery and click "Go".
Step 3. To recover a Word document from AutoRecovery, open the AutoRecovery folder, select the file that starts with "AutoRecovery save of", rename it, and add the ".doc" extension.

Step 4. Double-clicking the file opens the document in Word for Mac.
Step 5. To save a file with a new name, click the File menu and select "Save As". Then, type a new name for the file into the Name field and select a folder for the file. Finally, click the "Save" button.
#2. Recover Unsaved Word Documents on Mac from TMP Folder
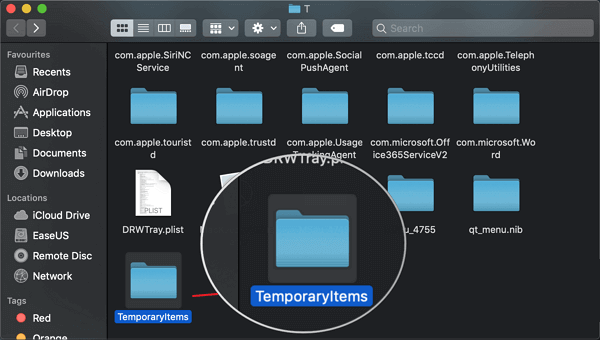
On a Mac, when you close Microsoft Word without saving your document, it automatically saves a copy in the Temporary folder. This folder also stores temporary files from other applications, but locating it can be challenging for many users.
Guide: How to recover an unsaved Word document on Mac
Step 1. Go to "Applications" > "Utilities" and double-click "Terminal".
Step 2.To access the TMP folder in Terminal, simply type "open $TMPDIR" and press enter, which will direct you to the folder where temporary files are stored.
Step 3. In the "TemporaryItems" folder, right-click the desired unsaved Word files and select "Open with..." Microsoft Word.
Step 4. To save the Word file, click on the "File" tab at the top of the screen, then select "Save As" from the dropdown menu. This will open a new window where you can choose a location to save the file, such as your desktop or documents folder, and give it a new name if desired.

#3. Recover Unsaved Word Document on Mac from Recovered Item
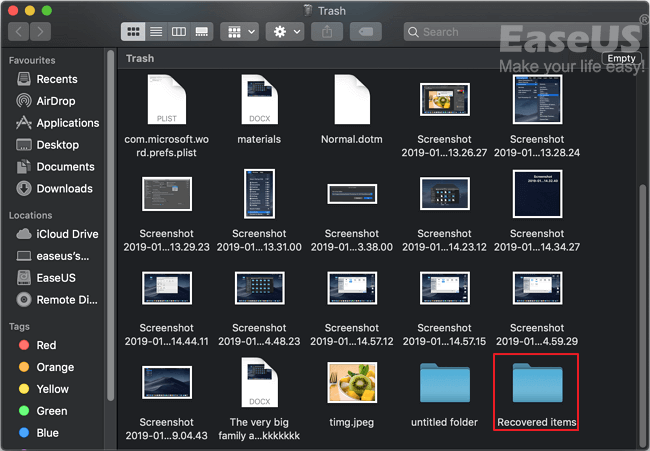
The Word for Mac saves unsaved documents in a "Recovered items" folder within the Trash, appearing only if there are recovered files.
Guide: How to find unsaved Word files on Mac
Step 1. Open "Trash" by clicking its icon on the dock.
Step 2. Look for a folder labeled "Recovered items" in your computer and click into it to see if your unsaved Word file is there, or try the next solution if you can't find it.

#4. Recover Unsaved Word Document with Word Recovery Software
Deep Data Recovery, a reliable Word file recovery software, has been upgraded with an unsaved document recovery feature, allowing users to recover unsaved Word files from Mac with ease.
Step 1. Launch Deep Data Recovery. Select file types and click "Next" to start the recovery process.

Step 2. To recover a lost unsaved file, hover the mouse over the device where the file was last saved, and click "Scan" to initiate a search for the file. This will allow you to locate and potentially recover the file.

Step 3. After scanning, click on "Type" and expand "Unsaved Documents" to locate the lost file. Select the exact file type, such as Word, Excel, PowerPoint, Keynote, Pages, or Numbers, that you were working on without saving.

Step 4. To recover an unsaved file on a Mac, double-click on the file icon to preview it. Select the correct version of the file and click "Recover" to save it to a secure location.
#5. Recover Deleted Word Document with Qiling File Recovery Software
If you're working on a Word document on your Mac and it suddenly disappears before you can save it, there are three ways to recover it. However, these methods only work for files that were being worked on when they disappeared, and won't help if the document was already deleted, formatted, or lost access. If that's the case, you'll need to explore other recovery options.
Deep Data Recovery for Mac is a specialized software that can recover lost data from Mac devices, including hard drives, external hard drives, SD cards, and USB flash drives. It can scan these devices to find and retrieve deleted files, even if they have been emptied from the trash bin, providing a chance to recover lost data on Mac OS X/macOS.
For the first attempt, we recommend downloading the free version of the software, which allows you to search for missing files without any cost. The 2GB recovery limit is sufficient for a few lost Word files, and the scan and recovery process is simple.
Guide: How to recover a Word document on Mac
Step 1. Launch Deep Data Recovery. Select file types and click "Next" to start.

Step 2. To recover your lost Word documents, select the location where they were stored, and then click the "Scan" button. This will initiate a search for the files in that location.

Step 3. Deep Data Recovery for Mac performs a quick scan and a deep scan on the selected disk volume, displaying the scanning results in the left pane.

Step 4. This software allows you to quickly recover lost Word files by filtering them by path and type. You can select the target files and click the "Recover" button to retrieve them immediately.
How to Increase the Chance of Unsaved Word Data Recovery
To avoid losing your Word documents, it's essential to take proactive measures. You can prevent complete loss by regularly saving your files, using a cloud storage service like OneDrive or Google Drive, and setting automatic backups. Additionally, consider using the built-in autosave feature in Word, which can save your work at regular intervals. By taking these precautions, you can minimize the risk of losing your important documents and ensure they remain safe and accessible.
Tip 1. Save the Word Document Whenever You Create a New One
Whenever you create a new Word document, save it at least once to prevent data loss in case of a system crash or power outage. The document exists only in RAM until saved, making it vulnerable to loss if not saved. Saving it once ensures that your work is protected.
Tip 2. Change the AutoSave Interval
To minimize the loss of progress on the file you are working on, you can change the frequency of AutoSave in Word after saving your document. This feature will automatically save your work at a specified interval, helping to prevent data loss in case of a power outage or system crash. You can adjust the AutoSave frequency by going to File > Options > Save, where you can select from various options, such as saving every 1, 5, 10, or 15 minutes, or even every 1 hour.
Step 1. Open Microsoft Word on your Mac.
Step 2. To make the desired changes, go to the "Word" menu, select "Preferences," and click the "Save" option under "Output and Sharing."
Step 3. Check all the items under Save Options (Recommended) and adjust the interval of AutoSave from 10 minutes to 5 minutes.
If you follow the two tips above, you can substantially decrease the risk of losing your Word documents. However, if you carelessly deleted your important Word files on your Mac, don't worry. You can try the free method to retrieve permanently deleted Word documents using Deep Data Recovery for Mac.
Related Articles
- How to Undelete Data on Mac OS X
- TRIM SSD Data Recovery
- Mac Hard Drive Recovery: Recover Files from Internal/External Hard Drive on macOS
- 5 Ways to Troubleshoot Video Not Working on Zoom
Having issues with Zoom Meetings' video? Here are 5 Ways to Troubleshoot Video Not Working on Zoom for crystal-clear videos and uninterrupted meetings. Besides, download Qiling video repair software to repair corrupted Zoom recordings as soon as possible.