How Do You Create Partitions in Windows with Infographics 2022
To Reader: This page guides you on how to create partitions in various versions of Windows, including Windows 11/10/8.1/8/7 and Vista, XP.
In this article, you'll learn:
- What Is a Hard Drive Partition
- What Tools Can You Use to Create Partition
- Method 1. Create Partition with Disk Management
- Method 2. Use Diskpart to Create Partition
- Method 3. Run Third-party Partition Manager Software to Create Partition
What Is a Hard Drive Partition and Why Do You Need to Create Partitions in Windows
In Windows, a partition is a logical directory created on a hard drive or SSD to save files, store data, and install programs, allowing for separate management of disk storage space.
Creating partitions is the first step in preparing a disk for OS installation or data storage on a Windows computer. To utilize a hard drive or SSD, you'll need to partition the hard drive or create partitions on Windows computers.
According to disk partitioning statistics, as shown in the infographic, creating a partition is a top demand among worldwide users.
Share this Image On Your Site
Creating a partition on disk drives or partitioning a hard drive in Windows computers involves using a reliable disk management tool.
What Tools Can You Use to Create Partition? 3 Windows Disk Management Tools Recommend
To create a partition in Windows, you can use either Disk Management or the DiskPart command lines. Experienced users may recommend using DiskPart for partitioning hard drives, which involves running specific command lines to achieve the desired partition setup. Alternatively, you can use the built-in Disk Management tool, which provides a graphical interface for creating and managing partitions. Both methods can help you achieve the desired partition configuration on your Windows system.
Here are the 3 most commonly used disk partitioning tools that all Windows users can apply any one of them for help:
#1. Disk Management
Disk management is a crucial aspect of maintaining your computer's performance and data security. Microsoft's overview of disk management provides a comprehensive guide to understanding and managing your computer's storage needs.

Disk Management is a Windows built-in utility that helps users manage disk partitions and perform advanced tasks on storage devices.
Applies to: Windows 11/10/8.1/8/7/XP/Vista and Windows Server 2022/2019/2016/2012 r2/2012/2008, etc.
#2. Diskpart
- Diskpart by Microsoft

Diskpart is an interpreting tool that executes disk partitioning commands in Windows disks, partition volumes, and even virtual disks.
Applies to: Windows 11/10/8.1/8/7/XP/Vista and Windows Server 2022/2019/2016/2012 r2/2012/2008, etc.
#3. Partition Manager Software
Partition manager software is a tool that helps create partitions on physical or virtual disks, allowing basic operations such as creating partitions.
Professional partition manager software like Qiling Partition Master allows users to perform advanced operations in Windows systems, going beyond basic disk management. With this tool, users can easily migrate their OS to a new HDD or SSD, clone a disk, convert from MBR to GPT, and more, all with just a few simple clicks.
Applies to: Windows 11/10/8.1/8/7/XP/Vista and all Windows Servers.
When it comes to creating partitions on your computer, you have three main tools to choose from: Disk Management, EaseUS Partition Master, and MiniTool Partition Wizard. Each tool has its own strengths and weaknesses, and the right one for you will depend on your specific needs. If you're looking for a user-friendly interface and a wide range of features, EaseUS Partition Master or MiniTool Partition Wizard may be the way to go. However, if you're looking for a free and simple solution, Disk Management is a good option.
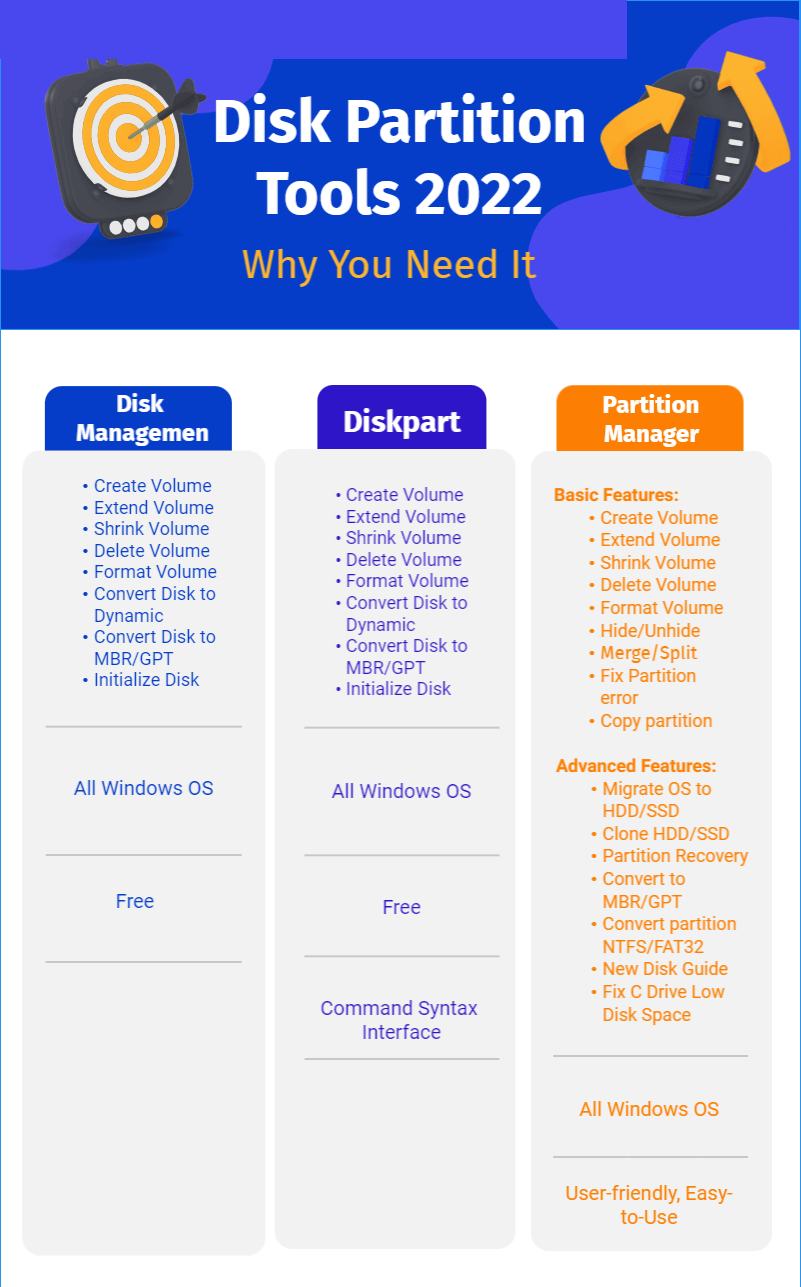
| Partition Tools | Disk Management | Diskpart | Qiling Partition Manager | |
|---|---|---|---|---|
| Features |
|
|
Basic Features:
|
Advanced Features:
|
| Difficulty Level | Medium | Medium | Easy | |
| Duration | 2 - 20 minutes | 3 - 20 minutes |
|
|
| Pros | Free | Free, command syntax interface | User-friendly interface, advanced partitioning features | |
Which tool suits you better?
- For creating partitions, you can use a free tool such as Disk Management, Diskpart, or a free partition manager software.
- Administrators often use Diskpart to perform daily disk partitioning tasks.
- Qiling Partition Master is a powerful partition manager that is suitable for both Windows beginners and advanced users, offering a range of features to execute various tasks.
Disk Management, Diskpart, and Qiling partition manager software are three top tools for disk partitioning. These tools allow users to easily create partitions and manage disk space. With them, users can efficiently organize their disk space and meet their storage needs. This knowledge can be shared with others who may need help with disk partitioning.
This infographic highlights 3 disk partition tools that you may like in 2022, featuring their basic and advanced functionalities.

Share this Image On Your Site
Method 1. Create Partition with Disk Management in Windows 11/10/8/7
Step 1. To open Disk Management, right-click the Windows icon and select Disk Management from the menu. This will open the Disk Management console, where you can view and manage the disks and partitions on your computer.
Step 2. To shrink a partition, right-click on the partition and select "Shrink Volume". Then, determine the desired size of the partition and click "Shrink" to proceed.

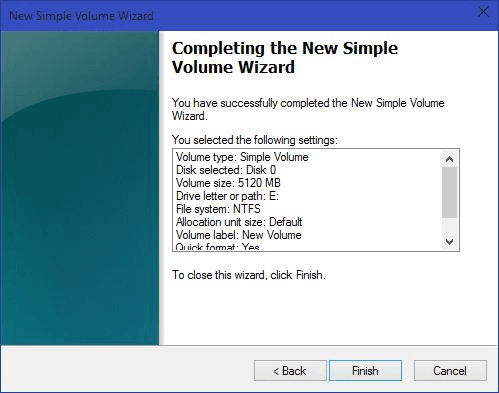
Step 3. To create a partition, right-click on the unallocated space on your hard disk, select "New Simple Volume", then follow the prompts to set the volume size, assign a drive letter, set the file system, and finish the process.

This infographic provides a step-by-step guide to creating a partition in Disk Management, and you can share it with others to help them understand the process. The infographic includes the complete process, making it easy to follow and share with others.

Share this Image On Your Site
Method 2. Use Diskpart to Create Partition in Windows 11/10/8/7
Step 1. Open diskpart.
To run Command Prompt as an administrator, type "Command Prompt" in the search box, right-click on it and select "Run as administrator", then input "diskpart" and press Enter.
Step 2. Enter command lines and press Enter each time.
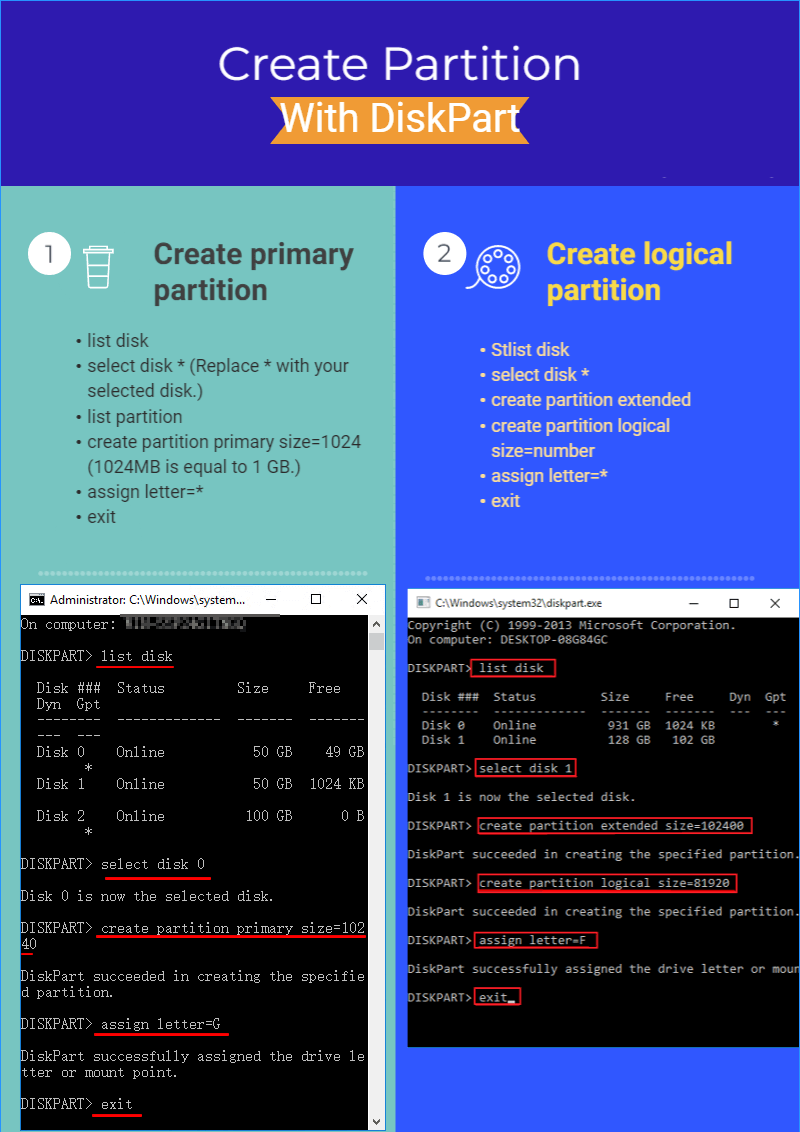
Create primary partition syntax:
- list disk
- select disk * (Replace * with your selected disk.)
- list partition
- create partition primary
- create partition primary size=1024 (1024MB is equal to 1 GB.)
- assign letter=*
- exit
Create logical partition syntax:
- list disk
- select disk *
- create partition extended
- create partition logical size=number
- assign letter=*
- exit
The infographic provides a step-by-step guide on how to create primary and logical partitions in Windows using Diskpart, making it a valuable resource for those who need to manage their disk partitions. It's worth sharing with others who may have similar needs.

Share this Image On Your Site
Method 3. Run Third-party Partition Manager Software to Create Partition
Step 1. Launch Qiling Partition Master and check for free space.
Step 2. Shrink a disk partition to create unallocated space.
- Right-click partition and select "Resize/Move".
- Drag the partition handle to shrink size.
- Click OK > Apply.
Step 3. Right-click on the unallocated space and select "Create..." > Customize drive letter, partition label, file system > OK > Apply.
This infographic provides a step-by-step guide to creating partitions using Qiling Partition Master, making the process easy and enjoyable. Users can follow the procedure without worrying about data loss issues, as it is designed to be safe and efficient.
Partition Hard Drives in Windows Can Be As Easy As 1-2-3 with a Correct Tool
For many Windows users, external storage device users, and game enthusiasts, disk partitioning is a must-have feature. Fortunately, there are three partition tools that can help you create, resize, delete, format, and even convert partitions on your own, providing a full overview of the partitioning process.
To create partitions on your computer or storage devices efficiently, you need to have some basic computer skills. First, determine which type of Windows user you are, as this will help you navigate the partitioning process.
3 categories of users are: beginners who need simple instructions, experienced users who require more advanced information, and geeks or developers who need technical details.
Based on the types of Windows users, we have re-sorted the three tools to help you find the most suitable partition tool quickly.
- Disk Management - For Beginners
- Diskpart - For Experienced Geeks, and Developers
- Qiling Partition Manager Software - All Levels of Windows Users.
Recommendation: Qiling Partition Master is a must-have tool for managing disk space and creating partitions, offering an easy-to-use and efficient way to manage your disk partitions, and it works even better than you can expect.
The infographic provides a concise summary of how to create partitions in Windows operating systems, including 11/10/8/7/XP/Vista, using three disk partitioning tools. It highlights the pros and cons of each tool, allowing users to quickly decide which one suits their needs. With this knowledge, users can effectively manage disk partitions like an expert and even share the infographic with others to help them.

Share this Image On Your Site
Related Articles
- Windows 10 File Transfer Stuck at 99%? Fixes Are Here!
- SD Card Repair Tool - 10 Ways to Fix Corrupted Memory Card
- 4TB Hard Drive Only Shows 2TB Windows 11/10, Why and How to Restore the Full Capacity
- 20 Tips and Tricks on How to Speed Up Windows 11/10 in 2022