Free Up Disk Space in Windows 11 Can Be Easy Enough Now
It can be very stressful if your PC is running out of room in Windows 11. The good news is that you can free up disk space on your PC with the following solutions.
- 1. Empty Recycle Bin
- 2. Use Disk Cleanup Tool
- 3. Enable Storage Sense
- 4. Clean Up Junk Files with Software
- 5. Uninstall Applications You No Longer Need
How Much Space Does Windows 11 Take
You are unable to install important Windows updates if your computer is running low on free disk space. Before you free up disk space, you must know how much space does it take in Windows 11. When you are going to install windows 11 setup on your desktop or laptop it takes about 27 GB of space.
If you have installed Windows 11, you can find what is eating up your disk space in Windows 11 by the following steps.
Step 1. Select the Start button, and then select "Settings".

Step 2. Navigate to "System > Storage", and you can see what is eating up your disk space.

How to Free up Drive Space in Windows 11
It's always important to make sure that your disk doesn't run out of space. Resetting your PC might help, but you may lose other stuff. Thus, follow the solutions below to free up disk space in Windows 11.
Method 1. Empty Recycle Bin
When you are deleting files, Windows 11 does not erase them from the hard drive. Instead, they are placed inside the Recycle Bin in case you need them back. However, depending on how the feature is configured, over time, the Recycle Bin can take a lot of space. Therefore, emptying the bin is the first action you should take to regain valuable storage space.
Step 1. On the desktop, right-click the recycle bin icon.

Step 2. Select "Empty Recycle Bin" and click "OK".
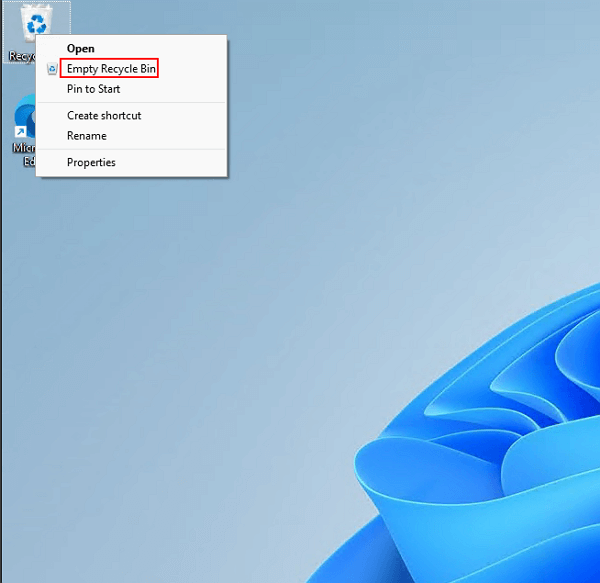
Once you complete the steps, the system will free up around ten percent of the drive capacity (assuming the Recycle Bin is at capacity).
Method 2. Use Disk Cleanup Tool
You can also free up space using the legacy Disk Cleanup tool. It's a Windows 11 built-in tool that frees up drive space and helps it run better. It is one of the easiest ways to clean up files. To use Disk Cleanup, follow the steps below:
Step 1. Select the Start button, type disk cleanup, then select "Disk Cleanup" from the list of results.

Step 2. Check all the contents you want to clear. For example:
- Downloaded Program Files
- Temporary Internet Files
- Delivery Optimization Files
- DirectX Shader Cache
- Recycle Bin...
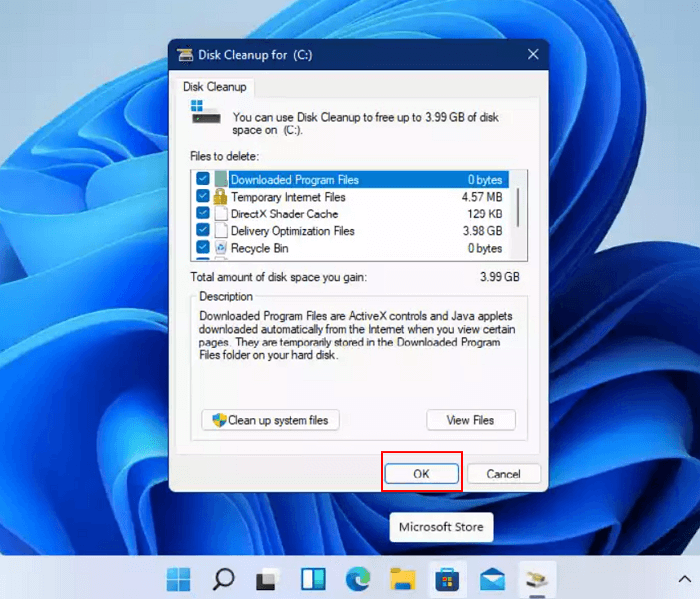
Step 3. Select the types of files to delete, select "OK", and then select "Delete files" in the confirmation window to start the cleanup process.
Once you complete the steps, those unnecessary files will be removed from the computer to freeing up the hard drive space.
Method 3. Enable Storage Sense
Windows 11 comes with a built-in tool called Storage Sense. Although you can use Storage Sense manually, you can also enable the feature to run maintenance automatically to prevent running out of space quickly. To set up Storage Sense to run automatically, use these steps:
Step 1. Select the Start button, and then click "Settings".
Step 2. Navigate to System > Storage and turn on "Storage sense".
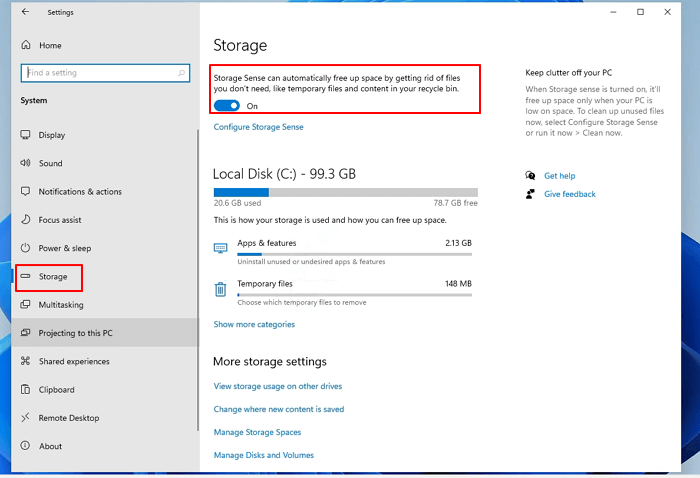
Step 3. Select "Configure Storage sense", then select or clear the checkboxes for options under Temporary Files and Locally available cloud content. You can also use the "Run Storage Sense" drop-down menu and select the best option for your situation.
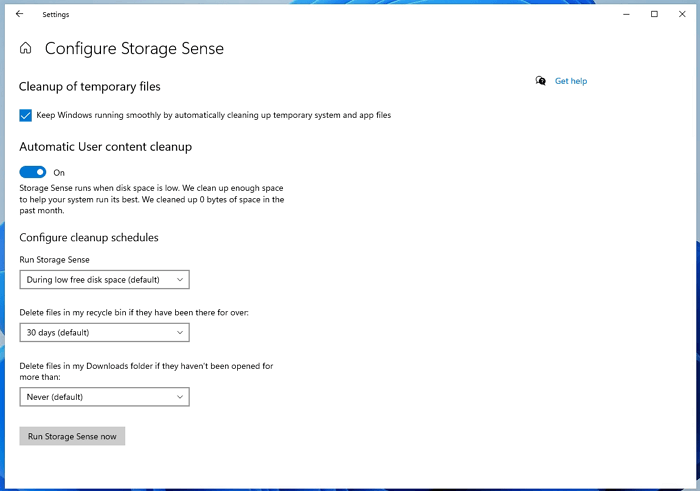
Once you complete the steps, Storage Sense will run automatically at the schedule you specified.
Method 4. Clean Up Junk Files with Software
If you have difficulty determining which files should be deleted and which should not, you can choose third-party disk cleanup software. Qiling CleanGenius is my recommendation. With this software, you can easily free up disk space without any cost. Follow the steps to free up disk space in Windows 11.
Step 1. Download and install Qiling Partition Master Suite on your PC. Click to download PC Cleaner on panel.
Step 2. Install Qiling CleanGenius on your PC. To begin with, navigate to "Cleanup" and click "Scan."
Step 3. Qiling CleanGenius will start immediately to scan all the useless files, select system junk files and invalid entries, and click "Clean" over all your PC.
Step 4. Once completed, you can see clearly how many MBs or GBs of data are cleaned. Click "Done" to finish the process.
Method 5. Uninstall Applications You No Longer Need
Another effective way to reclaim storage space is to uninstall apps you no longer need or rarely use. To uninstall applications in Windows 11, use the steps below.
Step 1. Select the Start button, type Control Panel, then select "Control Panel" from the list of results.
Step 2. Under the Programs, select "Uninstall a program".

Step 3. Right-click the program and click "Uninstall".
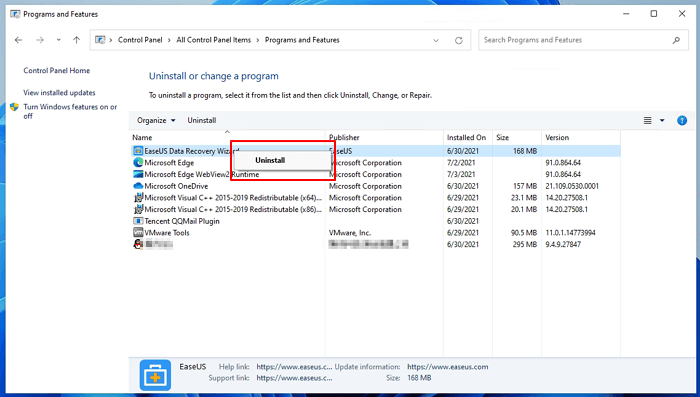
Once you complete the steps, repeat the same instructions to remove additional programs and games from your device. You can also use software to uninstall applications if you don't like the manual way.
Bounus Tip - Add Free Space to Your Drive in Windows 11
There's nothing worse than running out of space, especially the drive C. If your C drive is almost full of space, how can you add free space to C drive from D drive, E drive, or F drive? All you need is Qiling Partition Master which is an all-in-one disk management tool. It can add free space from other drives to C drive with or without unallocated space. The only condition is that these partitions must on the same disk. Follow the steps below to add free space to the wanted drive to increase your partition space.
Step 1. Click on the D: partition with enough free space and select "Resize/Move".

Step 2. Drag either end of the D: partition rightwards or leftwards so you can shrink its size, in order to get ample unallocated space. You can visually know how much space you've decreased in the "Partition size" area. Click "Proceed".

Step 3. Select the target partition - C: drive and select "Resize/Move". Drag the partition panel rightward to add the free space from D: drive to C: drive.
Step 4. Click the "Proceed" to start the process of moving free space from D: drive to C: drive.
Conclusion
You have learned five ways to configure Windows 11 to free up disk space and improve performance. If you find any error or any extra tip, you can contact us through Live Chat or email.
Related Articles
- Top 5 Disk Management Tools for Windows 11 in 2022
- How to Fix Hard Drive Very Slow in Windows 10/8/7
- How to Delete All Partitions on Windows 11
- Free Download SD Card Formatter: All Memory Card Format Software Free Download