What is CHKDSK(Check Disk)? All You Should Know about CHKDSK
What is CHKDSK?
Most of us lack the technical knowledge to properly manage our computer data, often leading to wasted time and frustration when our disks become corrupted. However, there's a simple solution: running the command "chkdsk" can help fix these issues and save us from such problems in the future.
Chkdsk is a Windows utility tool that checks and fixes errors on a storage disk, displaying a status report and correcting logical errors, making it a foolproof method to tackle disk corruption and save time.

What Can You Do with CHKDSK?
The CHKDSK command is used to diagnose and repair issues with a hard drive. It can be run with various parameters, such as /f, /r, and others, to specify the type of scan and repair to perform. The command will identify and fix problems, such as disk errors, bad sectors, and file system inconsistencies, to ensure the hard drive is functioning properly and safely.
- 1. It works by analyzing the file system on your disk and checking its integrity, also containing metadata.
- 2. If there's any corrupt or incorrect data, such as timestamps or file sizes, the command will correct it.
- 3. The drive also scans for poorly written data (soft bad sector) and physical disk damage.
- 4. The process aims to restore the original data and recover as much information as possible from the damaged data, minimizing data loss.
Specific CHKDSK Commands
chkdsk is a versatile command that offers various options to diagnose and repair issues on a Windows system. You can run several different versions of chkdsk, each with its own specific function, such as diagnosing problems, fixing errors, recovering corrupted data, and more. Each option is designed to meet a specific need, and understanding the differences between them is essential to selecting the right one for your situation.
List of Commands to be run with CHKDSK |
|
| Command | Function |
| This parameter specifies the volume name or drives letter. | |
|
[[< path >]< filename >] |
The chkdsk command can be used with FAT and FAT32 file allocation tables to specify the location and name of a file to be checked, and can be used to run chkdsk on multiple files using the * wildcard character. |
| /f | You can run the command "chkdsk /f" to fix the errors present on your disk. This will lock the disk to allow the check to run and fix any errors found. |
| /r | Running chkdsk with /r will check for both logical and physical errors on the disk, locate bad sectors, and recover any possible information from them. This command checks for errors and recovers data from the disk, ensuring that all possible data is recovered. |
| /x | The command dismounts the drive and forces it to be dismounted. |
| /v | The command will display the names of every file present in every directory while checking the disk. |
| /i | The feature can only be used with the NTFS file system, but it reduces the time it takes to run chkdsk by performing index entries checks less vigorously. |
| /c | This command can only be used with NTFS and decreases chkdsk run time by skipping check cycles within the folder structure. |
| /L: size | To change the size of the log file, run this NTFS-specific command to set the desired size. |
| /b | This NTFS command will remove bad clusters on your hard drive and rescan the allocated and free clusters for errors. |
| /? | You can use the "help" command at the command prompt to get help with a specific command, or the "?" command to get a list of available commands. |
The complete syntax for the chkdsk command is: chkdsk [/f] [/v] [/r] [/x] [/p] [/offlines] [/offline] [/c] [/h] [/m] [/scan] [/b] [/l: size] [/size: size] [/i] [/s] [/t] [/p: size] [/v: size] [/x: size] [/off] [/on] [/quiet] [/n] [/y] [/p: size] [/v: size] [/x: size] [/size: size] [/l: size] [/i] [/s] [/t] [/off] [/on] [/quiet] [/n] [/y] [/p] [/v] [/r] [/x] [/offlines] [/offline] [/c] [/h] [/m] [/scan] [/b] [/i] [/s] [/t] [/p: size] [/v: size] [/x: size] [/off] [/on] [/quiet] [/n] [/y] [/p] [/v] [/r] [/x] [/offlines] [/offline] [/c] [/h] [/m] [/scan] [/b] [/l: size] [/size: size] [/i] [/s] [/t] [/p: size] [/v: size] [/x: size] [/off] [/on] [/quiet] [/n] [/y] [/f] [/v] [/r] [/x] [/p] [/offlines] [/offline] [/c] [/h] [/m] [/scan] [/b] [/l: size] [/size: size] [/i] [/s] [/t] [/p: size] [/v: size] [/x: size] [/off] [/on] [/quiet] [/n] [/y] [/f] [/v] [/r] [/x] [/p] [/offlines] [/offline] [/c] [/h] [/m] [/scan] [/b] [/l: size] [/size: size] [/i] [/s] [/t] [/p: size] [/v: size] [/x: size] [/off] [/on] [/quiet] [/n] [/y] [/f] [/v] [/r] [/x] [/p] [/offlines] [/offline] [/
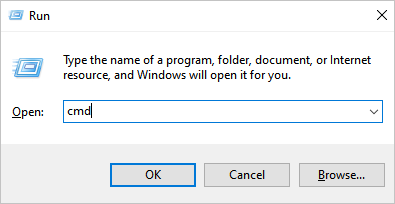
chkdsk [ You can skip out on any parameter that you don't want to use by simply not typing it in. For example, if a function requires a name, age, and address, you can just leave out the age and address if you don't want to provide them. You can run chkdsk using the /f command, which is one of several ways to execute it. The details of this process have been discussed extensively below. Here is how to run chkdsk in command mode To open the Command Prompt, press the Windows key + R to open the Run dialog, type `cmd`, and press Enter. Alternatively, you can search for "Command Prompt" in the Start menu and select the result. Then, type in 'cmd' and click enter. Next, right-To access the Command Prompt with administrative privileges, click on the 'Command Prompt' option at the top left of the search window and select 'Run as Administrator'.
The command to run a check disk (chkdsk) on the Windows system drive (C:) would be: chkdsk c: /f To check the integrity of your hard disk drive, you can use the built-in `chkdsk` command in Windows. To do this, open the Command Prompt as an administrator and type `chkdsk c:`, replacing `c:` with the actual drive letter of your hard disk drive (e.g. The chkdsk command will scan your disk and fix any errors it finds. You can run the command on Windows by using the method given below. To open the File Explorer window, press the Windows key and the E key simultaneously, or click on the File Explorer icon. Click on This PC. Right-click on the drive that needs to be checked. Now click on Properties. A pop-A pop-up window will appear. Click on the Tools tab in this window, which is located at the top. Under the error checking section, click on Check.
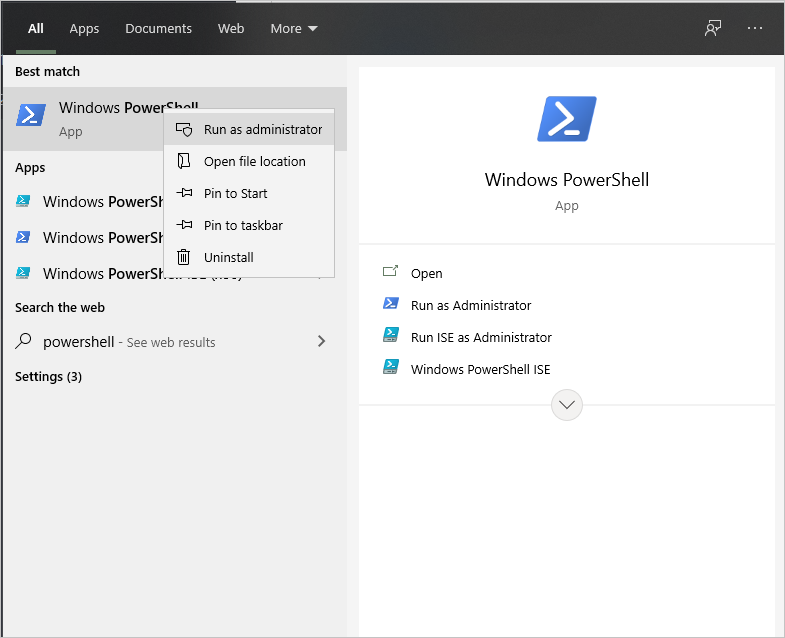
The pop-up window will appear, stating that everything is in check and a scan is not required. However, you can still choose to run chkdsk by clicking on the "scan drive" option, which will execute the command. If errors are found on the disk, a pop-up window will appear offering a repair drive option. Clicking this option will run the chkdsk command, which fixes errors on the disk. To run chkdsk using Windows PowerShell, you can use the following command: `chkdsk C: /f`, replacing "C:" with the drive letter you want to check. The `/f` option forces the check to run at the next system restart. You can also use the `/r` option to specify a thorough scan, or the `/x` option to dismount the volume before scanning. Type in Powershell after clicking on the search button. Right-click the PowerShell and select 'Run as Administrator.'
Type in the following after C:\WINDOWS\system32> to fix disk errors. chkdsk c /f Where c stands for the name of your drive. Running chkdsk before using a disk drive is highly recommended to ensure no errors on the disk. This command can fix logical errors on your drive, but it may take a long time depending on the size of your drive, so schedule it when you don't need to use your PC. Stopping the check in between can result in more damage to your disk, so be cautious and use this simple command to keep your data and drives corruption-free. Your best companion for disk partitioning, MBR to GPT/GPT to MBR conversion, and even OS migration is a valuable tool that provides a comprehensive solution for managing your computer's storage. It offers a user-friendly interface for partitioning disks, converting between MBR and GPT partition schemes, and migrating operating systems, making it an essential companion for anyone who needs to optimize their computer's storage and ensure smooth system transitions.How to Run CHKDSK Command?
Method #1- Run chkdsk in Command mode

Method #2- Running chkdsk from Properties

Method #3- Running chkdsk from Windows Powershell

Conclusion
Hot Topics in 2022
Get Qiling Partition Master
Related Articles
Products


