Guide to Fix Microsoft Compatibility Telemetry High Disk Usage Windows 11/10
If you notice Microsoft Compatibility Telemetry high disk usage or high CPU usage on Windows 11/10 and want to fix it to speed up your computer, you can try disabling the service, stopping the service, uninstalling the service, or deleting the service files to resolve the issue.
| Workable Solutions | Step-by-step Troubleshooting |
|---|---|
| Fix 1. Disable Compatibility Telemetry | To disable Compatibility Telemetry, you can use one of three methods: Task Scheduler, Group Policy Editor, or Registry Editor. In Task Scheduler, go to Task Scheduler Library, right-click on the "Microsoft Compatibility Telemetry" task, and select "Disable". In the Group Policy Editor, navigate to Computer Configuration > Administrative Templates > Windows Components > Microsoft Compatibility Telemetry, and set the "Turn off Microsoft Compatibility Telemetry" policy to "Enabled". Alternatively, in the Registry Editor, navigate to HKEY_LOCAL_MACHINE\SOFTWARE\Policies\Microsoft\Windows\Windows Error Reporting, create a new DWORD value named "DisableTelemetry", and set its value to 1.Full steps |
| Fix 2. Delete CompatTelRunner.exe | Delete CompatTelRunner.exe after taking ownership of it. Find CompatTelRunner file, right-click it, and choose Properties...Full steps |
| Fix 3. Update Windows 10 | To check for Windows updates, click the "Start" icon, then navigate to "Settings" > "Update & Security settings" > "Windows Update".Full steps |
| Fix 4. Run SFC to Repair System File | Microsoft Compatibility Telemetry high disk usage may be caused by corrupted system files. Running the System File Checker (SFC) in Command Prompt (CMD) can help identify and replace corrupted system files, which may resolve the issue.Full steps |
| 2 More Useful Methods | To fix Windows Compatibility Telemetry high disk usage, clean up the Windows system and optimize your hard disk. This can be done by running the built-in Disk Cleanup tool, which removes temporary files, system logs, and other items you don't need. You can also use the Storage Sense feature to automatically clean up temporary files and free up space. Additionally, disable the Windows Compatibility Telemetry service if you don't need it, as it can consume a significant amount of disk space.Full steps |
IMPORTANT: Optimize your hard disk and system with a FREE partition manager
What Is Microsoft Compatibility Telemetry High Disk
When installing Windows 10, most users will default to joining the Microsoft Customer Experience Improvement Program, which involves collecting telemetry data and sending it to Microsoft, with the Microsoft Compatibility Telemetry (CompatTelRunner.exe) program responsible for this task.
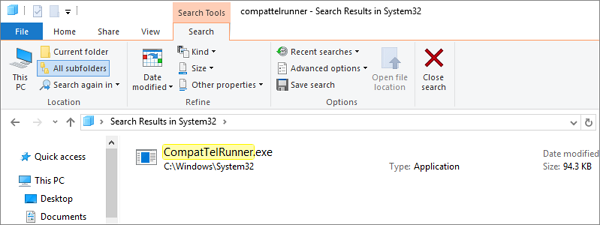
Microsoft Compatibility Telemetry is a Windows 10 service that collects data on how devices and software are working and sends it to Microsoft to improve user experience. However, its high disk usage or CPU activity can cause severe computer performance issues, such as slowdowns or crashes.
To disable CompatTelRunner.exe on Windows 10 and solve the Microsoft Compatibility Telemetry high disk usage issue, follow our full guide, which provides detailed steps on how to resolve this problem.
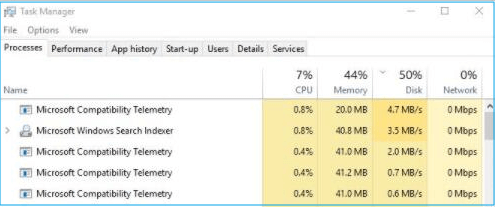
Fix 1. Disable Microsoft Compatibility Telemetry Windows 11/10
If you're experiencing high disk usage or CPU problems on Windows 10 due to Microsoft Compatibility Telemetry, try disabling CompatTelRunner.exe in a few ways.
1. Disable Microsoft Compatibility Appraiser via Task Scheduler
Microsoft Compatibility Appraiser scans Windows 7/8/8.1/10/11 application files to assess their compatibility with Windows 10 if an upgrade is performed. To address your concern, you can disable this service from the Task Scheduler by following the steps below:
Step 1. Click Start, type Task Scheduler, and then press Enter.
Step 2. To access the Task Scheduler window, go to the Control Panel and click on System and Security, then click on Administrative Tools and select Task Scheduler. From there, navigate to Task Scheduler Library > Microsoft > Windows > Application Experience.
Step 3. On the Application Experience folder, look for "Microsoft Compatibility Appraiser".
Step 4. To resolve the issue, right-click on the problematic driver, select "Disable", and confirm the action. This will temporarily disable the driver, and you can then check if the issue persists. If it does, you can re-enable the driver and try other troubleshooting steps.

2. Disable Windows Compatibility Telemetry via Group Policy Editor
Step 1. Press the Windows logo key + R, then type gpedit.msc and click "OK" to open the Local Group Policy Editor.
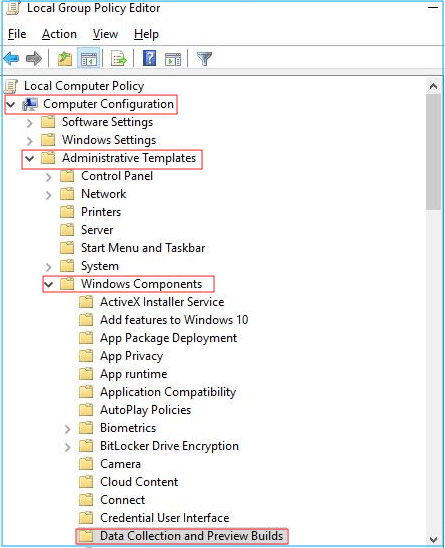
Step 2. Go to "Computer Configuration > Administrative Templates > Windows Components > Data Collection and Preview Builds".
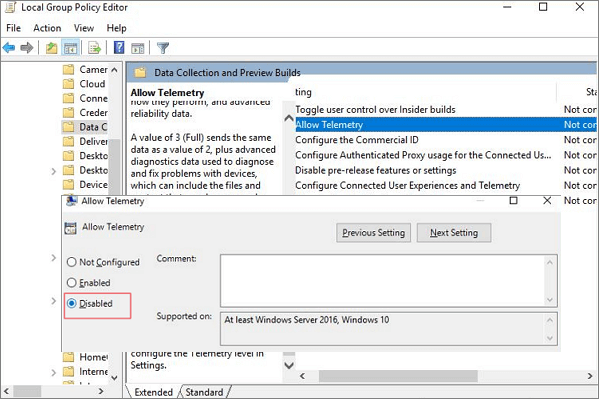
Step 3. Double-click "Allow Telemetry". Select "Disabled", then click "OK".
You can check if the solution works by going to your task manager. If it doesn't work well, you can try the second solution.
3. Disable Microsoft Compatibility Telemetry Using Registry Editor
Step 1. To open the Registry Editor, press the Windows + R keys, type regedit in the box, and click "OK". You may be prompted by User Account Control; click "YES" to proceed.
Step 2. To access the specified registry key, go to the "HKEY_LOCAL_MACHINE" section, then navigate to "SOFTWARE", followed by "Policies", then "Microsoft", then "Windows", and finally "DataCollection".
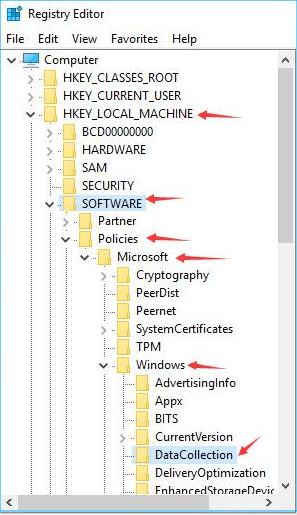
Step 3. To disable Windows 10 telemetry, right-click on "DataCollection" and choose "New > DWORD (32-bit) Value", name it "Allow Telemetry" and set its value to "0".
Step 4. Set Value date to 0 (zero) and click "OK".

Fix 2. Delete CompatTelRunner.exe to Fix Microsoft Compatibility Telemetry High Disk Usage
To resolve the issue of Microsoft Compatibility Telemetry high disk usage or CPU usage, you can delete the CompatTelRunner.exe file, which is responsible for the issue. This requires logging into your computer with an Administrator account, and you need to take ownership of the file. To do this, follow these steps:
Step 1. Open File Explorer. 2. Type "CompatTelRunner" in the Search box.
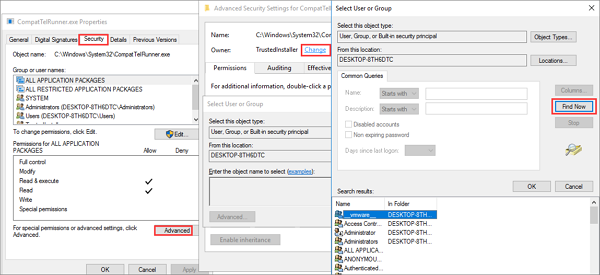
Step 2. To resolve the issue, right-click on CompatTelRunner.exe and select "Properties". Then, switch to the Security tab and click "Advanced". Finally, click the "Change" button next to the Owner.
Step 3. To make your computer remember the current account, click on "Advanced" in the Windows login screen, then select "Find now", and finally click "OK". This will allow your computer to remember the current account, and you can then click "Apply" and "OK" to confirm the change.
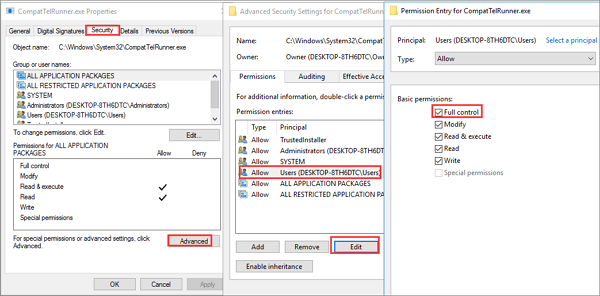
Step 4. To change permission settings, right-click the CompatTelRunner.exe file, open its properties, go to the Security tab, click on Advanced, select User from the list, and edit. On the new window, select Full Control and click OK. Then, click Apply and OK.
Step 5. Right-click the CompatTelRunner.exe file and choose "Delete" to have full control of your computer.
Fix 3. Update Windows 11/10 to Solve Compatibility Telemetry Issue
Microsoft Compatibility Telemetry is a Windows 10 component that helps the system to update and improve its performance. If you're experiencing issues with it, getting the latest Windows 10 updates may resolve the problem.
Step 1. Click the "Start" icon.
Step 2. Go to the "Settings" menu, then click on "Update & Security settings" and select "Windows Update". From there, download and install the latest available update.

Fix 4. Run SFC Scan to Repair Windows System File
The Microsoft Compatibility Telemetry high disk usage or high CPU problem may be caused by corrupted system files, which can be resolved by running the SFC scan to find and replace damaged system files related to Microsoft compatibility telemetry.
Step 1. To run the Command Prompt as an administrator, press the Windows key and type "cmd". Then, right-click on "Command Prompt" and select "Run as administrator".
Step 2. To resolve system errors, type the command `sfc /scannow` and press Enter. Windows will then automatically search for and fix any system errors, ensuring your system is running smoothly and efficiently.
To troubleshoot the issue, you can run the System File Checker tool (SFC) by typing sfc /scannow in Command Prompt to scan and replace corrupted system files. If the issue persists, you can run DISM /Online /Cleanup-Image /RestoreHealth in Command Prompt to perform a deeper scan and repair.
Fix 5. Clean Up System to Solve Compatibility Telemetry High Disk
Leaving system junk and temporary files uncleaned for a long time can cause issues such as CompatTelRunner.exe consuming high CPU or disk usage. To resolve this, you can use a free PC cleanup tool to get rid of system junk files.
Step 1. Download and install Qiling Partition Master Suite on your PC, and then click to download the PC Cleaner on the panel.
Step 2. Install Qiling CleanGenius on your PC. Navigate to "Cleanup" and click "Scan" to start the cleaning process.
Step 3.Qiling CleanGenius will immediately scan your PC to identify and select useless files, system junk files, and invalid entries, and then click "Clean" to remove them.
Step 4. Once completed, you can see clearly how many MBs or GBs of data are cleaned. Click "Done" to finish the process.
Fix 6. Manage Your Hard Drive and Enhance System Performance
If your PC frequently experiences 100% disk usage errors or high Microsoft Compatibility Telemetry usage, optimizing your Windows system's disk partition can help. This involves tasks such as resizing or moving partitions, migrating your OS to a larger HDD or SSD, and performing SSD 4K alignment to boost your PC's speed. By doing so, you can improve your system's overall performance and reduce the likelihood of these errors occurring.
Qiling Partition Master can be used to manage disk partitions by creating, resizing, cloning, moving, merging, and formatting partitions with simple solutions.
The "Resize/Move" feature allows you to adjust the space of a selected disk partition as desired, enabling you to shrink a volume, extend another one, or create unallocated space for specific use.
The "Clone" feature is used to create an exact copy of a hard disk or partition, including its layout and content, allowing for identical backups or replacements.
The method of deleting a disk partition is a way to remove unwanted partitions, turning them into unallocated space.
Formatting a drive partition allows you to change the file system, resolve some corruption issues, and sometimes eliminate viruses and malware by altering the drive's format.
Allocating space can be useful when one drive partition has too much free space, while another partition has inadequate space, allowing you to redistribute the excess space to the partition that needs it.
The "Migrate OS" feature allows for the easy transfer of a Windows installation drive to another without requiring a reinstall.
Qiling Partition Master customers are increasingly converting between GPT and MBR, as well as between NTFS and FAT32, and from Basic to Dynamic, taking advantage of the benefits of these conversions. Additionally, there are many other functional and practical features waiting to be explored in the software.
It's Your Turn to Fix Microsoft Compatibility Telemetry High Disk
After reading this tutorial, you'll be able to solve the Microsoft compatibility telemetry high disk usage issue by following the detailed instructions. To do so, don't forget to optimize your hard drive using the ultimate partition management software, Qiling Partition Master, to improve your computer's overall performance and capabilities.
Other 100 disk usage topics you may be interested in:
Read More About Microsoft Compatibility Telemetry
If Microsoft Compatibility Telemetry is consuming high disk or CPU resources, it's likely due to the software's periodic scans to gather data about your system and applications. To minimize its impact, you can disable it. Go to Settings > Privacy > Diagnostics & feedback.
Can I end task Microsoft compatibility telemetry?
The Windows Telemetry service, part of the Windows OS, is typically not recommended to be disabled, but if Microsoft's Compatibility Telemetry Runner causes significant performance issues or you're concerned about privacy, you can disable it and terminate the CompatTelRunner.exe process on Windows.
Is it safe to disable Microsoft Compatibility Telemetry?
Disabling Microsoft Compatibility Telemetry doesn't affect normal usage, but may be necessary if it slows down the PC severely.
How do I turn off Windows 10 Telemetry?
To turn off Telemetry:
Step 1. To open the Registry Editor, press the Windows logo key + R, then type "regedit" in the Run dialog box and click OK.
Step 2. Click "YES" when prompted by User Account Control.
Step 3. To access the DataCollection registry key, navigate to HKEY_LOCAL_MACHINE, then Software, then Policies, then Microsoft, then Windows, and finally DataCollection. This key path allows you to configure various Windows data collection settings.
Step 4. To disable telemetry, right-click on the "DataCollection" key, select "New" and then choose "DWORD (32-bit) Value" from the context menu, name the new value "Allow Telemetry", and then double-click on it to change its value to 0.
Related Articles
- How to Fix SSD Full for No Reason
- How to Change File Type in Windows 10
- Effective Fixes for Windows Was Unable to Complete the Format SD Card and USB Drive
- Windows 10 File Transfer Stuck at 99%? Fixes Are Here!